How Does Cloud Mining Bitcoin Work?
If you want to invest in bitcoin mining without the hassle of managing your own hardware, there is an alternative. You can use the cloud to earn your coins.
Put very simply, cloud mining means using (generally) shared processing power run from remote data centres. One only needs a home computer for communications, optional local bitcoin wallets and so on.
However, there are certain risks associated with cloud mining that investors need to understand prior to purchase.
Here's why you might want to consider cloud mining:
- A quiet, cooler home – no constantly humming fans
- No added electricity costs
- No equipment to sell when mining ceases to be profitable
- No ventilation problems with hot equipment
- Reduced chance of being let down by mining equipment suppliers.
Here's why you might not want to consider cloud mining:
- Risk of fraud
- Opaque mining operations
- Less fun (if you're a geek who likes system building!)
- Lower profits – the operators have to cover their costs after all
- Contractual warnings that mining operations may cease depending on the price of bitcoin
- Lack of control and flexibility.
Types of cloud mining
In general, there are three forms of remote mining available at the moment:
- Hosted mining
Lease a mining machine that is hosted by the provider. - Virtual hosted mining
Create a (general purpose) virtual private server and install your own mining software. - Leased hashing power
Lease an amount of hashing power, without having a dedicated physical or virtual computer. (This is, by far, the most popular method of cloud mining.)
How to determine profitability
 We have previously covered ways to calculate mining profitability. However, the web services offered are designed to work with your hardware parameters, not cloud-mining parameters.
Even so, you can still use these calculators by thinking clearly about the costs involved. Profitability calculators (for example, The Genesis Block) often ask for your electricity costs, and sometimes the initial investment in hardware. Effectively, you are being asked for your ongoing costs and your one-off investments.
Therefore, since the provider, not you, is paying the electricity bills, you can enter the monthly mining bill in place of the electricity cost.
The conversion process isn't completely straightforward, though. In the case of hardware miners, you can work out the monthly running cost by multiplying your electricity charge (ie: $ per KWh) by the power consumption of the unit and by a conversion factor of 0.744 (the ratio of seconds per month to joules of energy per KWh).
But, for cloud mining calculations, you need to do the opposite, because the provider gives you an (effective) monthly running cost. Hence, you need to calculate an equivalent cost per kilowatt hour to feed into the mining calculator. This is done by dividing (not multiplying) the monthly running cost by the 0.744 conversion factor mentioned above.
Risk vs reward
 When engaging in any type of cryptocurrency mining there are risks, but profitability is possible if you make the right choices. In this article, we've given you some pointers on how to decide which way to go.
In your test calculations, you will likely see that some cloud mining services will be profitable for a few months, but, as the difficulty level of bitcoin increases, you would probably start to make a loss in four to six months and beyond.
A possible remedy to this situation is to reinvest what you have made into maintaining a competitive hashing rate, but this is highly speculative.
As mentioned above, the risk of fraud and mismanagement is all too common in the cloud mining space. Investors should only invest in cloud mining if they are comfortable with these risks – as the saying goes, never invest more than you are willing to lose.
Investigate social media channels, speak with former customers and ask pointed questions of operators prior to investing. Ultimately, you should practice the same kind of due diligence that you would for any investment.
Disclaimer: This article should not be viewed as an endorsement of any of the services mentioned. Please do your own research before considering investing any funds via these services.
VPS hosts that accept Bitcoin
If this list was useful to you, a donation would be much appreciated :)
Western Europe
- LibertyVPS - Amsterdam, Netherlands
- RamNode - Alblasserdam, Netherlands
- CrownCloud - Frankfurt, Germany
- Cinfu - Various cities, Germany • Roubaix, France • Rotterdam, Netherlands
- QHoster (offers Windows) - Oslo, Norway • Milan, Italy • Coventry, United Kingdom • Maidenhead, United Kingdom • Rotterdam, Netherlands • Stockholm, Sweden • Amsterdam, Netherlands • Düsseldorf, Germany • Frankfurt, Germany • Zurich, Switzerland • Strasbourg, France • Gravelines, France • Roubaix, France
- KgoVPS - Milan, Italy • Stockholm, Sweden
- HostSailor - Amsterdam, Netherlands
- Legionbox - Zurich, Switzerland • Nuremberg, Germany
- BuyVM - Roost, Luxembourg
- Bithost.io (DigitalOcean reseller) - Amsterdam, Netherlands • London, United Kingdom • Frankfurt, Germany
- RockHoster - Capelle, Netherlands • Amsterdam, Netherlands
- noez.de - Frankfurt, Germany
- SolVPS (offers Windows) - Maidstone, United Kingdom
- VPSNine - Zurich, Switzerland • Düsseldorf, Germany
- Cirrusflex - Madrid, Spain
- LowEndSpirit (only listed locations) - Rotterdam, Netherlands • Nottingham, United Kingdom • Milan, Italy
- Little Happy Cloud - Rotterdam, Netherlands
- Inception Hosting - Rotterdam, Netherlands • Maidenhead, United Kingdom
- VPSDime - Maidenhead, United Kingdom
- RouterHosting (offers Windows) - Roubaix, France
- Linevast - Frankfurt, Germany
- OrangeWebsite - Reykjavik, Iceland
- DataCell - Reykjavik, Iceland
Eastern Europe & Russia
- Legionbox - Moscow, Russia
- QHoster (offers Windows) - Sofia, Bulgaria • Šiauliai, Lithuania • Moscow, Russia
- HostSailor - Bucharest, Romania
- 2sync - Serbia • Kiev, Ukraine
- VPSBiT - Lithuania
- Virtual Systems - Kiev, Ukraine
- Angani - Nairobi, Kenya
- VPSNine - Cape Town, South Africa
- Zappie Host - Johannesburg, South Africa
South America
- QHoster (offers Windows) - Sao Paulo, Brazil
Australia & New Zealand
- KgoVPS - Auckland, New Zealand • Brisbane, Australia
- Cloud Shards - Sydney, Australia
- Zappie Host - Auckland (North Shore), New Zealand
- VPSNine - Auckland, New Zealand
- QHoster (offers Windows) - Sydney, Australia
- IP-Transit - Pardis, Iran
- HostWadi - Riyadh, Saudi Arabia
- 2sync - Riyadh, Saudi Arabia • Taiwan
- StarryDNS - Seoul, South Korea • Tokyo, Japan • Hong Kong
- Kdatacenter - Seoul, South Korea
- Internet Brothers - Seoul, South Korea
- LowEndSpirit (only listed locations) - Tokyo, Japan • Singapore
- QHoster (offers Windows) - Jurong, Singapore
- Bithost.io (DigitalOcean reseller) - Singapore
- VPSBiT - Hong Kong
- VPSNine - Hong Kong • Singapore
- Little Happy Cloud - Singapore
- Luna Node - Toronto, Canada • Beauharnois, Canada
- QHoster (offers Windows) - Beauharnois, Canada
- Zappie Host - Beauharnois, Canada
- DeepNet Solutions (Gestion DBI, MooseVZ) - Beauharnois, Canada
- RouterHosting (offers Windows) - Beauharnois, Canada
United States
- Hostigation - Charlotte, North Carolina • Los Angeles, California
- SecureDragon - Tampa, Florida • Phoenix, Arizona • Portland, Oregon (DDoS-mitigated) • Denver, Colorado • Lenoir, North Carolina • Dallas, Texas • Piscataway, New Jersey • Chicago, Illinois • Los Angeles, California
- RamNode - Atlanta, Georgia • Seattle, Washington • New York, New York • Los Angeles, California
- CrownCloud - Los Angeles, California • Baltimore, Maryland • Lenoir, North Carolina
- Cinfu - New York, New York
- QHoster (offers Windows) - Mexico City, Mexico • Seattle, Washington • New York, New York • Chicago, Illinois • Piscataway, New Jersey • Miami, Florida • Dallas, Texas • Los Angeles, California • Atlanta, Georgia
- KgoVPS - Las Vegas, Nevada • Atlanta, Georgia • Los Angeles, California
- ServerCrate - Los Angeles, California • Dallas, Texas
- Legionbox - Los Angeles, California
- BuyVM - Piscataway, New Jersey • Las Vegas, Nevada
- Impact VPS - Seattle, Washington
- Mean Servers - Denver, Colorado • Los Angeles, California
- vpsGOD - Lenoir, North Carolina
- Cloud Shards - New York City, New York • Dallas, Texas • Los Angeles, California
- Bithost.io (DigitalOcean reseller) - New York City, New York • San Francisco, California
- SolVPS (offers Windows) - New York City, New York
- NodeServ - Jacksonville, Florida
- VPSNine - New York City, New York
- DeepNet Solutions (Gestion DBI, MooseVZ) - Piscataway, New Jersey • Miami, Florida • Dallas, Texas • Los Angeles, California
- LowEndSpirit (only listed locations) - Miami, Florida • Dallas, Texas
- Inception Hosting - Phoenix, Arizona • Miami, Florida
- prgmr - Santa Clara, California
- NocRoom - Miami, Florida
- StarryDNS - Los Angeles, California
- VPSDime - Seattle, Washington • Dallas, Texas • Los Angeles, California
- ImbaHost.com - Dallas, Texas
- Build Your VPS / TOCICI - Portland, Oregon
- YOKU - Weehawken, New Jersey • New York City, New York
- MightWeb - Dallas, Texas
- RouterHosting (offers Windows) - Los Angeles, California
Note: That a VPS host accepts Bitcoin does not automatically mean that they allow anonymous registrations! Please check with an individual host about their policy on this, before providing fake details.
Another thing to note is that not all providers allow you to select Bitcoin from the ordering system. If the option is not offered during ordering, ask the support department.
More Bitcoin-accepting VPS providers can be found here. Update, April 10, 2015: It looks like the page has been deleted from the Bitcoin wiki. I'll be keeping an eye on the wiki, and link the new page if it ever comes to exist again.
Beginner’s Guide to Mining Bitcoins
Last updated on May 18th, 2018 at 03:08 pm
One of the biggest problems I ran into when I was looking to start mining Bitcoin for investment and profit was most of the sites were written for the advanced user. I am not a professional coder, I have no experience with Ubuntu, Linux and minimal experience with Mac. So, this is for the individual or group that wants to get started the easy way.
1. Get a Bitcoin mining rig
Bitcoin mining is a very competitive niche to get into. As more and more miners come on board with the latest mining hardware the difficulty to mine increases each day. Before even starting out with Bitcoin mining you need to do your due diligence. This means you need to find out if Bitcoin mining is even profitable for you.
The best way to do this is through the use of a Bitcoin mining calculator. Just enter the data of the Bitcoin miner you are planning on buying and see how long it will take you to break even or make a profit. However, I can tell you from the get go that if you don’t have a few hundred dollars to spare you probably won’t be able to mine any Bitcoins.
Once you’ve finished with your calculations it’s time to get your miner. Make sure to go over our different Bitcoin mining hardware reviews to understand which miner is best for you. Today, the Antminer S9 is the newest and most powerful miner.
Select miner
AntMiner S9
Antminer R4
Antminer T9
AntMiner S7
AntMiner S5
Antrouter R1
As a side note it’s important to state that in the past it was possible to mine Bitcoins with your computer or with a graphics card (also known as GPU mining). Today however, the mining niche has become so competitive that you’ll need to use ASIC miners – special computers built strictly for mining Bitcoins.
2. Get a Bitcoin wallet
First thing you need to do is get a “Bitcoin Wallet“. Because Bitcoin is an internet based currency, you need a place to keep your Bitcoins. Once you have a wallet make sure to get your wallet address. It will be a long sequence of letters and numbers. Each wallet has a different way to get the public Bitcoin address but most wallets are pretty straight forward about it. Notice that you’ll need your PUBLIC bitcoin address and not your PRIVATE KEY (which is like a password for your wallet).
If you’re using a self hosted wallet (i.e. you downloaded a program to your computer and are not using an internet based service) there’s one additional very important step. Make sure you have a copy of the wallet.dat file on a thumb drive and print a copy out and keep it in a safe location. You can view a tutorial on how to create a secure wallet here. The reason is that if you computer crashes and you do not have a copy of your wallet.dat file, you will lose all of your Bitcoins. They won’t go to someone else, they will disappear forever. It is like burning cash.
3. Find a mining pool
Now that you have a wallet you are probably roaring to go, but if you actually want to make Bitcoin (money), you probably need to join a mining pool. A mining pool is a group of Bitcoin miners that combines their computing power to make more Bitcoins. The reason you shouldn’t go it alone is that Bitcoins are awarded in blocks, usually 12.5 at a time, and unless you get extremely lucky, you will not be getting any of those coins.
In a pool, you are given smaller and easier algorithms to solve and all of your combined work will make you more likely to solve the bigger algorithm and earn Bitcoins that are spread out throughout the pool based on your contribution. Basically, you will make a more consistent amount of Bitcoins and will be more likely to receive a good return on your investment.
When choosing which mining pool to join you will need to ask several questions:
- What is the reward method? – Proportional/Pay Per Share/Score Based/PPLNS
- What fee they charge for mining and withdrawal of funds?
- How frequently they find a block (means how frequently I get rewarded)?
- How easy it is to withdraw funds?
- What kind of stats they provide?
- How stable is the pool?
To answer most of these questions you can use our best Bitcoin mining pools review or this excellent post from BitcoinTalk. You can also find a complete comparison of mining pools inside the Bitcoin wiki. For the purpose of demonstration I will use Slush’s Pool when mining for Bitcoins. Once you are signed up with a pool you will get a username and password for that specific pool which we will use later on.
Follow the link to go to their site and click the “Sign up here” link at the top of their site and follow their step by step instructions. After you have your account set up, you will need to add a “Worker”. Basically, for every miner that you have running, you will need to have a worker ID so the pool can keep track of your contributions.
4. Get a mining program for your computer
Now that you’ve got the basics covered we’re almost ready to mine. You will need a mining client to run on your computer to that you will be able to control and monitor your mining rig. Depending on what mining rig you got you will need to find the right software. Many mining pools have their own software but some don’t. You can find a list of Bitcoin mining software here.
I’m using a mac so I will use a program called MacMiner. The most popular program I’ve found for a PC are BFGMiner and 50Miner . If you want to compare different mining software you can do this here.
5. Start mining
OK, so hopefully now everything is ready to go. Connect you miner to a power outlet and fire it up. Make sure to connect it also to your computer (usually via USB) and open up your mining software. The first thing you’ll need to do is to enter your mining pool, username and password.

Once this is configured you’ll basically start mining for Bitcoins. You will actually start collections shares which represent your part of the work in finding the next block. According to the pool you’ve chosen you will be paid for your share of coins – just make sure that you enter your address in the required fields when signing up to the pool. Here’s a full video of me mining in action:
Conclusion – perhaps it’s better just to buy the coins?
To conclude this article here’s something to consider. Perhaps it would be more profitable for you to just buy Bitcoins with the money you plan to spend on Bitcoin mining. Many times just buying the coins will yield a higher ROI (return on investment) than mining. If you want to dig into this a bit deeper here’s a post about exactly that.
Mining Experiment: Running 600 Servers for a Year Yields 0.4 Bitcoin

Online backup provider iDrive (mascot shown above) conducted an experiment in which it used 600 quad-core servers to mine for Bitcoin. The result: Stick with custom ASICs. (Image: iDrive)
Can data centers tap unused server capacity to mine for Bitcoins? The question occurred to the team at the online backup service iDrive, which performs most of its customer backup jobs overnight, leaving its 3,000 quad-core servers idle for much of the day. So the company ran a test with 600 servers to see whether Bitcoin mining could become a secondary revenue stream.
The result: running Bitcoin mining software on those 600 quad-core servers for a year would earn about 0.43 Bitcoin, worth a total return of about $275.08 at current prices on major Bitcoin exchanges.
"Its a waste of time, so any other company thinking about mining with their infrastructure, learn from us," said iDrive's Matthew Harvey. "Don't do it. You need custom machines to effectively mine bitcoins and generate a real ROI."
The iDrive test-drive reinforced a common theme on Bitcoin mining forums: To earn money by mining, you need to invest in highly-customized computers using ASICs (Application Specific Integrated Circuits) to crunch data for creating and tracking bitcoins.
Bitcoin is sometime referred to as the “Internet of money,” a platform using cryptography and software to offer an alternative currency and payment-tracking system. At its heart is a huge distributed computing network that verifies each transaction. Participants in this online ledger are rewarded with new bitcoins, which are issued about every 10 minutes.
Miners Upgrade to Powerful Hardware
Over the past year, the computing power supporting the bitcoin network has soared. The cryptocurrency is now supported by a powerful global network backed by 150,000 petaflops per second of computing power, roughly 600 times the combined power of the all the supercomputers in the Top500 list. Practitioners of Bitcoin mining – the term for using data-crunching computers to earn newly-issued virtually currency – are adopting more powerful hardware, pooling their efforts and seeking to slash their power bills.
Most serious Bitcoin miners have graduated from CPUs and GPUs to specialized chips such as FPGAs (Field Programmable Gate Arrays) or ASICs that can be optimized for specific workloads. This has led to the emergence of a new class of hardware vendors selling custom hardware for bitcoin mining.
The horsepower required to succeed in Bitcoin is highlighted by the iDrive simulation, which used 600 servers.
"Our study projected a year of mining at 100 percent processing power 24/7 and the assumption that the difficulty of mining (the calculating of hashes) would increase linearly," iDrive noted in a blog post describing its experiment. "In the end, we learned a lot about the interesting process of bitcoin mining, however, for us, the pros did not outweigh the cons. So, IDrive decided to stick with that we do best."
They're not the only ones who've contemplated repurposing powerful equipment to pursue cryptocurrency, The 4,000-core Odyssey supercomputer at Harvard was secretly used to mine Dogecoin, the ironic virtual currency used primarily for online tipping. The covert miner has had their computing privileges at the university suspended.
Running A Full Node
Support the Bitcoin network by running your own full node
What Is A Full Node?
A full node is a program that fully validates transactions and blocks. Almost all full nodes also help the network by accepting transactions and blocks from other full nodes, validating those transactions and blocks, and then relaying them to further full nodes.
Most full nodes also serve lightweight clients by allowing them to transmit their transactions to the network and by notifying them when a transaction affects their wallet. If not enough nodes perform this function, clients won’t be able to connect through the peer-to-peer network—they’ll have to use centralized services instead.
Many people and organizations volunteer to run full nodes using spare computing and bandwidth resources—but more volunteers are needed to allow Bitcoin to continue to grow. This document describes how you can help and what helping will cost you.
Costs And Warnings
Running a Bitcoin full node comes with certain costs and can expose you to certain risks. This section will explain those costs and risks so you can decide whether you’re able to help the network.
Special Cases
Miners, businesses, and privacy-conscious users rely on particular behavior from the full nodes they use, so they will often run their own full nodes and take special safety precautions. This document does not cover those precautions—it only describes running a full node to help support the Bitcoin network in general.
Please seek out assistance in the community if you need help setting up your full node correctly to handle high-value and privacy-sensitive tasks. Do your own diligence to ensure who you get help from is ethical, reputable and qualified to assist you.
Secure Your Wallet
It’s possible and safe to run a full node to support the network and use its wallet to store your bitcoins, but you must take the same precautions you would when using any Bitcoin wallet. Please see the securing your wallet page for more information.
Minimum Requirements
Bitcoin Core full nodes have certain requirements. If you try running a node on weak hardware, it may work—but you’ll likely spend more time dealing with issues. If you can meet the following requirements, you’ll have an easy-to-use node.
Desktop or laptop hardware running recent versions of Windows, Mac OS X, or Linux.
145 gigabytes of free disk space, accessable at a minimum read/write speed of 100 MB/s.
2 gigabytes of memory (RAM)
A broadband Internet connection with upload speeds of at least 400 kilobits (50 kilobytes) per second
An unmetered connection, a connection with high upload limits, or a connection you regularly monitor to ensure it doesn’t exceed its upload limits. It’s common for full nodes on high-speed connections to use 200 gigabytes upload or more a month. Download usage is around 20 gigabytes a month, plus around an additional 140 gigabytes the first time you start your node.
6 hours a day that your full node can be left running. (You can do other things with your computer while running a full node.) More hours would be better, and best of all would be if you can run your node continuously.
Note: many operating systems today (Windows, Mac, and Linux) enter a low-power mode after the screensaver activates, slowing or halting network traffic. This is often the default setting on laptops and on all Mac OS X laptops and desktops. Check your screensaver settings and disable automatic “sleep” or “suspend” options to ensure you support the network whenever your computer is running.
Possible Problems
Bandwidth limits: Some Internet plans will charge an additional amount for any excess upload bandwidth used that isn’t included in the plan. Worse, some providers may terminate your connection without warning because of overuse. We advise that you check whether your Internet connection is subjected to such limitations and monitor your bandwidth use so that you can stop Bitcoin Core before you reach your upload limit.
Anti-virus: Several people have placed parts of known computer viruses in the Bitcoin block chain. This block chain data can’t infect your computer, but some anti-virus programs quarantine the data anyway, making it more difficult to run Bitcoin Core. This problem mostly affects computers running Windows.
Attack target: Bitcoin Core powers the Bitcoin peer-to-peer network, so people who want to disrupt the network may attack Bitcoin Core users in ways that will affect other things you do with your computer, such as an attack that limits your available download bandwidth.
Linux Instructions
The following instructions describe installing Bitcoin Core on Linux systems.
Ubuntu 16.04
*Instructions for Bitcoin Core 0.14.2
If you use Ubuntu Desktop, click the Ubuntu swirl icon to start the Dash and type “term” into the input box. Choose any one of the terminals listed:

Alternatively, access a console or terminal emulator using another method, such as SSH on Ubuntu Server or a terminal launcher in an alternative desktop environment.
Type the following line to add the Bitcoin Personal Package Archive (PPA) to your system:
You will be prompted for your user password. Provide it to continue. Afterwards, the following text will be displayed:
Press enter to continue. The following text (with some variations) will be displayed and you will be returned to the command line prompt:
Type the following line to get the most recent list of packages:
A large number of lines will be displayed as different update files are downloaded. This step may take several minutes on a slow Internet connection.
To continue, choose one of the following options
To install the Bitcoin Core Graphical User Interface (GUI), type the following line and proceed to the Bitcoin Core GUI section below:
To install the Bitcoin Core daemon (bitcoind), which is useful for programmers and advanced users, type the following line and proceed to the Bitcoin Core Daemon section below:
To install both the GUI and the daemon, type the following line and read both the GUI instructions and the daemon instructions. Note that you can’t run both the GUI and the daemon at the same time using the same configuration directory.
After choosing what packages to install, you will be asked whether you want to proceed. Press enter to continue.
Bitcoin Core GUI
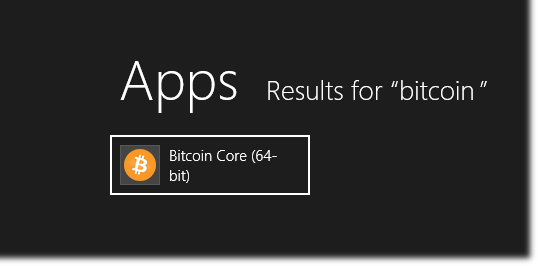
To start Bitcoin Core GUI, click the Ubuntu swirl icon to open the Dash, type bitcoin , and click the Bitcoin icon.

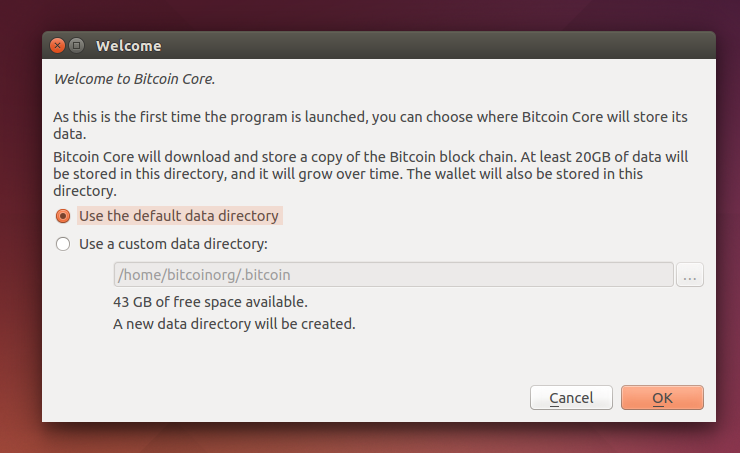
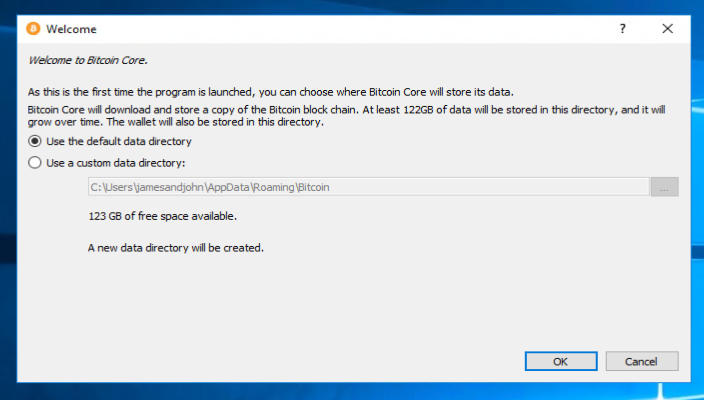
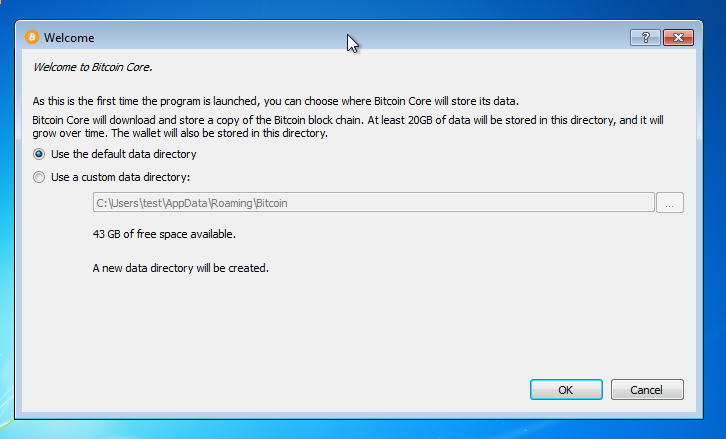
You will be prompted to choose a directory to store the Bitcoin block chain and your wallet. Unless you have a separate partition or drive you want to use, click Ok to use the default.
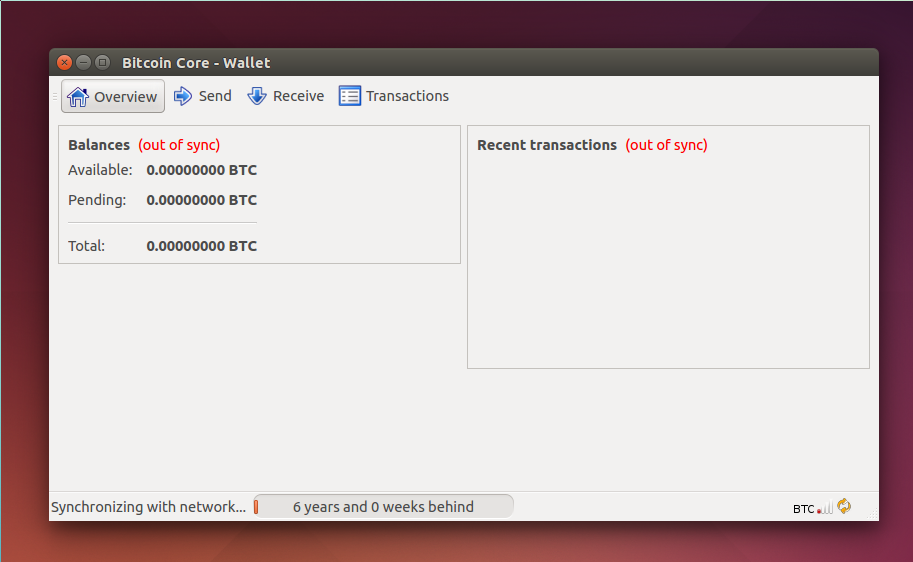
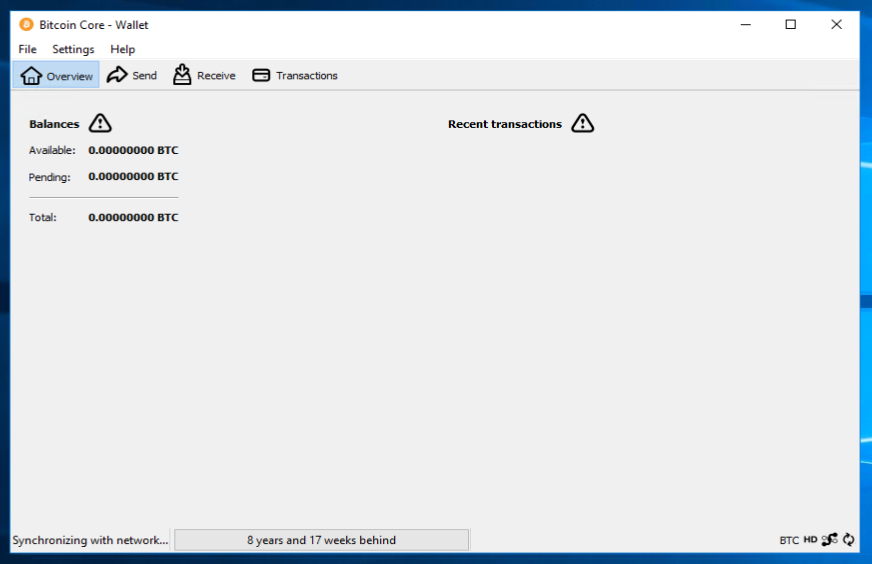
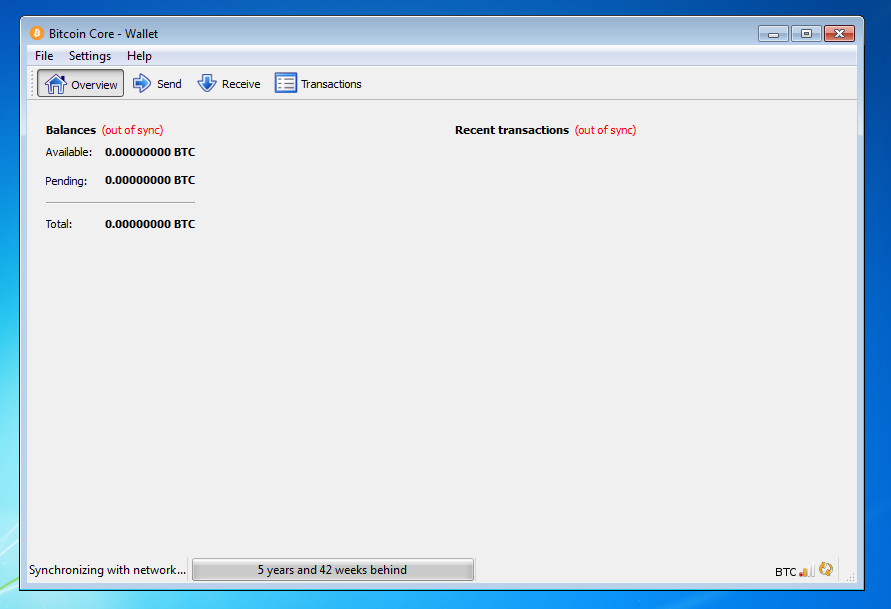
Bitcoin Core GUI will begin to download the block chain. This step will take at least several days, and it may take much more time on a slow Internet connection or with a slow computer. During the download, Bitcoin Core will use a significant part of your connection bandwidth. You can stop Bitcoin Core at any time by closing it; it will resume from the point where it stopped the next time you start it.
After download is complete, you may use Bitcoin Core as your wallet or you can just let it run to help support the Bitcoin network.
Optional: Start Your Node At Login
Starting your node automatically each time you login to your computer makes it easy for you to contribute to the network. The easiest way to do this is to tell Bitcoin Core GUI to start at login.
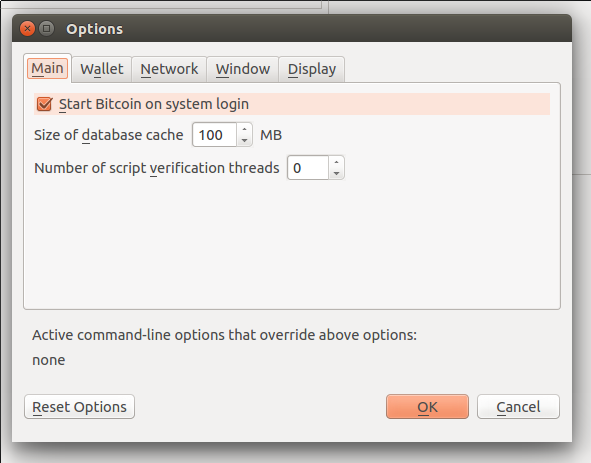
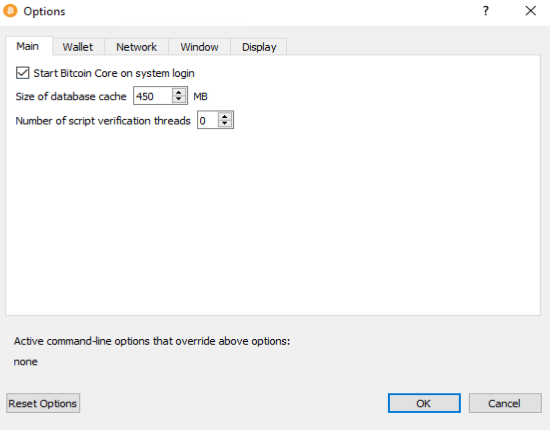
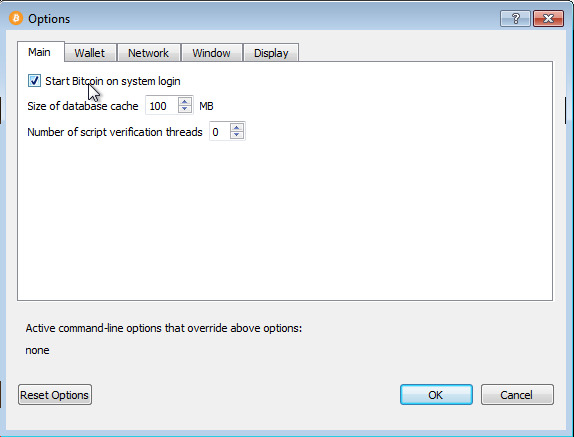
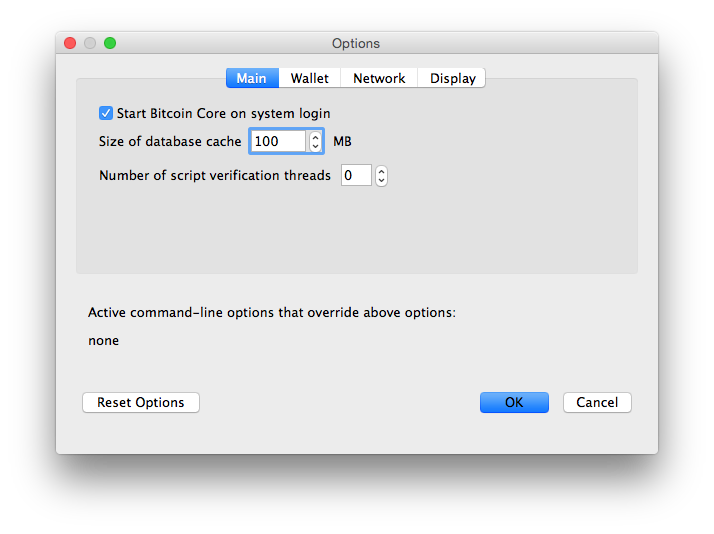
While running Bitcoin Core GUI, open the Settings menu and choose Options. On the Main tab, click Start Bitcoin on system login. Click the Ok button to save the new settings.
The next time you login to your desktop, Bitcoin Core GUI will be automatically started in as an icon in the tray.
You have now completed installing Bitcoin Core. If you have any questions, please ask in one of Bitcoin’s many communities, such as Bitcoin StackExchange, BitcoinTalk technical support, or the #bitcoin IRC chatroom on Freenode.
To support the Bitcoin network, you also need to allow incoming connections. Please read the Network Configuration section for details.
Bitcoin Core Daemon
If you’re logged in as an administrative user with sudo access, you may log out. The steps in this section should be performed as the user you want to run Bitcoin Core. (If you’re an expert administrator, you can make this a locked account used only by Bitcoin Core.)
From the terminal, type:
It will print a message that Bitcoin Core is starting. To interact with Bitcoin Core daemon, you will use the command bitcoin-cli (Bitcoin command line interface).
Note: it may take up to several minutes for Bitcoin Core to start, during which it will display the following message whenever you use bitcoin-cli :
After it starts, you may find the following commands useful for basic interaction with your node: getblockchaininfo , getnetworkinfo , getnettotals , getwalletinfo , stop , and help .
For example, to safely stop your node, run the following command:
A complete list of commands is available in the Bitcoin.org developer reference.
When Bitcoin Core daemon first starts, it will begin to download the block chain. This step will take at least several days, and it may take much more time on a slow Internet connection or with a slow computer. During the download, Bitcoin Core will use a significant part of your connection bandwidth. You can stop Bitcoin Core at any time using the stop command; it will resume from the point where it stopped the next time you start it.
Optional: Start Your Node At Boot
Starting your node automatically each time your computer boots makes it easy for you to contribute to the network. The easiest way to do this is to start Bitcoin Core daemon from your crontab. To edit your crontab, run the following command:
Scroll to the bottom of the file displayed and add the following line:
Save the file and exit; the updated crontab file will be installed for you. Now Bitcoin Core daemon will be automatically started each time your reboot your computer.
If you’re an Ubuntu expert and want to use an init script instead, see this Upstart script.
You have now completed installing Bitcoin Core. If you have any questions, please ask in one of Bitcoin’s many communities, such as Bitcoin StackExchange, BitcoinTalk technical support, or the #bitcoin IRC chatroom on Freenode.
To support the Bitcoin network, you also need to allow incoming connections. Please read the Network Configuration section for details.
Other Linux Distributions
*Instructions for Bitcoin Core 0.14.2
The following instructions describe installing Bitcoin Core using tools available in most mainstream Linux distributions. We assume you use a Bourne-like shell such as bash .
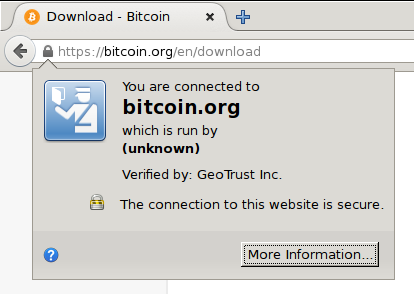
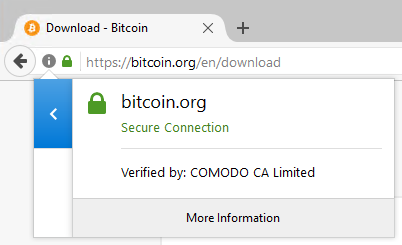
Using any computer, go to the Bitcoin Core download page and verify you have made a secure connection to the server.
In the “Linux (tgz)” section of the Download page, choose the appropriate file for your Linux install (either 32-bit or 64-bit) and download the file. If necessary, move the file to the computer you want to use to run Bitcoin Core.
Optional: Verify the release signatures
If you know how to use PGP, you should also click the Verify Release Signatures link on the download page to download a signed list of SHA256 file hashes. The 0.11 and later releases are signed by Wladimir J. van der Laan’s releases key with the fingerprint:
Earlier releases were signed by Wladimir J. van der Laan’s regular key. That key’s fingerprint is:
Even earlier releases were signed by Gavin Andresen’s key. His primary key’s fingerprint is:
You should verify these keys belong to their owners using the web of trust or other trustworthy means. Then use PGP to verify the signature on the release signatures file. Finally, use PGP or another utility to compute the SHA256 hash of the archive you downloaded, and ensure the computed hash matches the hash listed in the verified release signatures file.
If you aren’t already logged into the computer you want to install Bitcoin on, login now. Make sure you use an account that can use su or sudo to install software into directories owned by the root user.
If you logged in graphically, start a terminal. If you logged in another way, we will assume you’re already in a shell.
Locate the file you downloaded and extract it using the tar command followed by the argument xzf followed by the file name. The argument xzf means eXtract the gZipped tar archive File. For example, for a 64-bit tar archive in your current directory, the command is:
This will create the directory bitcoin-0.14.2 within your current working directory. We will install the contents of its bin subdirectory into the /usr/local/bin directory using the the install command. The install command is part of the GNU coreutils available on nearly every Linux distribution, and the /usr/local/bin directory is a standard location for self-installed executables (you may edit the commands below to use a different location).
If you use sudo to run commands as root, use the following command line:
If you use su to run commands as root, use the following command line:
To continue, choose one of the following options
To use Bitcoin Core Graphical User Interface (GUI), proceed to the Bitcoin Core GUI section below.
To use the Bitcoin Core daemon (bitcoind), which is useful for programmers and advanced users, proceed to the Bitcoin Core Daemon section below.
To use both the GUI and the daemon, read both the GUI instructions and the daemon instructions. Note that you can’t run both the GUI and the daemon at the same time using the same configuration directory.
Bitcoin Core GUI
In order to use Bitcoin Core GUI, you will need several libraries installed. All of them should be available in all major recently-released Linux distributions, but they may not be installed on your computer yet. To determine whether you’re missing any libraries, open a terminal (if you haven’t already) and run the command /usr/local/bin/bitcoin-qt to start Bitcoin Core GUI.
If all the required libraries are installed, Bitcoin Core will start. If a required library is missing, an error message similar to the following message will be displayed:
Search your distribution’s package database for the missing file missing and install package containing that file. Then re-run /usr/local/bin/bitcoin-qt to see if it’s missing another file. Repeat until Bitcoin Core GUI starts.
You will be prompted to choose a directory to store the Bitcoin block chain and your wallet. Unless you have a separate partition or drive you want to use, click Ok to use the default.
Bitcoin Core GUI will begin to download the block chain. This step will take at least several days, and it may take much more time on a slow Internet connection or with a slow computer. During the download, Bitcoin Core will use a significant part of your connection bandwidth. You can stop Bitcoin Core at any time by closing it; it will resume from the point where it stopped the next time you start it.
After download is complete, you may use Bitcoin Core as your wallet or you can just let it run to help support the Bitcoin network.
Optional: Start Your Node At Login
Starting your node automatically each time you login to your computer makes it easy for you to contribute to the network. The easiest way to do this is to tell Bitcoin Core GUI to start at login. This only works in desktop environments that support the autostart specification, such as Gnome, KDE, and Unity.
While running Bitcoin Core GUI, open the Settings menu and choose Options. On the Main tab, click Start Bitcoin on system login. Click the Ok button to save the new settings.
The next time you login to your desktop, Bitcoin Core GUI should be automatically started in as an icon in the tray.
If Bitcoin Core GUI does not automatically start, you may need to add it to an .xinit or .xsession file as described here.
You have now completed installing Bitcoin Core. If you have any questions, please ask in one of Bitcoin’s many communities, such as Bitcoin StackExchange, BitcoinTalk technical support, or the #bitcoin IRC chatroom on Freenode.
To support the Bitcoin network, you also need to allow incoming connections. Please read the Network Configuration section for details.
Bitcoin Core Daemon
If you’re logged in as an administrative user with sudo access, you may log out. The steps in this section should be performed as the user you want to run Bitcoin Core. (This can be a locked account used only by Bitcoin Core.) If you changed users in a graphical interface, start a terminal.
Type the following command:
It will print a message that Bitcoin Core is starting. To interact with Bitcoin Core daemon, you will use the command bitcoin-cli (Bitcoin command line interface).
Note: it may take up to several minutes for Bitcoin Core to start, during which it will display the following message whenever you use bitcoin-cli :
After it starts, you may find the following commands useful for basic interaction with your node: getblockchaininfo , getnetworkinfo , getnettotals , getwalletinfo , stop , and help .
For example, to safely stop your node, run the following command:
A complete list of commands is available in the Bitcoin.org developer reference.
When Bitcoin Core daemon first starts, it will begin to download the block chain. This step will take at least several days, and it may take much more time on a slow Internet connection or with a slow computer. During the download, Bitcoin Core will use a significant part of your connection bandwidth. You can stop Bitcoin Core at any time using the stop command; it will resume from the point where it stopped the next time you start it.
Optional: Start Your Node At Boot
Starting your node automatically each time your computer boots makes it easy for you to contribute to the network. The easiest way to do this is to start Bitcoin Core daemon from your crontab. To edit your crontab on most distributions, run the following command:
Scroll to the bottom of the file displayed and add the following line:
Save the file and exit; the updated crontab file will be installed for you. On most distributions, this will cause Bitcoin Core daemon to be automatically started each time your reboot your computer.
If you’re a expert system administrator and want to use an init script instead, see the init scripts directory in Bitcoin Core’s source tree.
You have now completed installing Bitcoin Core. If you have any questions, please ask in one of Bitcoin’s many communities, such as Bitcoin StackExchange, BitcoinTalk technical support, or the #bitcoin IRC chatroom on Freenode.
To support the Bitcoin network, you also need to allow incoming connections. Please read the Network Configuration section for details.
Windows Instructions
Windows 10
*Instructions for Bitcoin Core 0.14.2 on Windows 10
Go to the Bitcoin Core download page and verify you have made a secure connection to the server.
Click the large blue Download Bitcoin Core button to download the Bitcoin Core installer to your desktop.
Optional: Verify the release signatures
If you know how to use PGP, you should also click the Verify Release Signatures link on the download page to download a signed list of SHA256 file hashes. The 0.11 and later releases are signed by Wladimir J. van der Laan’s releases key with the fingerprint:
Earlier releases were signed by Wladimir J. van der Laan’s regular key. That key’s fingerprint is:
Even earlier releases were signed by Gavin Andresen’s key. His primary key’s fingerprint is:
You should verify these keys belong to their owners using the web of trust or other trustworthy means. Then use PGP to verify the signature on the release signatures file. Finally, use PGP or another utility to compute the SHA256 hash of the archive you downloaded, and ensure the computed hash matches the hash listed in the verified release signatures file.
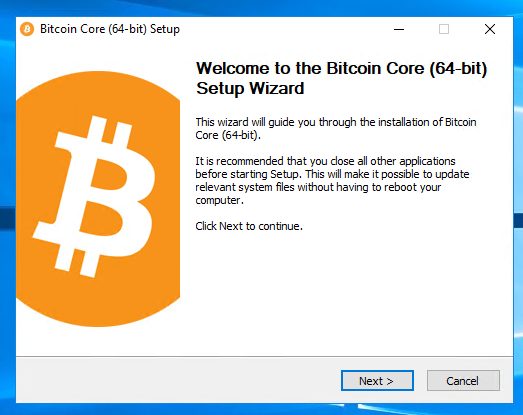
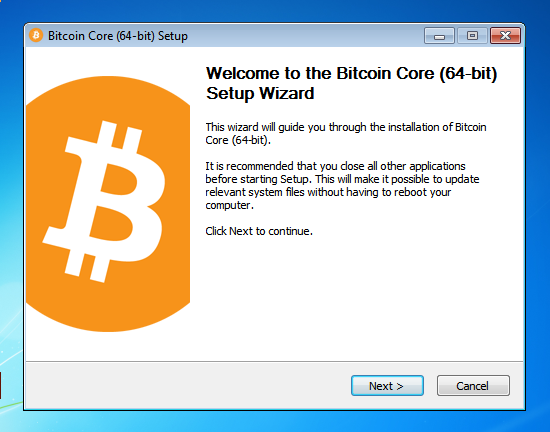
After downloading the file to your desktop or your Downloads folder ( C:\Users\ \Downloads ), run it by double-clicking its icon. Windows will ask you to confirm that you want to run it. Click Yes and the Bitcoin installer will start. It’s a typical Windows installer, and it will guide you through the decisions you need to make about where to install Bitcoin Core.
To continue, choose one of the following options
If you want to use the Bitcoin Core Graphical User Interface (GUI), proceed to the Bitcoin Core GUI section below.
If you want to use the Bitcoin Core daemon (bitcoind), which is useful for programmers and advanced users, proceed to the Bitcoin Core Daemon section below.
To want to use both the GUI and the daemon, read both the GUI instructions and the daemon instructions. Note that you can’t run both the GUI and the daemon at the same time using the same configuration directory.
Bitcoin Core GUI
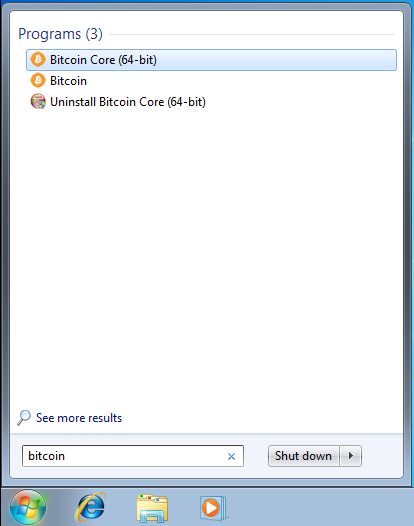
Press the Windows key ( ⊞ Win ) and start typing “bitcoin”. When the Bitcoin Core icon appears (as shown below), click on it.

You will be prompted to choose a directory to store the Bitcoin block chain and your wallet. Unless you have a separate partition or drive you want to use, click Ok to use the default.
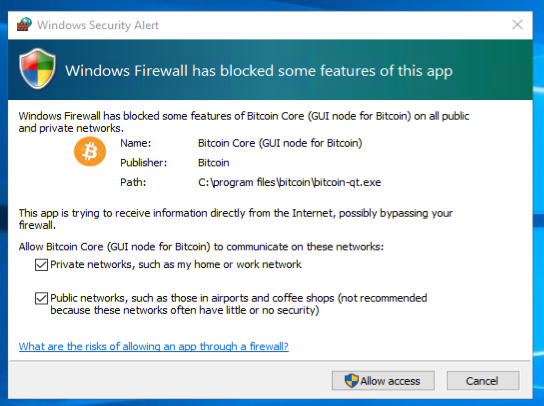
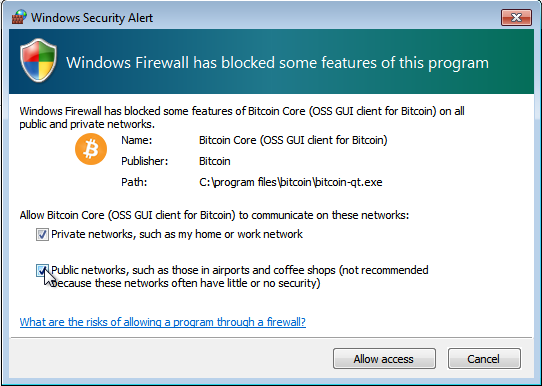
Your firewall may block Bitcoin Core from making outbound connections. It’s safe to allow Bitcoin Core to use all networks. (Note: you will still need to configure inbound connections as described later in the Network Configuration section.)
Bitcoin Core GUI will begin to download the block chain. This step will take at least several days, and it may take much more time on a slow Internet connection or with a slow computer. During the download, Bitcoin Core will use a significant part of your connection bandwidth. You can stop Bitcoin Core at any time by closing it; it will resume from the point where it stopped the next time you start it.
After download is complete, you may use Bitcoin Core as your wallet or you can just let it run to help support the Bitcoin network.
Optional: Start Your Node At Login
Starting your node automatically each time you login to your computer makes it easy for you to contribute to the network. The easiest way to do this is to tell Bitcoin Core GUI to start at login.
While running Bitcoin Core GUI, open the Settings menu and choose Options. On the Main tab, click Start Bitcoin on system login. Click the Ok button to save the new settings.
The next time you login to your desktop, Bitcoin Core GUI will be automatically started minimized in the task bar.
Warning: to prevent data corruption, do not force shutdown your computer from the Windows shutdown screen when you have Bitcoin Core running.
You have now completed installing Bitcoin Core. If you have any questions, please ask in one of Bitcoin’s many communities, such as Bitcoin StackExchange, BitcoinTalk technical support, or the #bitcoin IRC chatroom on Freenode.
To support the Bitcoin network, you also need to allow incoming connections. Please read the Network Configuration section for details.
Bitcoin Core Daemon
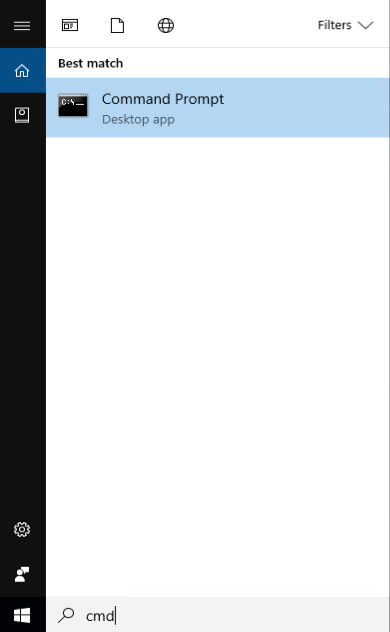
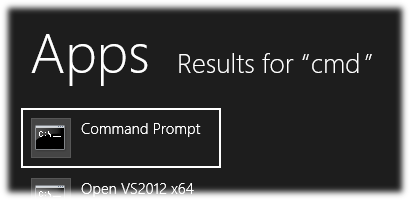
To start Bitcoin Core daemon, first open a command window: press the Windows key ( ⊞ Win ) and type “cmd”. Choose the option labeled “Command Prompt”.
If you installed Bitcoin Core into the default directory, type the following at the command prompt:
Bitcoin Core daemon should start. To interact with Bitcoin Core daemon, you will use the command bitcoin-cli (Bitcoin command line interface). If you installed Bitcoin Core into the default location, type the following at the command prompt to see whether it works:
Note: it may take up to several minutes for Bitcoin Core to start, during which it will display the following message whenever you use bitcoin-cli :
After it starts, you may find the following commands useful for basic interaction with your node: getblockchaininfo , getnetworkinfo , getnettotals , getwalletinfo , stop , and help .
For example, to safely stop your node, run the following command:
A complete list of commands is available in the Bitcoin.org developer reference.
When Bitcoin Core daemon first starts, it will begin to download the block chain. This step will take at least several days, and it may take much more time on a slow Internet connection or with a slow computer. During the download, Bitcoin Core will use a significant part of your connection bandwidth. You can stop Bitcoin Core at any time using the stop command; it will resume from the point where it stopped the next time you start it.
Optional: Start Your Node At Boot
Starting your node automatically each time your computer boots makes it easy for you to contribute to the network. The easiest way to do this is to start Bitcoin Core daemon when you login to your computer.
Start File Explorer and go to,
Right-click on the File Explorer window and choose New → Text file. Name the file start_bitcoind.bat . Then right-click on it and choose Open in Notepad (or whatever editor you prefer). Copy and paste the following line into the file.
(If you installed Bitcoin Core in a non-default directory, use that directory path instead.)
Save the file. The next time you login to your computer, Bitcoin Core daemon will be automatically started.
Warning: to prevent data corruption, do not force shutdown your computer from the Windows shutdown screen when you have Bitcoin Core running.
You have now completed installing Bitcoin Core. If you have any questions, please ask in one of Bitcoin’s many communities, such as Bitcoin StackExchange, BitcoinTalk technical support, or the #bitcoin IRC chatroom on Freenode.
To support the Bitcoin network, you also need to allow incoming connections. Please read the Network Configuration section for details.
Windows 8.x
Instructions for Bitcoin Core 0.14.2 on Windows 8 and 8.1.
Go to the Bitcoin Core download page and verify you have made a secure connection to the server.
Click the large blue Download Bitcoin Core button to download the Bitcoin Core installer to your desktop.
Optional: Verify the release signatures
If you know how to use PGP, you should also click the Verify Release Signatures link on the download page to download a signed list of SHA256 file hashes. The 0.11 and later releases are signed by Wladimir J. van der Laan’s releases key with the fingerprint:
Earlier releases were signed by Wladimir J. van der Laan’s regular key. That key’s fingerprint is:
Even earlier releases were signed by Gavin Andresen’s key. His primary key’s fingerprint is:
You should verify these keys belong to their owners using the web of trust or other trustworthy means. Then use PGP to verify the signature on the release signatures file. Finally, use PGP or another utility to compute the SHA256 hash of the archive you downloaded, and ensure the computed hash matches the hash listed in the verified release signatures file.
After downloading the file to your desktop or your Downloads folder ( C:\Users\ \Downloads ), run it by double-clicking its icon. Windows will ask you to confirm that you want to run it. Click Yes and the Bitcoin installer will start. It’s a typical Windows installer, and it will guide you through the decisions you need to make about where to install Bitcoin Core.
To continue, choose one of the following options
If you want to use the Bitcoin Core Graphical User Interface (GUI), proceed to the Bitcoin Core GUI section below.
If you want to use the Bitcoin Core daemon (bitcoind), which is useful for programmers and advanced users, proceed to the Bitcoin Core Daemon section below.
To want to use both the GUI and the daemon, read both the GUI instructions and the daemon instructions. Note that you can’t run both the GUI and the daemon at the same time using the same configuration directory.
Bitcoin Core GUI
Press the Windows key ( ⊞ Win ) and start typing “bitcoin”. When the Bitcoin Core icon appears (as shown below), click on it.
You will be prompted to choose a directory to store the Bitcoin block chain and your wallet. Unless you have a separate partition or drive you want to use, click Ok to use the default.
Your firewall may block Bitcoin Core from making outbound connections. It’s safe to allow Bitcoin Core to use all networks. (Note: you will still need to configure inbound connections as described later in the Network Configuration section.)
Bitcoin Core GUI will begin to download the block chain. This step will take at least several days, and it may take much more time on a slow Internet connection or with a slow computer. During the download, Bitcoin Core will use a significant part of your connection bandwidth. You can stop Bitcoin Core at any time by closing it; it will resume from the point where it stopped the next time you start it.
After download is complete, you may use Bitcoin Core as your wallet or you can just let it run to help support the Bitcoin network.
Optional: Start Your Node At Login
Starting your node automatically each time you login to your computer makes it easy for you to contribute to the network. The easiest way to do this is to tell Bitcoin Core GUI to start at login.
While running Bitcoin Core GUI, open the Settings menu and choose Options. On the Main tab, click Start Bitcoin on system login. Click the Ok button to save the new settings.
The next time you login to your desktop, Bitcoin Core GUI will be automatically started minimized in the task bar.
Warning: to prevent data corruption, do not force shutdown your computer from the Windows shutdown screen when you have Bitcoin Core running.
You have now completed installing Bitcoin Core. If you have any questions, please ask in one of Bitcoin’s many communities, such as Bitcoin StackExchange, BitcoinTalk technical support, or the #bitcoin IRC chatroom on Freenode.
To support the Bitcoin network, you also need to allow incoming connections. Please read the Network Configuration section for details.
Bitcoin Core Daemon
To start Bitcoin Core daemon, first open a command window: press the Windows key ( ⊞ Win ) and type “cmd”. Choose the option labeled “Command Prompt”.
If you installed Bitcoin Core into the default directory, type the following at the command prompt:
Bitcoin Core daemon should start. To interact with Bitcoin Core daemon, you will use the command bitcoin-cli (Bitcoin command line interface). If you installed Bitcoin Core into the default location, type the following at the command prompt to see whether it works:
Note: it may take up to several minutes for Bitcoin Core to start, during which it will display the following message whenever you use bitcoin-cli :
After it starts, you may find the following commands useful for basic interaction with your node: getblockchaininfo , getnetworkinfo , getnettotals , getwalletinfo , stop , and help .
For example, to safely stop your node, run the following command:
A complete list of commands is available in the Bitcoin.org developer reference.
When Bitcoin Core daemon first starts, it will begin to download the block chain. This step will take at least several days, and it may take much more time on a slow Internet connection or with a slow computer. During the download, Bitcoin Core will use a significant part of your connection bandwidth. You can stop Bitcoin Core at any time using the stop command; it will resume from the point where it stopped the next time you start it.
Optional: Start Your Node At Boot
Starting your node automatically each time your computer boots makes it easy for you to contribute to the network. The easiest way to do this is to start Bitcoin Core daemon when you login to your computer.
Start File Explorer and go to,
Right-click on the File Explorer window and choose New → Text file. Name the file start_bitcoind.bat . Then right-click on it and choose Open in Notepad (or whatever editor you prefer). Copy and paste the following line into the file.
(If you installed Bitcoin Core in a non-default directory, use that directory path instead.)
Save the file. The next time you login to your computer, Bitcoin Core daemon will be automatically started.
Warning: to prevent data corruption, do not force shutdown your computer from the Windows shutdown screen when you have Bitcoin Core running.
You have now completed installing Bitcoin Core. If you have any questions, please ask in one of Bitcoin’s many communities, such as Bitcoin StackExchange, BitcoinTalk technical support, or the #bitcoin IRC chatroom on Freenode.
To support the Bitcoin network, you also need to allow incoming connections. Please read the Network Configuration section for details.
*Instructions for Bitcoin Core 0.14.2
Go to the Bitcoin Core download page and verify you have made a secure connection to the server.
Click the large blue Download Bitcoin Core button to download the Bitcoin Core installer to your desktop.
Optional: Verify the release signatures
If you know how to use PGP, you should also click the Verify Release Signatures link on the download page to download a signed list of SHA256 file hashes. The 0.11 and later releases are signed by Wladimir J. van der Laan’s releases key with the fingerprint:
Earlier releases were signed by Wladimir J. van der Laan’s regular key. That key’s fingerprint is:
Even earlier releases were signed by Gavin Andresen’s key. His primary key’s fingerprint is:
You should verify these keys belong to their owners using the web of trust or other trustworthy means. Then use PGP to verify the signature on the release signatures file. Finally, use PGP or another utility to compute the SHA256 hash of the archive you downloaded, and ensure the computed hash matches the hash listed in the verified release signatures file.
After downloading the file to your desktop or your Downloads folder ( C:\Users\ \Downloads ), run it by double-clicking its icon. Windows will ask you to confirm that you want to run it. Click Yes and the Bitcoin installer will start. It’s a typical Windows installer, and it will guide you through the decisions you need to make about where to install Bitcoin Core.
To continue, choose one of the following options
If you want to use the Bitcoin Core Graphical User Interface (GUI), proceed to the Bitcoin Core GUI section below.
If you want to use the Bitcoin Core daemon (bitcoind), which is useful for programmers and advanced users, proceed to the Bitcoin Core Daemon section below.
To want to use both the GUI and the daemon, read both the GUI instructions and the daemon instructions. Note that you can’t run both the GUI and the daemon at the same time using the same configuration directory.
Bitcoin Core GUI
Open the Start menu, type bitcoin into the search box, and click the Bitcoin Core icon.
You will be prompted to choose a directory to store the Bitcoin block chain and your wallet. Unless you have a separate partition or drive you want to use, click Ok to use the default.
Your firewall may block Bitcoin Core from making outbound connections. It’s safe to allow Bitcoin Core to use all networks. (Note: you will still need to configure inbound connections as described later in the Network Configuration section.)
Bitcoin Core GUI will begin to download the block chain. This step will take at least several days, and it may take much more time on a slow Internet connection or with a slow computer. During the download, Bitcoin Core will use a significant part of your connection bandwidth. You can stop Bitcoin Core at any time by closing it; it will resume from the point where it stopped the next time you start it.
After download is complete, you may use Bitcoin Core as your wallet or you can just let it run to help support the Bitcoin network.
Optional: Start Your Node At Login
Starting your node automatically each time you login to your computer makes it easy for you to contribute to the network. The easiest way to do this is to tell Bitcoin Core GUI to start at login.
While running Bitcoin Core GUI, open the Settings menu and choose Options. On the Main tab, click Start Bitcoin on system login. Click the Ok button to save the new settings.
The next time you login to your desktop, Bitcoin Core GUI will be automatically started minimized in the task bar.
Warning: to prevent data corruption, do not force shutdown your computer from the Windows shutdown screen when you have Bitcoin Core running.
You have now completed installing Bitcoin Core. If you have any questions, please ask in one of Bitcoin’s many communities, such as Bitcoin StackExchange, BitcoinTalk technical support, or the #bitcoin IRC chatroom on Freenode.
To support the Bitcoin network, you also need to allow incoming connections. Please read the Network Configuration section for details.
Bitcoin Core Daemon
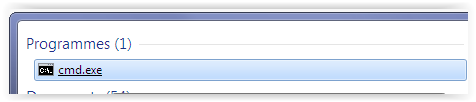
To start Bitcoin Core daemon, first open a command window: press the Windows key ( ⊞ Win ) and type “cmd”. Choose the program named “cmd.exe”
If you installed the Bitcoin Core into the default directory, type the following at the command prompt :
Bitcoin Core daemon should start. You can now try using Bitcoin Cli Utility.
To interact with Bitcoin Core daemon, you will use the command bitcoin-cli (Bitcoin command line interface). If you installed Bitcoin Core into the default location, type the following at the command prompt to see whether it works:
Note: it may take up to several minutes for Bitcoin Core to start, during which it will display the following message whenever you use bitcoin-cli :
After it starts, you may find the following commands useful for basic interaction with your node: getblockchaininfo , getnetworkinfo , getnettotals , getwalletinfo , stop , and help .
For example, to safely stop your node, run the following command:
A complete list of commands is available in the Bitcoin.org developer reference.
When Bitcoin Core daemon first starts, it will begin to download the block chain. This step will take at least several days, and it may take much more time on a slow Internet connection or with a slow computer. During the download, Bitcoin Core will use a significant part of your connection bandwidth. You can stop Bitcoin Core at any time using the stop command; it will resume from the point where it stopped the next time you start it.
When Bitcoin Core daemon first starts, it will begin to download the block chain. This step will take at least several days, and it may take much more time on a slow Internet connection or with a slow computer. During the download, Bitcoin Core will use a significant part of your connection bandwidth. You can stop Bitcoin Core at any time using the stop command; it will resume from the point where it stopped the next time you start it.
Optional: Start Your Node At Boot
Starting your node automatically each time your computer boots makes it easy for you to contribute to the network. The easiest way to do this is to start Bitcoin Core daemon when you login to your computer.
Start File Explorer and go to,
You can also access this folder by executing the following command after reaching the Execute. prompt :
Right-click on the File Explorer window and choose New → Text file. Name the file start_bitcoind.bat . Then right-click on it and choose Open in Notepad (or whatever editor you prefer). Copy and paste the following line into the file.
(If you installed Bitcoin Core in a non-default directory, use that directory path instead.)
Save the file. The next time you login to your computer, Bitcoin Core daemon will be automatically started.
Warning: to prevent data corruption, do not force shutdown your computer from the Windows shutdown screen when you have Bitcoin Core running.
You have now completed installing Bitcoin Core. If you have any questions, please ask in one of Bitcoin’s many communities, such as Bitcoin StackExchange, BitcoinTalk technical support, or the #bitcoin IRC chatroom on Freenode.
To support the Bitcoin network, you also need to allow incoming connections. Please read the Network Configuration section for details.
Mac OS X Instructions
Mac OS X Yosemite 10.10.x
Instructions for Bitcoin Core 0.14.2 on Mac OS X Yosemite
Go to the Bitcoin Core download page and verify you have made a secure connection to the server.
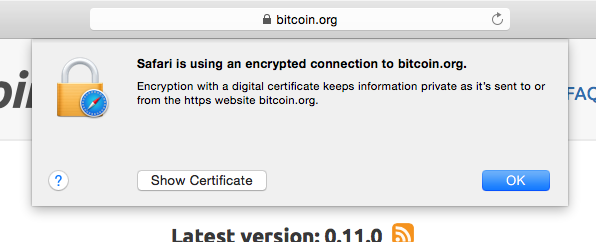
Click the large blue Download Bitcoin Core button to download the Bitcoin Core installer to your Downloads folder.
Optional: Verify the release signatures
If you know how to use PGP, you should also click the Verify Release Signatures link on the download page to download a signed list of SHA256 file hashes. The 0.11 and later releases are signed by Wladimir J. van der Laan’s releases key with the fingerprint:
Earlier releases were signed by Wladimir J. van der Laan’s regular key. That key’s fingerprint is:
Even earlier releases were signed by Gavin Andresen’s key. His primary key’s fingerprint is:
You should verify these keys belong to their owners using the web of trust or other trustworthy means. Then use PGP to verify the signature on the release signatures file. Finally, use PGP or another utility to compute the SHA256 hash of the archive you downloaded, and ensure the computed hash matches the hash listed in the verified release signatures file.
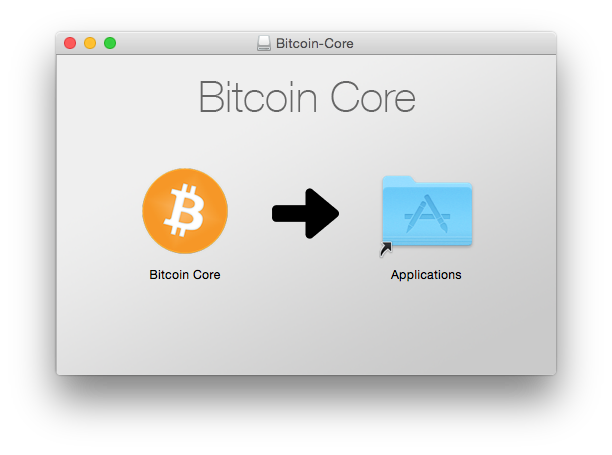
After downloading the file to your Downloads folder ( /Users/ /Downloads ), run it by double-clicking its icon. OS X will open a Finder window for you to drag Bitcoin Core to your Applications folder.
Bitcoin Core GUI
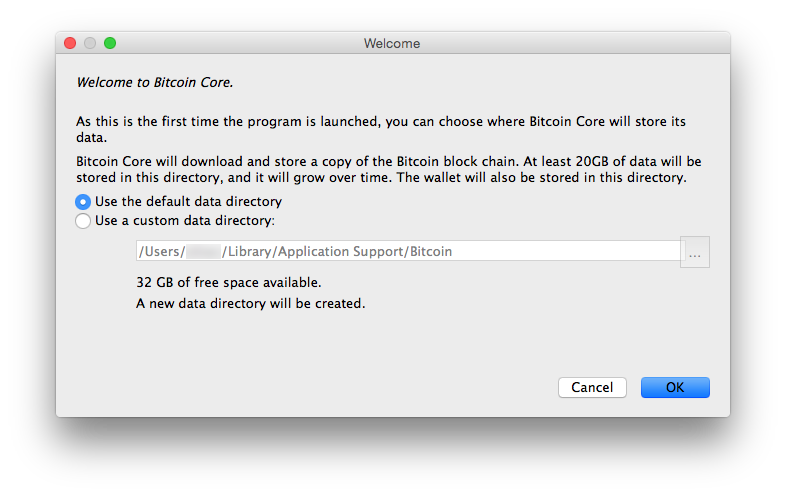
The first time running Bitcoin Core, Max OS X will ask you to confirm that you want to run it:

You will be prompted to choose a directory to store the Bitcoin block chain and your wallet. Unless you have a separate partition or drive you want to use, click Ok to use the default.
Bitcoin Core GUI will begin to download the block chain. This step will take at least several days, and it may take much more time on a slow Internet connection or with a slow computer. During the download, Bitcoin Core will use a significant part of your connection bandwidth. You can stop Bitcoin Core at any time by closing it; it will resume from the point where it stopped the next time you start it.
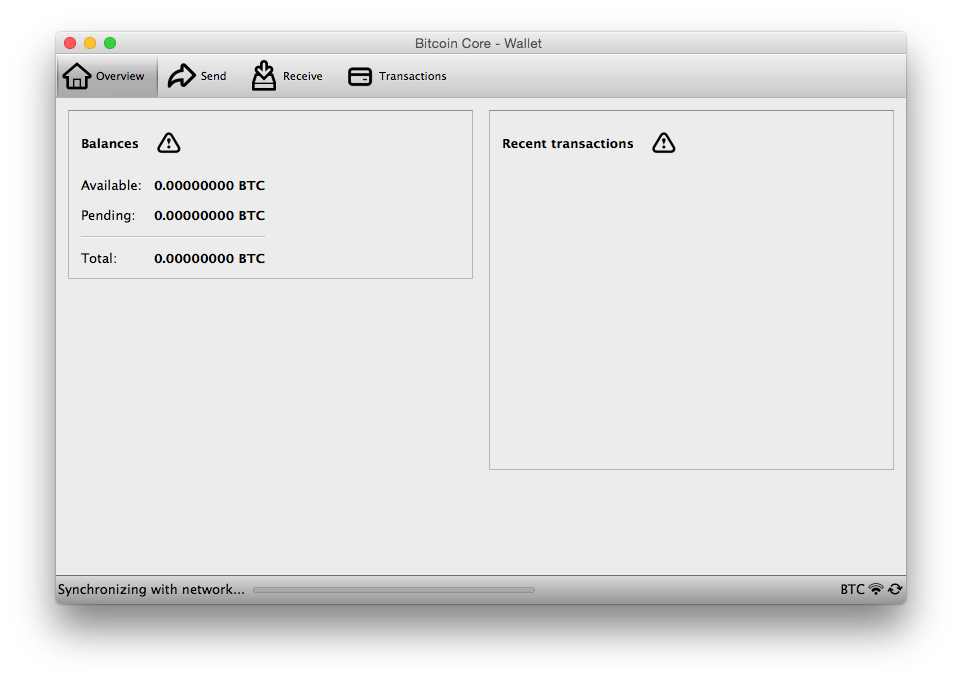
After download is complete, you may use Bitcoin Core as your wallet or you can just let it run to help support the Bitcoin network.
Optional: Start Your Node At Login
Starting your node automatically each time you login to your computer makes it easy for you to contribute to the network. The easiest way to do this is to tell Bitcoin Core GUI to start at login.
While running Bitcoin Core GUI, open the Bitcoin Core menu and choose Preferences. On the Main tab, click Start Bitcoin on system login. Click the Ok button to save the new settings.
The next time you login to your desktop, Bitcoin Core GUI will be automatically started minimized in the task bar.
You have now completed installing Bitcoin Core. If you have any questions, please ask in one of Bitcoin’s many communities, such as Bitcoin StackExchange, BitcoinTalk technical support, or the #bitcoin IRC chatroom on Freenode.
To support the Bitcoin network, you also need to allow incoming connections. Please read the Network Configuration section for details.
Bitcoin Core Daemon
The Bitcoin Core daemon (bitcoind) is not included in the .dmg file you may have downloaded to install Bitcoin-QT. Bitcoind, along with its support binaries, is instead included in the OS X .tar.gz file listed on the official Bitcoin Core download page. To download this file using Terminal, execute the following command:
Optional: Verify the release signatures
If you know how to use PGP, you should also click the Verify Release Signatures link on the download page to download a signed list of SHA256 file hashes. The 0.11 and later releases are signed by Wladimir J. van der Laan’s releases key with the fingerprint:
Earlier releases were signed by Wladimir J. van der Laan’s regular key. That key’s fingerprint is:
Even earlier releases were signed by Gavin Andresen’s key. His primary key’s fingerprint is:
You should verify these keys belong to their owners using the web of trust or other trustworthy means. Then use PGP to verify the signature on the release signatures file. Finally, use PGP or another utility to compute the SHA256 hash of the archive you downloaded, and ensure the computed hash matches the hash listed in the verified release signatures file.
Extract bitcoind and its support binaries from the archive we just downloaded by running this command in Terminal:
Now we’ll move the executables into your default path to make running and stopping bitcoind easier. To move the executables, run these commands (note that we have to use sudo to perform these commands since we are modifying directories owned by root):
To clean up the directory we’ve been working in, run:
You should now be able to start up your full node by running bitcoind -daemon in any Terminal window. If you need to stop bitcoind for any reason, the command is bitcoin-cli stop
Optional: Start Your Node At Login
Starting your node automatically each time you login to your computer makes it easy for you to contribute to the network. The easiest way to do this is to tell Bitcoin Core Daemon to start at login. In OS X, the way to start background programs at login is using a Launch Agent. Here is how to install a Launch Agent for Bitcoin Core daemon on your machine:
The next time you login to your desktop, Bitcoin Core daemon will be automatically started.
You have now completed installing Bitcoin Core. If you have any questions, please ask in one of Bitcoin’s many communities, such as Bitcoin StackExchange, BitcoinTalk technical support, or the #bitcoin IRC chatroom on Freenode.
To support the Bitcoin network, you also need to allow incoming connections. Please read the Network Configuration section for details.
Upgrading Bitcoin Core
If you are running an older version, shut it down. Wait until it has completely shut down (which might take a few minutes for older versions), then run the installer (on Windows) or just copy over /Applications/Bitcoin-Qt (on Mac) or bitcoind/bitcoin-qt (on Linux).
The blockchain and wallet files in the data directory are compatible between versions so there is no requirement to make any changes to the data directory when upgrading. Occasionally the format of those files changes, but the new Bitcoin Core version will include code that automatically upgrades the files to the new format so no manual intervention is required.
Sometimes upgrade of the blockchain data files from very old versions to the new versions is not supported. In those cases it may be necessary to redownload the blockchain. Check the release notes of the new version if you are planning to upgrade from a very old version.
Sometimes downgrade is not possible because of changes to the data files. Again, check the release notes for the new version if you are planning to downgrade.
Network Configuration
If you want to support the Bitcoin network, you must allow inbound connections.
When Bitcoin Core starts, it establishes 8 outbound connections to other full nodes so it can download the latest blocks and transactions. If you just want to use your full node as a wallet, you don’t need more than these 8 connections—but if you want to support lightweight clients and other full nodes on the network, you must allow inbound connections.
Servers connected directly to the Internet usually don’t require any special configuration. You can use the testing instructions below to confirm your server-based node accepts inbound connections.
Home connections are usually filtered by a router or modem. Bitcoin Core will request your router automatically configure itself to allow inbound connections to Bitcoin’s port, port 8333. Unfortunately many routers don’t allow automatic configuration, so you must manually configure your router. You may also need to configure your firewall to allow inbound connections to port 8333. Please see the following subsections for details.
Testing Connections
The BitNodes project provides an online tool to let you test whether your node accepts inbound connections. Before using BitNodes, you must first ensure that your node is fully synced with the block chain. Once you’ve done so, start Bitcoin Core (either the GUI or the daemon), wait 10 minutes, and then visit the Bitnodes page. The tool will attempt to guess your IP address—if the address is wrong (or blank), you will need to enter your address manually.
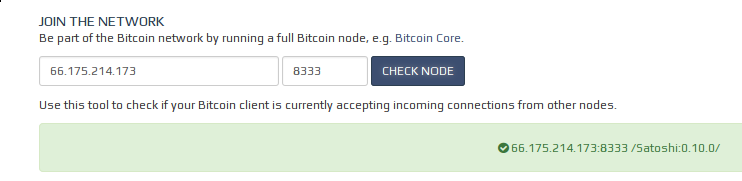
After you press Check Node, the tool will inform you whether your port is open (green box) or not open (red box). If you get the green box, you don’t need to do anything—you accept inbound connections. If you get the red box, please read the enabling connections subsection.
For confirmation that you accept inbound connections, you can use Bitcoin Core. Bitcoin Core can’t tell you directly whether you allow inbound connections, but it can tell you whether or not you currently have any inbound connections. If your node has been online for at least 30 minutes, it should normally have inbound connections. If want to check your peer info using Bitcoin Core, choose the appropriate instructions below:
GUI Peer Info
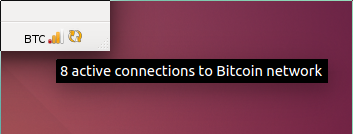
In the bottom right corner of the Bitcoin Core GUI are several icons. If you hover over the signal strength icon, it will tell you how many connections you have. The icon won’t turn green until you have more than 8 active connections, which only happens if inbound connections are allowed.
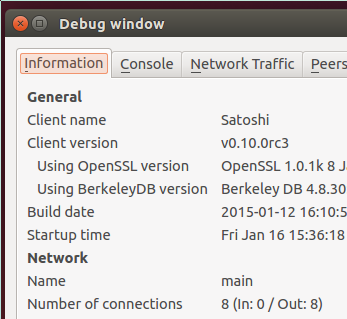
For confirmation, you can go to the Help menu, choose Debug Window, and open the Information tab. In the Network section, it will tell you exactly how many inbound connections you have. If the number is greater than zero, then inbound connections are allowed.
If you don’t have inbound connections, please read the instructions for enabling inbound connections.
Daemon Peer Info
The getconnectioncount command will tell you how many connections you have. If you have more than 8 connections, inbound connections are allowed. For example:
For confirmation, you can use the getpeerinfo command to get information about all of your peers. Each peer’s details will include an inbound field set to true if the connection is inbound. If you have any inbound connections, then inbound connections are allowed.
If you don’t have inbound connections, please read instructions for enabling inbound connections.
Enabling Connections
If Bitcoin Core can’t automatically configure your router to open port 8333, you will need to manually configure your router. We’ve tried to make the following instructions generic enough to cover most router models; if you need specific help with your router, please ask for help on a tech support site such as SuperUser.
Enabling inbound connections requires two steps, plus an extra third step for firewall users:
Giving your computer a static (unchanging) internal IP address by configuring the Dynamic Host Configuration Protocol (DHCP) on your router.
Forwarding inbound connections from the Internet through your router to your computer where Bitcoin Core can process them.
Configuring your firewall to allow inbound connections. This step mainly applies to Windows users, as Mac OS X and most Linuxes do not enable a firewall by default.
Configuring DHCP
In order for your router to direct incoming port 8333 connections to your computer, it needs to know your computer’s internal IP address. However, routers usually give computers dynamic IP addresses that change frequently, so we need to ensure your router always gives your computer the same internal IP address.
Start by logging into your router’s administration interface. Most routers can be configured using one of the following URLs, so keep clicking links until you find one that works. If none work, consult your router’s manual.
Upon connecting, you will probably be prompted for a username and password. If you configured a password, enter it now. If not, the Router Passwords site provides a database of known default username and password pairs.
After logging in, you want to search your router’s menus for options related to DHCP, the Dynamic Host Configuration Protocol. These options may also be called Address Reservation. For example, the router page shown below calls the option we need “DHCP Reservation”:

In the reservation configuration, some routers will display a list of computers and devices currently connected to your network, and then let you select a device to make its current IP address permanent:
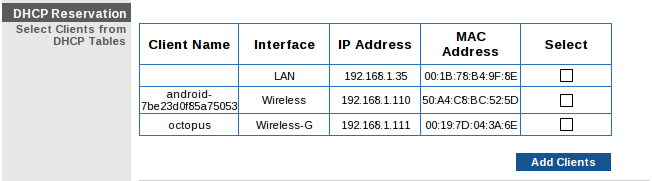
If that’s the case, find the computer running Bitcoin Core in the list, select it, and add it to the list of reserved addresses. Make a note of its current IP address—we’ll use the address in the next section.
Other routers require a more manual configuration. For these routers, you will need to look up the fixed address (MAC address) for your computer’s network card and add it to the list. This operation differs by operating system:
Windows 7 & 8: Press Win-R (Windows key plus the R key) to open the Run dialog. Type cmd to open the console. Type ipconfig /all and find the result that best matches your connection—usually a wireless connection. Look for a line that starts with “Physical Address” and contains a value like this:
Replace all the dashes with colons, so the address looks like this: 01:23:45:67:89:AB. Use that address in the instructions below.
Linux: open a terminal and type ifconfig . Find the result that best matches your connection—a result starting with wlan indicates a wireless connection. Find the field that starts with HWaddr and copy the immediately following field that looks like 01:23:45:67:89:ab. Use that value in the instructions below.
Mac OS X: open a terminal and type ifconfig . Find the result that best matches your connection—a result starting with en1 usually indicates a wireless connection. Find the field that starts with ether: and copy the immediately following field that looks like 01:23:45:67:89:ab. Use that value in the instructions below.
Once you have the MAC address, you can fill it into to your router’s manual DHCP assignment table, as illustrated below. Also choose an IP address and make a note of it for the instructions in the next subsection. After entering this information, click the Add or Save button.

Then reboot your computer to ensure it gets assigned the address you selected and proceed to the Port Forwarding instructions below.
Port Forwarding
For this step, you need to know the local IP address of the computer running Bitcoin Core. You should have this information from configuring the DHCP assignment table in the subsection above.
Login to your router using the same steps described near the top of the DHCP subsection. Look for an option called Port Forwarding, Port Assignment, or anything with “Port” in its name. On the some routers, this option is buried in an Applications & Gaming menu.
The port forwarding settings should allow you to map an external port on your router to the “internal port” of a device on your network as shown in the screenshot below.
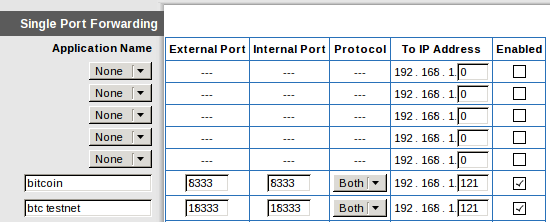
Both the external port and the internal port should be 8333 for Bitcoin. (You may also want to map port 18333 for Bitcoin’s testnet, although this guide does not cover using testnet.) Make sure the IP address you enter is the same one you configured in the previous subsection.
After filling in the details for the mapping, save the entry. You should not need to restart anything. Start Bitcoin Core (if you haven’t already) and follow the Testing Connections instructions to test your connection.
If you still can’t connect and you use a firewall, you probably need to change your firewall settings. See the Firewall section below.
If something else went wrong, it’s probably a problem with your router configuration. Re-read the instructions above to see if you missed anything, search the web for help with “port forwarding”, and ask for help on sites like SuperUser.
We can’t provide direct support, but if you see a way to improve these instructions, please open an issue.
Firewall Configuration
Firewalls block inbound connections. To use Bitcoin, you need to configure your computer’s firewall to allow connections to port 8333. This is usually as easy as starting your firewall configuration software and defining a new rule to allow inbound connections to port 8333. For additional information for Windows, see the links below:
Mac OS X comes with its firewall disabled by default, but if you have enabled it, see the section Allowing Specific Applications from the official Apple guide.
Ubuntu also comes with its firewall disabled by default, but if you have enabled it, see the Ubuntu wiki page for information about adding port forwarding rules.
Once you have allowed inbound connections to port 8333, start Bitcoin Core (if you haven’t already) and follow the Testing Connections instructions to test your connection.
If something else went wrong re-read the DHCP, port forwarding, and firewall instructions above to see if you missed anything, search the web for help with “port forwarding” and “opening firewall ports”, and ask for help on sites like SuperUser.
We can’t provide direct support, but if you see a way to improve these instructions, please open an issue.
Configuration Tuning
This section contains advice about how to change your Bitcoin Core configuration to adapt it to your needs.
There are two ways to change your configuration. The first is to start Bitcoin Core with the options you want. For example, if you want to limit it to using one CPU core for signature verification, you can start Bitcoin Core like this:
Once you’ve decided you like an option, you can add it to the Bitcoin Core configuration file. You can find that file in the following directories:
OSX: $HOME/Library/Application Support/Bitcoin/
To add an option to the configuration file, just remove its leading dash. You may also need to remove any quotation marks you used in your shell. For example, the -par option seen above would look like this in the configuration file:
A user-friendly configuration file generator is available here. If you have any questions about configuring Bitcoin Core, please stop by one of our forums or live chatrooms.
Reduce Storage
It is possible to configure your node to to run in pruned mode in order to reduce storage requirements. This can reduce the disk usage from over 145GB to around 5GB.
Running a node in pruned mode is incompatible with -txindex and -rescan . It also disables the RPC importwallet . Two RPCs that are available and potentially helpful, however, are importprunedfunds and removeprunedfunds .
To enable block pruning set prune=N on the command line or in bitcoin.conf , where N is the number of MiB to allot for raw block and undo data.
A value of 0 disables pruning. The minimal value above 0 is 550 . Your wallet is as secure with high values as it is with low ones. Higher values merely ensure that your node will not shut down upon blockchain reorganizations of more than 2 days - which are unlikely to happen in practice. In future releases, a higher value may also help the network as a whole because stored blocks could be served to other nodes.
Reduce Traffic
Some node operators need to deal with bandwidth caps imposed by their ISPs.
By default, bitcoin-core allows up to 125 connections to different peers, 8 of which are outbound. You can therefore, have at most 117 inbound connections.
The default settings can result in relatively significant traffic consumption.
Ways to reduce traffic:
Maximum Upload Targets
A major component of the traffic is caused by serving historic blocks to other nodes during the initial blocks download phase (syncing up a new node). This option can be specified in MiB per day and is turned off by default. This is not a hard limit; only a threshold to minimize the outbound traffic. When the limit is about to be reached, the uploaded data is cut by no longer serving historic blocks (blocks older than one week). Keep in mind that new nodes require other nodes that are willing to serve historic blocks. The recommended minimum is 144 blocks per day (max. 144MB per day)
Disable listening
Disabling listening will result in fewer nodes connected (remember the maximum of 8 outbound peers). Fewer nodes will result in less traffic usage as you are relaying blocks and transactions to fewer nodes.
Reduce maximum connections
Reducing the maximum connected nodes to a minimum could be desirable if traffic limits are tiny. Keep in mind that bitcoin’s trustless model works best if you are connected to a handful of nodes.
Blocks-only mode
Causes your node to stop requesting and relaying transactions unless they are part of a block and also disables listening as described above.
This reduces your node’s bandwidth to the absolute minimum necessary to stay synchronized with the network, about 150 megabytes incoming data per day and about 1 megabyte of outgoing data per day, but it does mean that your node won’t see incoming transactions until they’ve received at least one confirmation.
You will still be able to send transactions from the built-in wallet or from peers you’ve whitelisted using the -whitelist parameter.
US Search Mobile Web

Welcome to the Yahoo Search forum! We’d love to hear your ideas on how to improve Yahoo Search.
The Yahoo product feedback forum now requires a valid Yahoo ID and password to participate.
You are now required to sign-in using your Yahoo email account in order to provide us with feedback and to submit votes and comments to existing ideas. If you do not have a Yahoo ID or the password to your Yahoo ID, please sign-up for a new account.
If you have a valid Yahoo ID and password, follow these steps if you would like to remove your posts, comments, votes, and/or profile from the Yahoo product feedback forum.
- Vote for an existing idea ( )
- or
- Post a new idea…
- Hot ideas
- Top ideas
- New ideas
- Category
- Status
- My feedback
Improve your services
Your search engine does not find any satisfactory results for searches. It is too weak. Also, the server of bing is often off
I created a yahoo/email account long ago but I lost access to it; can y'all delete all my yahoo/yahoo account except for my newest YaAccount
I want all my lost access yahoo account 'delete'; Requesting supporter for these old account deletion; 'except' my Newest yahoo account this Account don't delete! Because I don't want it interfering my online 'gamble' /games/business/data/ Activity , because the computer/security program might 'scure' my Information and detect theres other account; then secure online activities/ business securing from my suspicion because of my other account existing will make the security program be 'Suspicious' until I'm 'secure'; and if I'm gambling online 'Depositing' then I need those account 'delete' because the insecurity 'Suspicioun' will program the casino game 'Programs' securities' to be 'secure' then it'll be 'unfair' gaming and I'll lose because of the insecurity can be a 'Excuse'. Hope y'all understand my explanation!
I want all my lost access yahoo account 'delete'; Requesting supporter for these old account deletion; 'except' my Newest yahoo account this Account don't delete! Because I don't want it interfering my online 'gamble' /games/business/data/ Activity , because the computer/security program might 'scure' my Information and detect theres other account; then secure online activities/ business securing from my suspicion because of my other account existing will make the security program be 'Suspicious' until I'm 'secure'; and if I'm gambling online 'Depositing' then I need those account 'delete' because the insecurity 'Suspicioun' will program the casino game 'Programs' securities' to be… more
chithidio@Yahoo.com
i dont know what happened but i can not search anything.
Golf handicap tracker, why can't I get to it?
Why do I get redirected on pc and mobile device?
Rahyaftco@yahoo.com
RYAN RAHSAD BELL literally means
Question on a link
In the search for Anaïs Nin, one of the first few links shows a picture of a man. Why? Since Nin is a woman, I can’t figure out why. Can you show some reason for this? Who is he? If you click on the picture a group of pictures of Nin and no mention of that man. Is it an error?
Repair the Yahoo Search App.
Yahoo Search App from the Google Play Store on my Samsung Galaxy S8+ phone stopped working on May 18, 2018.
I went to the Yahoo Troubleshooting page but the article that said to do a certain 8 steps to fix the problem with Yahoo Services not working and how to fix the problem. Of course they didn't work.
I contacted Samsung thru their Samsung Tutor app on my phone. I gave their Technican access to my phone to see if there was a problem with my phone that stopped the Yahoo Search App from working. He went to Yahoo and I signed in so he could try to fix the Yahoo Search App not working. He also used another phone, installed the app from the Google Play Store to see if the app would do any kind of search thru the app. The Yahoo Search App just wasn't working.
I also had At&t try to help me because I have UVERSE for my internet service. My internet was working perfectly. Their Technical Support team member checked the Yahoo Search App and it wouldn't work for him either.
We can go to www.yahoo.com and search for any topic or website. It's just the Yahoo Search App that won't allow anyone to do web searches at all.
I let Google know that the Yahoo Search App installed from their Google Play Store had completely stopped working on May 18, 2018.
I told them that Yahoo has made sure that their Yahoo members can't contact them about anything.
I noticed that right after I accepted the agreement that said Oath had joined with Verizon I started having the problem with the Yahoo Search App.
No matter what I search for or website thru the Yahoo Search App it says the following after I searched for
www.att.com.
WEBPAGE NOT AVAILABLE
This webpage at gttp://r.search.yahoo.com/_ylt=A0geJGq8BbkrgALEMMITE5jylu=X3oDMTEzcTjdWsyBGNvbG8DYmyxBHBvcwMxBHZ0aWQDTkFQUEMwxzEEc2VjA3NylRo=10/Ru=https%3a%2f%2fwww.att.att.com%2f/Rk=2/Es=plkGNRAB61_XKqFjTEN7J8cXA-
could not be loaded because:
net::ERR_CLEARTEXT_NOT_PERMITTED
I tried to search for things like www.homedepot.com. The same thing happened. It would say WEBPAGE NOT AVAILABLE. The only thing that changed were all the upper and lower case letters, numbers and symbols.
Then it would again say
could not be loaded because:
net::ERR_CLEARTEXT_NOT_PERMITTED
This is the same thing that happened when Samsung and At&t tried to do any kind of searches thru the Yahoo Search App.
Yahoo needs to fix the problem with their app.
Yahoo Search App from the Google Play Store on my Samsung Galaxy S8+ phone stopped working on May 18, 2018.
I went to the Yahoo Troubleshooting page but the article that said to do a certain 8 steps to fix the problem with Yahoo Services not working and how to fix the problem. Of course they didn't work.
I contacted Samsung thru their Samsung Tutor app on my phone. I gave their Technican access to my phone to see if there was a problem with my phone that stopped the Yahoo Search App from working. He went to Yahoo and… more
Kid-Friendly Minecraft Server Launches Bitcoin Economy
A multi-player server on the wildly popular video game Minecraft has introduced bitcoin to its world as a way of teaching children about digital currency.
While in-game currencies exist in several different minecraft worlds, using bitcoin means that players can take their money out of the game and use it in the real world too.
The server, PlayMC, features an in-game currency called 'bits' which the company has set at 100,000,000th of a bitcoin (commonly known as a 'satoshi'). The unit was chosen for its ease-of-use, as it represents a whole unit and allows players to be rewarded seemingly on a larger scale.
With additional opportunities for players to spend their bits on classes, items and other additional content within the game, PlayMC says it provides a "safe gaming environment for kids to enjoy and have the opportunity to earn their own money".
Minecraft for the uninitiated
As the third best-selling video game of all time, Minecraft has sold over 60 million copies. Especially popular with younger people, it allows players and game developers to build worlds from 3D blocks not unlike digital Lego.
Everything in the game is based on these blocks, which can either be destroyed or moved and placed to create anything within a player's imagination. It is an open-ended world with a high degree of flexibility as to what is possible, though some elements of the world are consistent across the different games.
Players can play alone or connect to servers like PlayMC, allowing multi-player games and interaction in the online world with thousands of other players.
Plugins allow game creators to determine the nature of play and objectives of the game, which usually involves players acquiring resources in order to build tools and structures, and sometimes fight off enemies.
PlayMC's bitcoin economy
PlayMC's server has plugins that change the main Minecraft game into mini-games, where players either cooperate or fight against each other to win. Each game has different objectives and different ways for players to earn their bits.
A company spokesperson said:
"For example in our game type 'ArcherGames' players fight each other in a last man standing game mode. Each player is rewarded a small amount of Bits for killing other players and if they come in first, second or third they are rewarded with a larger amount of Bits."
As well as awarding bits for standard play actions like kills and wins, PlayMC also allows its players to earn them for winning tournaments and powerups, and in non-game actions like bug reporting, blog post writing, bounties, and acting as server staff.
No parents had yet approached the company for more information on bitcoin but plenty of young players have been actively trying to understand digital currency, the spokesperson said.
Most of the team's time is now spent clearing up misconceptions about bitcoin and providing links that explain bitoin in simple terms.
PlayMC also has an extensive explanation of bitcoin and its in-game 'Bitconomy' on the company website.
E-commerce for kids
PlayMC follows in the footsteps of other bitcoin-oriented Minecraft servers such as BitQuest, though PlayMC is aimed specifically at children.
One of bitcoin's touted advantages is the way it provides access to electronic payments to those under 18. Children generally have restricted access to banks or credit card accounts.
Of course, anyone wishing to turn their bits into fiat currency will still need to go through a bitcoin exchange, which have similar verification requirements to banks. This could actually promote a bitcoin-based economy by engaging users who can't easily escape it.
PlayMC was founded from a partnership between AcroMedia and developer Brandon Gordon, the latter of whom has been involved with Minecraft for five years and bitcoin for three. Given his personal interests, incorporating bitcoin into the game "seemed like a no-brainer," he said.
The server was founded to introduce new levels of reliability to Minecraft, which often have an 'anything goes' reputation and servers come and go with regularity.
It boasts 99.9% uptime and is regularly updated to the latest Minecraft version. Its community is always able to make suggestions and the focus is being as kid-friendly as possible.
The leader in blockchain news, CoinDesk is a media outlet that strives for the highest journalistic standards and abides by a strict set of editorial policies. CoinDesk is an independent operating subsidiary of Digital Currency Group, which invests in cryptocurrencies and blockchain startups.
Bitcoin Mining Hardware Guide

The best Bitcoin mining hardware has evolved dramatically since 2009
At first, miners used their central processing unit (CPU) to mine, but soon this wasn't fast enough and it bogged down the system resources of the host computer. Miners quickly moved on to using the graphical processing unit (GPU) in computer graphics cards because they were able to hash data 50 to 100 times faster and consumed much less power per unit of work.
During the winter of 2011, a new industry sprang up with custom equipment that pushed the performance standards even higher. The first wave of these specialty bitcoin mining devices were easy to use Bitcoin miners were based on field-programmable gate array (FPGA) processors and attached to computers using a convenient USB connection.
FPGA miners used much less power than CPU's or GPU's and made concentrated mining farms possible for the first time.
Today's modern and best bitcoin mining hardware
Application-specific integrated circuit (ASIC) miners have taken over completely. These ASIC machines mine at unprecedented speeds while consuming much less power than FPGA or GPU mining rigs. Several reputable companies have established themselves with excellent products.
Bitcoin Mining Hardware Comparison
Currently, based on (1) price per hash and (2) electrical efficiency the best Bitcoin miner options are:
AntMiner S7
AntMiner S9
Best Bitcoin Mining Hardware

Two major factors go into determining the best bitcoin mining hardware: (1) cost and (2) electricity efficiency.
Bitcoin mining is difficult to do profitably but if you try then this Bitcoin miner is probably a good shot.
ASIC Bitcoin Mining Hardware
Application-specific integrated circuit chips (ASICs) are bitcoin mining hardware created solely to solve Bitcoin blocks. They have only minimal requirements for other normal computer applications. Consequently, ASIC Bitcoin mining systems can solve Bitcoin blocks much quicker and use less less electricity or power than older bitcoin mining hardware like CPUs, GPUs or FPGAs.
As Bitcoin mining increases in popularity and the Bitcoin price rises so does the value of ASIC Bitcoin mining hardware. As more Bitcoin mining hardware is deployed to secure the Bitcoin network the Bitcoin difficulty rises. This makes it impossible to profitably compete without a Bitcoin ASIC system. Furthermore, Bitcoin ASIC technology keeps getting faster, more efficient and more productive so it keeps pushing the limits of what makes the best Bitcoin mining hardware.
Some models of Bitcoin miners include Antminer S5, Antminer U3, ASICMiner BE Tube, ASICMiner BE Prisma, Avalon 2, Avalon 3, BTC Garden AM-V1 616 GH/s, VMC PLATINUM 6 MODULE, and USB miners.
AntMiner U2
BPMC Red Fury USB
GekkoScience
Best Bitcoin Cloud Mining Services
For those not interested in operating the actual hardware then they can purchase Bitcoin cloud mining contracts. Being listed in this section is NOT an endorsement of these services. There have been a tremendous amount of Bitcoin cloud mining scams.
Hashflare Review: Hashflare offers SHA-256 mining contracts and more profitable SHA-256 coins can be mined while automatic payouts are still in BTC. Customers must purchase at least 10 GH/s.
Genesis Mining Review: Genesis Mining is the largest Bitcoin and scrypt cloud mining provider. Genesis Mining offers three Bitcoin cloud mining plans that are reasonably priced. Zcash mining contracts are also available.
Hashing 24 Review: Hashing24 has been involved with Bitcoin mining since 2012. They have facilities in Iceland and Georgia. They use modern ASIC chips from BitFury deliver the maximum performance and efficiency possible.
Minex Review: Minex is an innovative aggregator of blockchain projects presented in an economic simulation game format. Users purchase Cloudpacks which can then be used to build an index from pre-picked sets of cloud mining farms, lotteries, casinos, real-world markets and much more.
Minergate Review: Offers both pool and merged mining and cloud mining services for Bitcoin.
Hashnest Review: Hashnest is operated by Bitmain, the producer of the Antminer line of Bitcoin miners. HashNest currently has over 600 Antminer S7s for rent. You can view the most up-to-date pricing and availability on Hashnest's website. At the time of writing one Antminer S7's hash rate can be rented for $1,200.
Bitcoin Cloud Mining Review: Currently all Bitcoin Cloud Mining contracts are sold out.
NiceHash Review: NiceHash is unique in that it uses an orderbook to match mining contract buyers and sellers. Check its website for up-to-date prices.
Eobot Review: Start cloud mining Bitcoin with as little as $10. Eobot claims customers can break even in 14 months.
MineOnCloud Review: MineOnCloud currently has about 35 TH/s of mining equipment for rent in the cloud. Some miners available for rent include AntMiner S4s and S5s.
Welcome to the first Minecraft server denominated in cryptocurrency

The currency on this server are the Bits. A bit is a fraction of a Bitcoin (1/1000000) that you can obtain by killing monsters, trading with users or transfering from an outside wallet. All of it is stored on a standard Bitcoin wallet on the Blockchain.

Level System
The level system is different that in a vanilla server. You gather experience from killing mobs and is never lost. Your XP allows you to become stronger and gain extra health. Mobs also have levels and special abilities specially in dungeons and dangerous areas.

The server is made having the concept of fun in it. Bots and AFK farming is strictly banned, and there are hidden bosses and dungeons.
Latest Posts
- Jan 5, 2018
BitQuest supports Dogecoin. Such currency, very server!
Hi fellow BitQuesters!! Dogecoin is a notable cryptocurrency. It’s a clone of an old version the Bitcoin network, with one difference: it inflates at a rapid pace with no limit. Since Bitcoin entered.
BitQuest 2
The new BitQuest, version 2.0 is finished. The goal of this release was to make the integration of Bitcoin into Minecraft simple, open, and hackable. I am sure this is far from perfect.
Support BitQuest, your donations are appreciated!
Bitcoin Profitability Calculator – BTC Mining Profit Calculator
Enter your set up information in the form below. Do not enter commas, only dots for decimal separator.
Nothing guaranteed, of course this is only a rough estimate!
Do not enter commas, only dots for decimal separator. You can also calculate rented mining by setting “Power consumption” to 0 and “Cost of mining hardware” to the rent per time frame. Default values are for a system of four 6870s.
Estimate Strategy
Extrapolating bitcoin difficulty or price is pure voodoo. It is much easier to predict the relationship of the two parameters in form of the Mining Factor. The Mining Factor 100 is the value in USD of the bitcoins you can generate if you let a 100MHash/s miner run for 24 hours. If the Mining Factor 100 rises above $2 or so everybody buys mining equipment and thus increases difficulty. If it falls people will stop mining eventually. The estimate starts with the current Mining Factor and decreases it exponentially such that the decrease accounts for the factor decline per year. Please note that a profit/loss by holding the coins is not accounted for in this estimate.

Комментариев нет:
Отправить комментарий