ASRock H81 Pro BTC LGA 1150 Intel H81 HDMI SATA 6Gb/s USB 3.0 ATX Intel Motherboard
Sold and Shipped by Newegg
- Intel H81
- 4th generation Intel Core i7/i5/i3/Xeon/Pentium/Celeron (LGA 1150)
- DDR3 1600/1333/1066

- Overview
- Specifications
- Warranty & Returns
- Reviews
- Q&A
H81 Pro BTC

Bitcoin Mining
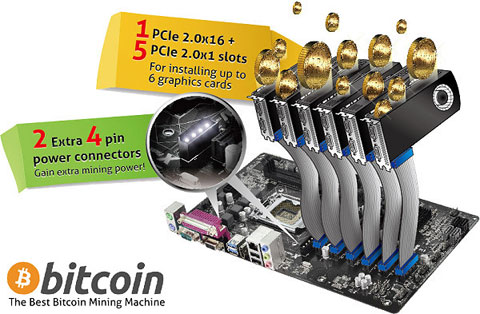
This motherboard is specifically designed for mining Bitcoins, the revolutionary digital crypto-currency that may be used anywhere in the world. The abundant onboard PCIe slots guarantee fast GPU mining, while the additional power connectors provide advanced system stability while mining.
4 Power Phase Design
Compared to competitors' 3 Power Phase designs on their motherboards, ASRock adds a finishing touch by implementing a 4 Power Phase design and sturdy components for delivering smoother power to the CPU, thus enhancing the motherboard's performance and stability at lower temperatures.
All Solid Capacitor Design
ASRock is determined to use high-quality materials to build the best motherboards, that's why all the capacitors on this motherboard are built with 100% solid capacitors. These solid capacitors bring long lasting durability and ultra stable performance.

Digi Power
A-Tuning
A-Tuning is ASRock's multipurpose software suite with a new interface, more new features, and improved utilities, including EZ OC, Auto Tuning, XFast 555, OC Tweaker, System Browser, Live Update, Tech Service, and a whole lot more!


XFast RAM
ASRock XFast RAM fully utilizes the memory space that cannot be used under Windows® 32-bit operating systems. It shortens the loading time of previously visited websites, making web surfing faster than ever. And it also boosts the speed of Adobe Photoshop five times faster. Another advantage of ASRock XFast RAM is that it reduces the frequency of accessing your SSDs or HDDs in order to extend their lifespan.


XFast LAN
When Internet Explorer loads very slowly for no clear reason, it's usually due to inefficient management. ASRock is rolling out super efficient web management in the motherboard industry. XFast LAN is a convenient tool that controls internet related applications easily and efficiently. Creating a perfect Internet environment, all you need is a smart manager. ASRock XFast LAN allows you to enjoy more speed, easier multitasking, an enhanced multimedia experience, and more – all without weighing you down.
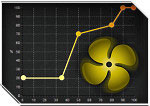
Fan-Tastic Tuning
Configure different fan speeds for respective temperatures using the graph. The fans will automatically shift to the next speed level when the assigned temperature is met.

USB Key
In a world where time is money, why waste precious time everyday typing usernames to log in to Windows? Why should we even bother memorizing those foot-long passwords? Nobody has time for that! Just plug in the USB Key and let your computer log in to windows - automatically.
UEFI Tech Service
Contact ASRock Tech Service by sending a support request from the UEFI setup utility if you are having trouble with your personal computer. Users may try to choose the category of the issue they have encountered, describe the problem in detail, and then attach an optional picture or log file for our technical support team.

OMG
Limit and control your children's time spent on the internet. ASRock Online Management Guard (OMG) technology allows you to establish an internet curfew or restrict internet access at specified times. Administrators are able to schedule the starting and ending hours of internet access granted to other users.


Dehumidifier
Dampness kills most electronics, so it's a better idea to keep your personal computer dry. Now users may prevent motherboard damages due to dampness by enabling Dehumidifier. When it is enabled, the computer will power on automatically to dehumidify the system after entering S4/S5 state.
Easy Driver Installer
For users that don't have an optical disk drive to install the drivers from our support CD, Easy Driver Installer is a handy tool in the UEFI that installs the LAN driver to your system via a USB storage device, then downloads and installs the other required drivers automatically through the internet. No CD or optical disk drive required!

Fast Boot
With ASRock's exclusive Fast Boot technology, it takes less than 1.5 seconds* to logon to Windows® 8 from a cold boot. No more waiting! The speedy boot will completely change your user experience and behavior.
*The boot time may vary with a different configuration.
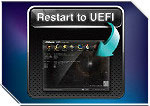
Restart to UEFI
Fast Boot is so fast that it is impossible for users to enter the UEFI setup utility during POST. Therefore, ASRock Restart to UEFI technology allows users to easily enter the UEFI setup utility automatically when turning on the PC next time. It is designed for those who constantly need to enter the UEFI setup utility.

HDMI™ - High-Definition Multimedia Interface
This motherboard supports HDMI™ - the High-Definition Multimedia Interface - which is an interface standard for transferring uncompressed video data and delivering multi-channel audio through a single cable. Both video and audio data signals transferred through the HDMI™ interface are digital without being converted into analog, therefore it delivers the richest pictures and the most realistic sounds.
Learn more about the ASRock H81 Pro BTC
Supported CPU
Onboard Video
Expansion Slots
Storage Devices
Onboard Audio
Onboard LAN
Rear Panel Ports
Internal I/O Connectors
Physical Spec
- Warranty
- Limited Warranty period (parts): 1 year
- Limited Warranty period (labor): 1 year
- Read full details
- Manufacturer Contact Info
- Manufacturer Product Page |
- Website: http://www.asrock.com/ |
- Support Phone: 1-909-590-8308
- Support Email: support@asrockamerica.com |
- Support Website |
- View other products from ASRock
- Return Policies
- Return for refund within: 30 days
- Return for replacement within: 30 days
- This item is covered by Newegg.com's Standard Return Policy.
Pros: 6 PCI Slots, basic everything, shallow board so not wide.
Cons: Nothing I can see other than 2 molex connections on board
Other Thoughts: I have bought well over 50 of these and have not ever had 1 of them fail. Not sure what people are doing to them or if they just fixed their QC issues. MAKE SURE YOU PLUG IN BOTH MOLEX PLUGS ON BOARD.
Pros: I was able to run 3 GPUs from this board, running at 100% 24/7 for several months with 0 issues.
Cons: Not entirely the board's fault, but the molex plug for extra power to the PCI-E slots came loose one day so I tried to secure it back on while the machine was running. this lead to a capacitor blowing up and putting my rig out of service (thankfully didn't short anything)
Other Thoughts: I wish there was a warning to not plug in the molex power cable while the machine was running, but you really shouldn't fidget with a running computer in the first place.
Pros: Great board. Just plain WORKS with 6 GPUs, which is a great time saver.
Cons: N/A
Pros: battery for motherbroad dead
Cons: battery for motherbroad dead
Other Thoughts: battery for motherbroad dead
Pros: Cheap, everything you need to get started. No frills. Low overhead. Compact.
Cons: Bought three of these so far 1 is DOA another is working fine and a third is TBD. The PCB is very flimsy and fragile just the simple act of installing an ATX cable makes it bend and creek. I've built at least 500 PCs in my time and I usually work with premium hardware and the sounds this thing makes just makes me cringe.
Other Thoughts: Bought these when i was in the states didn't test them out and now im abroad with a dead board in hand. Its going to be an expensive cheap board.
Pros: Does what the job, been running for a day or so.
Cons: Nothing so far!
Pros: I was very scared to order this product after reading reviews, but I ordered 4 of them anyway and to my surprise they all worked! Make sure you plug in the extra power to the board it asks for. Solid, been mining like a champ for 5 days now. I like it because you can put 6 cards on it.
Cons: none that I can see
Other Thoughts: Yes i would recomend
Pros: I ordered 2-3 of these boards last week, I got one of them to work, but then it died also. It will only handle up to 4 max GPUs so you are better off getting a board that can handle 4 GPUs and spending the extra money on an I5. This is ridiculous that newegg has let this gone one for so long. Either pull the board, or make it work.
Cons: EVERYTHING ESPECIALLY NO WIFI AND SERIAL MOUSE AND KEYBOARD
Other Thoughts: I'm done, I tried to promote this board on youtube, I'm sorry I ever did.
Your request will be processed within the next 24 hours.
Please add "promo@e.newegg.com" to your address book to ensure delivery.


This item is eligible for Newegg Premier benefits. Are you a Newegg Premier Member? If not, sign up today and get:
- Free 3-day-or-less shipping on eligible items, discounts on 2- or 1-day delivery
- Free shipping on returns using labels available on our website
- No re-stocking fees
Condition Guidelines
The following guidelines apply to all product categories unless otherwise indicated within specific categories.
- New : This means the product will ship as received by the manufacturer, sealed, with all advertised components, and with the manufacturer warranty.
- Refurbished : This means the product was tested and repaired as required to meet the standards of the refurbisher, which may or may not be the original manufacturer. Any exceptions to the condition of the item outside the manufacturer’s information should be provided in the listing, up to and including warranty details.
- Open Box : Newegg only guarantees your receipt of the Open Box product with the purchase of this item. Any accessories MAY OR MAY NOT be included. Newegg will NOT send you any missing accessories, even if it is required to use all of the item’s functions.Open Box items usually do not come with manufacturer or vendor warranty or technical support. However, warranty support may be available if an item was never registered by a previous owner. Please contact the manufacturer to check.
- Used - Like New : This means that the product has been opened, possibly used but is in perfect condition with no signs of cosmetic or functional defect. Product may includes warranty, and accessories found with the original product. Product may or may not be in the original packaging. Returned items with minor packaging defects fall under this category.
- Used - Very Good : This means that the product has been opened, may show slight signs of use and cosmetic blemish, and may be missing minor accessories, but remain in excellent condition. Product does not come with warranty unless stated otherwise in product description.
- Used - Good : This means that the product has been used, may show clear signs of use and may be missing minor accessories, but remain in good condition. Product does not come with warranty unless stated otherwise in product description.
- Used - Acceptable : This means that the product shows clear signs of use, cosmetic defect, and may be missing minor accessories and manual, but remain in working condition. Product does not come with warranty unless stated otherwise in product description. Functionality issues beyond signs of use should be disclosed in product description.
Some manufacturers place restrictions on how details of their products may be communicated.
Some manufacturers place restrictions on how details of their products may be communicated.
Some manufacturers place restrictions on how details of their products may be communicated.
ASRock H81 Pro BTC R2.0 LGA 1150 R2 Motherboard

Новые: самая низкая цена
С самой низкой ценой, совершенно новый, неиспользованный, неоткрытый, неповрежденный товар в оригинальной упаковке (если товар поставляется в упаковке). Упаковка должна быть такой же, как упаковка этого товара в розничных магазинах, за искл��чением тех случаев, когда товар является изделием ручной работы или был упакован производителем в упаковку не для розничной продажи, например в коробку без маркировки или в пластиковый пакет. См. подробные сведения с дополнительным описанием товара
7 821,75 руб

Подержанные: самая низкая цена
Товар с самой низкой ценой, который уже использовали или носили ранее. Товар может иметь признаки легкого износа, но находится в полном эксплуатационном состоянии и функционирует должным образом. Это может быть выставочный образец или товар, бывший в употреблении и возвращенный в магазин. См. подробные характеристики товара с описанием его недостатков.
3 116,24 руб

Аукцион: подержанный
Аукцион по этому товару, который завершится раньше всего. Включает товары в любом состоянии, кроме «Для разборки на запчасти или в нерабочем состоянии».
Все объявления по этому товару

товар 1 Brand new ASRock H81 PRO BTC R2.0 Motherboard DDR3 LGA 1150 - Совершенно новый Brand new ASRock H81 PRO BTC R2.0 Motherboard DDR3 LGA 1150
товар 2 ASRock H81 PRO BTC R2.0 1150 Cryptocurrency ETH BTC 6x GPU Mining Motherboard - Совершенно новый ASRock H81 PRO BTC R2.0 1150 Cryptocurrency ETH BTC 6x GPU Mining Motherboard
товар 3 New ASRock H81 PRO BTC R2.0 Motherboard Intel H81 LGA 1150 DDR3 - Совершенно новый New ASRock H81 PRO BTC R2.0 Motherboard Intel H81 LGA 1150 DDR3
товар 4 Asrock H81 Pro BTC R2.0 LGA1150 - GPU mining motherboard - New In Box - Подержанный Asrock H81 Pro BTC R2.0 LGA1150 - GPU mining motherboard - New In Box
товар 5 ASRock H81 Pro BTC R2.0 LGA 1150 R2 Motherboard USA - Совершенно новый ASRock H81 Pro BTC R2.0 LGA 1150 R2 Motherboard USA
товар 6 ASRock H81 PRO BTC R2.0 LGA 1150 Motherboard - Used - Подержанный ASRock H81 PRO BTC R2.0 LGA 1150 Motherboard - Used
товар 7 ASRock H81 Pro BTC R2.0 LGA 1150 R2 Motherboard 6 GPU - Совершенно новый ASRock H81 Pro BTC R2.0 LGA 1150 R2 Motherboard 6 GPU
товар 8 ASRock H81 Pro BTC R2.0 and Intel® G1840 bitcoin mining combo - Подержанный ASRock H81 Pro BTC R2.0 and Intel® G1840 bitcoin mining combo
Об этом товаре
Product Information
- With a high-density glass fabric, multi-GPU support, and integrated audio and video chipset, the ASRock H81 Pro BTC R2.0 mining motherboard can hold up to 6 graphics cards that work simultaneously. Designed for the Intel LGA1150 CPU, it features turbo boost technology and input/output ports for HDMI, Ethernet, SATA, parallel IEEE 1284, USB 2.0, USB 3.0, and serial RS-232. It also comes with several expansion slots.
Product Identifiers
Product Key Features
Оценки и отзывы
Хорошее качество работы
Отличается быстротой работы
Наиболее подходящие отзывы
A good replacement
The BIOS developed issues with the MSI board I had, and t . his AsRock board is its replacement. It's a GPU mining board, but wasn't bought to do that job, but simply to be a stable replacement for its predecessor board. It's stable and fast, and is a good value, another reason I got it. Its extra PCIe lanes will possibly be used for RAIDS down the road. I would like to add that I have decided just to run one GPU, and it's worth two, and use the other PCI e slots for other types of devices that give me more nUSB and SATA ports. Now my system is just about perfect.
Проверенная покупка: да | Состояние товара: Новые
On paper specs are outstanding.
Has everything you want for a 6 Graphics Car . d mining system. For no reason after 2 days the x4 PCIe slot above the 16x slot stopped working. Graphics card stops responding, found this out after a few hours of troubleshooting everything checked out, Graphics Card, Riser, Correct Power supplied to all parts. This issue is most likely due to the board being an older system H81 based on the Haswell Generation. I have a H110 and B250 (Skylake and Kabe Lake) BTC boards and they are running strong.
Проверенная покупка: да | Состояние товара: Подержанные
just plug and play, excellent mining board for 6 cards!
Проверенная покупка: да | Состояние товара: Новые
This is a great product easy hook-up and great design for mi . ning.
Проверенная покупка: да | Состояние товара: Новые
BEST Ethereum Mining Motherboard
After setting up a couple of other motherbo . ards to try to get just 5 cards working, the ASRock H81 Pro was so nice to work with. If you can get it for under $200 it's definitely worth it, just for t I didn't have to fight it to get all 6 cards working, it just worked. I would definitely recommend getting this motherboard for your ETH mining rig. I have mine setup with an RX 470, RX 570 and some RX 480's. Everything has been running smoothly.
ASRock H81 PRO BTC R2.0 LGA 1150 Intel H81 HDMI SATA 6Gb/s USB 3.0 ATX Intel Cryptocurrency Mining Motherboard
Ships from United States.
Sold and Shipped by Newegg
- Intel H81
- Xeon / Core i7/i5/i3 / Pentium / Celeron (LGA1150)
- DDR3 1600/ 1333/ 1066
- Made for bitcoin mining
- Made for Cryptocurrency mining

- Overview
- Specifications
- Warranty & Returns
- Reviews
- Q&A
The ASRock H81 PRO BTC R2.0 offers a stable and reliable platform to build the ultimate Intel Haswell PC. With high density glass fabric PCB, ASRock full spike protection, Digi power and solid capacitor design, your new build can operate stably, reliably and efficiently.
High Density Glass Fabric PCB design that reduces the gaps between the PCB layers to protect the motherboard against electrical shorts caused by humidity.

Unlike traditional motherboards that use analog power, this motherboard uses a next generation digital PWM (Pulse-Width Modulation) design, which provides CPU Vcore voltage more efficiently and smoothly, so that the stability and lifespan of the motherboard is greatly enhanced.
ASRock applied solid capacitors on this motherboard. With these solid caps, this motherboard is allowed to perform more stably and ensure longer lifetime.

Some sensitive digital components on the motherboard are vulnerable to power surges. The excessive current may cause your system to malfunction immediately. ASRock Full Spike Protection includes various technologies to prevent your motherboard’s components from being damaged by these unexpected voltage spikes.

ASRock Live Update & APP Shop is designed for your convenience. Various apps and support software are supported for users to download. You can also easily optimize your system and keep your motherboard up to date with ASRock Live Update & APP Shop.
Learn more about the ASRock H81 PRO BTC R2.0
Supported CPU
Onboard Video
Expansion Slots
Storage Devices
Onboard Audio
Onboard LAN
Rear Panel Ports
Internal I/O Connectors
Physical Spec
- Warranty
- Limited Warranty period (parts): 1 year
- Limited Warranty period (labor): 1 year
- Read full details
- Manufacturer Contact Info
- Manufacturer Product Page |
- Website: http://www.asrock.com/ |
- Support Phone: 1-909-590-8308
- Support Email: support@asrockamerica.com |
- Support Website |
- View other products from ASRock
- Return Policies
- Return for refund within: 30 days
- Return for replacement within: 30 days
- This item is covered by Newegg.com's Standard Return Policy.
Pros: Relatively easy to set up -- and then disassemble
Board ran flawlessly for 5 days.
Spent some quality time spec'ing out replacement board and cpu's
Cons: After the 5th day it died -- intermittent PCI slots
Swear jar got lots of contributions
Other Thoughts: I foolishly bought this product as I had another identical board that died -- thought it was a fluke and would save some money reusing 1150 CPU and ddr3 ram.
Pros: Plug and play, everything works!
Cons: After adding multiple cards you get a warning page on bootup about plugging in both 4 pin power plugs for pcie's.
Other Thoughts: I assumed something was wrong but after confirming everything was plugged in correctly, continued the boot up process and everything has been working fine. I started with one 1080 ti and am now running 2 1080tis and 2 1030s. 6 months 24/7. I still get the warning page on boot.
Pros: It shipped in a box for less than three digits.
Cons: Board super warped. One bad ram slot. Ridiculous location for side 4 pin molex connectors that is needed to drive the PCIe 1x slots.
Other Thoughts: Ordered knowing either it was going to work or not. After several hours and many reboots later, got it working and stable with this config;
- Win10 x64 1709, 4gb of ram due to one bad memory slot, and 760w modular PSU
- Both 4pin onboard molex connected
- Reset cmos but kept factory firmware using only onboard video
- Disabled the onboard sound and network since using usb wifi anyway. It appears there is a PCI contention within device manager once the video cards are plugged in.
- Then plugged the PCIe 1x in the slot closest to cpu, then skipped one, and then skipped the next one. Total of 2 1070 and one 1060.
Pros: No Pros, None to report
Cons: Everything is a CON the board is worthless still without a working board since Jan 3rd and thanks to Chinese new year. New egg supervisor involved does has not helped now going on 2 months paid for other products and do not have a working MB yet
Other Thoughts: Buy from a different site customer service has been nothing at best, similar MB on other major sites and price used is same as the price here. The boards here are supposed to be new but have been 3 for 3 DOA
Pros: None.
Cons: Can't run more then 1 gpu . even with the most updated firmware/bio's
No other pci slot work. board has more flex then what I would like.
poor quality & not enough memory slots. maxed out at 16gig.
Other Thoughts: I've owned for 2 months & can't return it. not worth the buy. spend a little bit more money for a better board.
Pros: The only pro is the price. Cheap, so when it fails you're not out much.
Cons: Only supports one RX 580. This is NOT a multi-GPU motherboard.
Pros: ninguno
Cons: viene sin el ventilador de enfriamiento hay que invertir un dinero extra para completar su funcionamiento
Pros: are there any pro's to a board that is done for after 6 months?
Cons: lost revenue thanks to this board ROI is getting more and more distant thanks to this board being RMA.
Other Thoughts: I recommend staying away from this product
- Add to Compare
- Add to Wish List
Best Sellers
2,514 (89% Positive)
1,517 (89% Positive)
Your request will be processed within the next 24 hours.
Please add "promo@e.newegg.com" to your address book to ensure delivery.
This item is eligible for Newegg Premier benefits. Are you a Newegg Premier Member? If not, sign up today and get:
- Free 3-day-or-less shipping on eligible items, discounts on 2- or 1-day delivery
- Free shipping on returns using labels available on our website
- No re-stocking fees
Condition Guidelines
The following guidelines apply to all product categories unless otherwise indicated within specific categories.
- New : This means the product will ship as received by the manufacturer, sealed, with all advertised components, and with the manufacturer warranty.
- Refurbished : This means the product was tested and repaired as required to meet the standards of the refurbisher, which may or may not be the original manufacturer. Any exceptions to the condition of the item outside the manufacturer’s information should be provided in the listing, up to and including warranty details.
- Open Box : Newegg only guarantees your receipt of the Open Box product with the purchase of this item. Any accessories MAY OR MAY NOT be included. Newegg will NOT send you any missing accessories, even if it is required to use all of the item’s functions.Open Box items usually do not come with manufacturer or vendor warranty or technical support. However, warranty support may be available if an item was never registered by a previous owner. Please contact the manufacturer to check.
- Used - Like New : This means that the product has been opened, possibly used but is in perfect condition with no signs of cosmetic or functional defect. Product may includes warranty, and accessories found with the original product. Product may or may not be in the original packaging. Returned items with minor packaging defects fall under this category.
- Used - Very Good : This means that the product has been opened, may show slight signs of use and cosmetic blemish, and may be missing minor accessories, but remain in excellent condition. Product does not come with warranty unless stated otherwise in product description.
- Used - Good : This means that the product has been used, may show clear signs of use and may be missing minor accessories, but remain in good condition. Product does not come with warranty unless stated otherwise in product description.
- Used - Acceptable : This means that the product shows clear signs of use, cosmetic defect, and may be missing minor accessories and manual, but remain in working condition. Product does not come with warranty unless stated otherwise in product description. Functionality issues beyond signs of use should be disclosed in product description.
Some manufacturers place restrictions on how details of their products may be communicated.
Some manufacturers place restrictions on how details of their products may be communicated.
Some manufacturers place restrictions on how details of their products may be communicated.
US Search Mobile Web

Welcome to the Yahoo Search forum! We’d love to hear your ideas on how to improve Yahoo Search.
The Yahoo product feedback forum now requires a valid Yahoo ID and password to participate.
You are now required to sign-in using your Yahoo email account in order to provide us with feedback and to submit votes and comments to existing ideas. If you do not have a Yahoo ID or the password to your Yahoo ID, please sign-up for a new account.
If you have a valid Yahoo ID and password, follow these steps if you would like to remove your posts, comments, votes, and/or profile from the Yahoo product feedback forum.
- Vote for an existing idea ( )
- or
- Post a new idea…
- Hot ideas
- Top ideas
- New ideas
- Category
- Status
- My feedback
Improve your services
Your search engine does not find any satisfactory results for searches. It is too weak. Also, the server of bing is often off
I created a yahoo/email account long ago but I lost access to it; can y'all delete all my yahoo/yahoo account except for my newest YaAccount
I want all my lost access yahoo account 'delete'; Requesting supporter for these old account deletion; 'except' my Newest yahoo account this Account don't delete! Because I don't want it interfering my online 'gamble' /games/business/data/ Activity , because the computer/security program might 'scure' my Information and detect theres other account; then secure online activities/ business securing from my suspicion because of my other account existing will make the security program be 'Suspicious' until I'm 'secure'; and if I'm gambling online 'Depositing' then I need those account 'delete' because the insecurity 'Suspicioun' will program the casino game 'Programs' securities' to be 'secure' then it'll be 'unfair' gaming and I'll lose because of the insecurity can be a 'Excuse'. Hope y'all understand my explanation!
I want all my lost access yahoo account 'delete'; Requesting supporter for these old account deletion; 'except' my Newest yahoo account this Account don't delete! Because I don't want it interfering my online 'gamble' /games/business/data/ Activity , because the computer/security program might 'scure' my Information and detect theres other account; then secure online activities/ business securing from my suspicion because of my other account existing will make the security program be 'Suspicious' until I'm 'secure'; and if I'm gambling online 'Depositing' then I need those account 'delete' because the insecurity 'Suspicioun' will program the casino game 'Programs' securities' to be… more
chithidio@Yahoo.com
i dont know what happened but i can not search anything.
Golf handicap tracker, why can't I get to it?
Why do I get redirected on pc and mobile device?
Rahyaftco@yahoo.com
RYAN RAHSAD BELL literally means
Question on a link
In the search for Anaïs Nin, one of the first few links shows a picture of a man. Why? Since Nin is a woman, I can’t figure out why. Can you show some reason for this? Who is he? If you click on the picture a group of pictures of Nin and no mention of that man. Is it an error?
Repair the Yahoo Search App.
Yahoo Search App from the Google Play Store on my Samsung Galaxy S8+ phone stopped working on May 18, 2018.
I went to the Yahoo Troubleshooting page but the article that said to do a certain 8 steps to fix the problem with Yahoo Services not working and how to fix the problem. Of course they didn't work.
I contacted Samsung thru their Samsung Tutor app on my phone. I gave their Technican access to my phone to see if there was a problem with my phone that stopped the Yahoo Search App from working. He went to Yahoo and I signed in so he could try to fix the Yahoo Search App not working. He also used another phone, installed the app from the Google Play Store to see if the app would do any kind of search thru the app. The Yahoo Search App just wasn't working.
I also had At&t try to help me because I have UVERSE for my internet service. My internet was working perfectly. Their Technical Support team member checked the Yahoo Search App and it wouldn't work for him either.
We can go to www.yahoo.com and search for any topic or website. It's just the Yahoo Search App that won't allow anyone to do web searches at all.
I let Google know that the Yahoo Search App installed from their Google Play Store had completely stopped working on May 18, 2018.
I told them that Yahoo has made sure that their Yahoo members can't contact them about anything.
I noticed that right after I accepted the agreement that said Oath had joined with Verizon I started having the problem with the Yahoo Search App.
No matter what I search for or website thru the Yahoo Search App it says the following after I searched for
www.att.com.
WEBPAGE NOT AVAILABLE
This webpage at gttp://r.search.yahoo.com/_ylt=A0geJGq8BbkrgALEMMITE5jylu=X3oDMTEzcTjdWsyBGNvbG8DYmyxBHBvcwMxBHZ0aWQDTkFQUEMwxzEEc2VjA3NylRo=10/Ru=https%3a%2f%2fwww.att.att.com%2f/Rk=2/Es=plkGNRAB61_XKqFjTEN7J8cXA-
could not be loaded because:
net::ERR_CLEARTEXT_NOT_PERMITTED
I tried to search for things like www.homedepot.com. The same thing happened. It would say WEBPAGE NOT AVAILABLE. The only thing that changed were all the upper and lower case letters, numbers and symbols.
Then it would again say
could not be loaded because:
net::ERR_CLEARTEXT_NOT_PERMITTED
This is the same thing that happened when Samsung and At&t tried to do any kind of searches thru the Yahoo Search App.
Yahoo needs to fix the problem with their app.
Yahoo Search App from the Google Play Store on my Samsung Galaxy S8+ phone stopped working on May 18, 2018.
I went to the Yahoo Troubleshooting page but the article that said to do a certain 8 steps to fix the problem with Yahoo Services not working and how to fix the problem. Of course they didn't work.
I contacted Samsung thru their Samsung Tutor app on my phone. I gave their Technican access to my phone to see if there was a problem with my phone that stopped the Yahoo Search App from working. He went to Yahoo and… more
ASRock H81 Pro BTC Manual

Also See for ASRock H81 Pro BTC

Related Manuals for ASRock H81 Pro BTC
Summary of Contents for ASRock H81 Pro BTC
Page 1: Copyright Notice
(including damages for loss of proits, loss of business, loss of data, interruption of business and the like), even if ASRock has been advised of the possibility of such damages arising from any defect or error in the documentation or product.
Page 3: Motherboard Layout
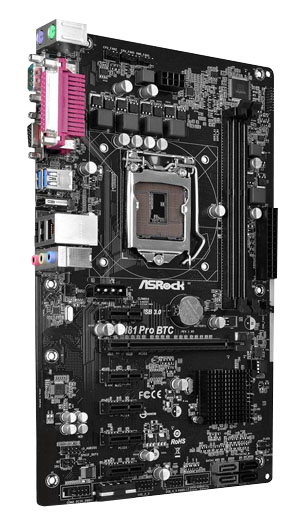
H81 Pro BTC Motherboard Layout CPU_FAN2 CPU_FAN1 PWR_FAN1 TPMS1 ATX12V1 USB 3.0 T: USB0 B: USB1 HDMI1 USB 2.0 Top: T: USB0 RJ-45 B: USB1 SLI/XFIRE_PWR2 CHA_FAN1 CLRCMOS1 CMOS USB 3.0 PCIE1 Battery H81 Pro BTC PCIE2 32Mb PCIE3 BIOS.
No. Description CPU Fan Connector (CPU_FAN2) CPU Fan Connector (CPU_FAN1) Power Fan Connector (PWR_FAN1) ATX 12V Power Connector (ATX12V1) 2 x 240-pin DDR3 DIMM Slots (DDR3_A1, DDR3_B1) TPM Header (TPMS1) ATX Power Connector (ATXPWR1) Chassis Fan Connector (CHA_FAN1) Power LED Header (PLED1) Chassis Speaker Header (SPEAKER1) SATA2 Connector (SATA2_0) SATA3 Connector (SATA3_0)
H81 Pro BTC I/O Panel No. Description No. Description PS/2 Mouse Port Front Speaker (Lime) Parallel Port Microphone (Pink) USB 3.0 Ports (USB3_01) USB 2.0 Ports (USB_01) HDMI Port D-Sub Port LAN RJ-45 Port* COM Port Line In (Light Blue) PS/2 Keyboard Port * here are two LEDs on each LAN port.
Page 6: Chapter 1 Introduction, Package Contents
ASRock’s website without further notice. If you require technical support related to this motherboard, please visit our website for speciic information about the model you are using. You may ind the latest VGA cards and CPU support list on ASRock’s website as well. ASRock website http://www.asrock.com.
H81 Pro BTC 1.2 Speciications • ATX Form Factor Platform • All Solid Capacitor design • Supports 4 Generation Intel® Core i7 / i5 / i3 / Xeon® / Pentium® / Celeron® in LGA1150 Package • Digi Power design • 4 Power Phase design • Supports Intel®.
• Supports Auto Lip Sync, Deep Color (12bpc), xvYCC and HBR (High Bit Rate Audio) with HDMI Port (Compliant HDMI monitor is required) • Supports HDCP with HDMI Port • Supports Full HD 1080p Blu-ray (BD) playback with HDMI Port • 5.1 CH HD Audio (Realtek ALC662 Audio Codec) Audio • PCIE x1 Gigabit LAN 10/100/1000 Mb/s.
• Microsot® Windows® 8.1 32-bit / 8.1 64-bit / 8 32-bit / 8 64- bit / 7 32-bit / 7 64-bit • FCC, CE, WHQL Certiica- • ErP/EuP ready (ErP/EuP ready power supply is required) tions * For detailed product information, please visit our website: http://www.asrock.com.
1. Due to limitation, the actual memory size may be less than 4GB for the reserva- tion for system usage under Windows® 32-bit operating systems. Windows® 64-bit operating systems do not have such limitations. You can use ASRock XFast RAM to utilize the memory that Windows® cannot use.
Page 11: Unique Features
LED, FAN-Tastic Tuning, OC Tweaker and a whole lot more. ASRock Instant Flash ASRock Instant Flash is a BIOS lash utility embedded in Flash ROM. his conve- nient BIOS update tool allows you to update the system BIOS in a few clicks without preparing an additional loppy diskette or other complicated lash utility.
ASRock Crashless BIOS ASRock Crashless BIOS allows users to update their BIOS without fear of failing. If power loss occurs during the BIOS updating process, ASRock Crashless BIOS will automatically inish the BIOS update procedure ater regaining power. Please note that BIOS iles need to be placed in the root directory of your USB disk.
Windows® 8 brings the ultimate boot up experience. he lightning boot up speed makes it hard to access the UEFI setup. ASRock Restart to UEFI allows users to enter the UEFI automatically when turning on the PC. By enabling this function, the PC will enter the UEFI directly ater you restart.
Page 14: Chapter 2 Installation
Chapter 2 Installation his is an ATX form factor motherboard. Before you install the motherboard, study the coniguration of your chassis to ensure that the motherboard its into it. Pre-installation Precautions Take note of the following precautions before you install motherboard components or change any motherboard settings.
Page 15: Installing The Cpu
H81 Pro BTC 2.1 Installing the CPU 1. Before you insert the 1150-Pin CPU into the socket, please check if the PnP cap is on the socket, if the CPU surface is unclean, or if there are any bent pins in the socket.
H81 Pro BTC Please save and replace the cover if the processor is removed. he cover must be placed if you wish to return the motherboard for ater service.
2.2 Installing the CPU Fan and Heatsink.
Page 19: Installing Memory Modules (dimm)
H81 Pro BTC 2.3 Installing Memory Modules (DIMM) his motherboard provides two 240-pin DDR3 (Double Data Rate 3) DIMM slots, and supports Dual Channel Memory Technology. 1. For dual channel coniguration, you always need to install identical (the same brand, speed, size and chip-type) DDR3 DIMM pairs.
Page 21: Expansion Slots (pci Express Slots)
H81 Pro BTC 2.4 Expansion Slots (PCI Express Slots) here are 6 PCI Express slots on the motherboard. Before installing an expansion card, please make sure that the power supply is switched of or the power cord is unplugged. Please read the documentation of the expansion card and make necessary hardware settings for the card before you start the installation.
Page 22: Jumpers Setup
2.5 Jumpers Setup he illustration shows how jumpers are setup. When the jumper cap is placed on the pins, the jumper is “Short”. If no jumper cap is placed on the pins, the jumper is “Open”. he illustration shows a 3-pin jumper whose pin1 and pin2 are “Short” when a jumper cap is placed on these 2 pins.
Page 23: Onboard Headers And Connectors
H81 Pro BTC 2.6 Onboard Headers and Connectors Onboard headers and connectors are NOT jumpers. Do NOT place jumper caps over these headers and connectors. Placing jumper caps over the headers and connectors will cause permanent damage to the motherboard.
Serial ATA2 Connectors hese two SATA2 SATA2_0 (SATA2_0: connectors support SATA see p.1, No. 11) data cables for internal (SATA2_1: storage devices with up to SATA2_1 see p.1, No. 13) 3.0 Gb/s data transfer rate. Serial ATA3 Connectors hese two SATA3 SATA3_0 (SATA3_0: connectors support SATA.
H81 Pro BTC Chassis Speaker Header Please connect the chassis DUMMY SPEAKER (4-pin SPEAKER1) speaker to this header. DUMMY (see p.1, No. 10) SPDIF Out Connector Please connect the (2-pin SPDIF_OUT1) SPDIF_OUT connector of (see p.1, No. 19) a HDMI VGA card to this header with a cable.
ATX 12V Power his motherboard pro- Connector vides an 8-pin ATX 12V (8-pin ATX12V1) power connector. To use a (see p.1, No. 4) 4-pin ATX power supply, please plug it along Pin 1 and Pin 5. SLI/XFIRE Power Please connect these Connectors connectors to the (4-pin SLI/XFIRE_.
H81 Pro BTC 1 Einleitung Vielen Dank, dass Sie sich für das H81 Pro BTC von ASRock entschieden haben – ein zuverlässiges Motherboard, das konsequent unter der strengen Qualitäts- kontrolle von ASRock hergestellt wurde. Es liefert ausgezeichnete Leistung mit robustem Design, das ASRocks Streben nach Qualität und Beständigkeit erfüllt.
Page 28: Technische Daten
1.2 Technische Daten • ATX-Formfaktor Plattform • Vollständig solides Kondensatordesign • Unterstützt Intel® Core Prozessor i7 / i5 / i3 / Xeon® / Pentium® / Celeron® der 4. Generation im LGA1150-Paket • Digipower-Design • 4-Leistungsphasendesign • Unterstützt Intel® Turbo Boost 2.0-Technologie • Intel®.
H81 Pro BTC • Unterstützt Auto-Lippensynchronizität, hohe Farbtiefe (12 bpc), xvYCC und HBR (Audio mit hoher Bitrate) mit HDMI (konformer HDMI-Monitor erforderlich) • Unterstützt HDCP-Funktion mit HDMI-Port • Unterstützt Blu-ray- (BD) Wiedergabe (Full HD/1080p) mit HDMI-Port • 5.1-Kanal-HD-Audio (Realtek ALC662-Audiocodec) Audio • PCIE x1 Gigabit LAN 10/100/1000 Mb/s.
• Microsot® Windows® 8.1, 32 Bit / 8.1, 64 Bit / 8, 32 Bit / 8, 64 Betriebssystem Bit / 7, 32 Bit / 7, 64 Bit • FCC, CE, WHQL Zertiizierungen • ErP/EuP ready (ErP/EuP ready-Netzteil erforderlich) * Detaillierte Produktinformationen inden Sie auf unserer Webseite: http://www.asrock.com.
Speichers unter Windows®-Betriebssystemen mit 32 Bit weniger als 4 GB betragen. Windows®-Betriebssysteme mit 64 Bit haben keine derartigen Beschränkungen. Mit ASRock XFast RAM können Sie den Speicher einsetzen, den Windows® nicht nutzen kann. 2. Mit Realteks RealWoW!-Technologie wecken Sie Ihr Computersystem mit Mo- bilgeräten wie Smartphones, Tablets und anderen PCs von extern auf.
1.3 Jumpereinstellung Die Abbildung zeigt, wie die Jumper eingestellt werden. Wenn die Jumper- Kappe auf den Kontakten angebracht ist, ist der Jumper „kurzgeschlossen“. Wenn keine Jumper-Kappe auf den Kontakten angebracht ist, ist der Jumper „ofen“. Die Abbildung zeigt einen 3-poligen Jumper, dessen Kontakt 1 und Kontakt 2 „kurzgeschlossen“.
H81 Pro BTC 1.4 Integrierte Stiftleisten und Anschlüsse Integrierte Stitleisten und Anschlüsse sind KEINE Jumper. Bringen Sie KEINE Jumper-Kappen an diesen Stitleisten und Anschlüssen an. Durch Anbringen von Jumper-Kappen an diesen Stitleisten und Anschlüssen können Sie das Motherboard dauerhat beschädigen.
Betrieb-LED-Stitleiste Bitte verbinden Sie (3-polig, PLED1) die Betrieb-LED des (siehe S. 1, Nr. 9) Gehäuses zur Anzeige des Systembetriebsstatus mit dieser Stitleiste. Serial-ATA-II-Anschlüsse Diese beiden SATA-II- SATA2_0 (SATA2_0: Anschlüsse unterstützen siehe S. 1, Nr. 11) SATA-Datenkabel für (SATA2_1: interne Speichergeräte mit SATA2_1 siehe S.
H81 Pro BTC 1. High Deinition Audio unterstützt Anschlusserkennung, der Draht am Gehäuse muss dazu jedoch HDA unterstützt. Bitte befolgen Sie zum Installieren Ihres Systems die Anweisungen in unserer Anleitung und der Anleitung zum Gehäuse. 2. Wenn Sie ein AC’97-Audiopanel nutzen, installieren Sie es bitte anhand der nachstehenden Schritte an der Audiostitleiste (Frontblende): A.
CPU-Lüteranschlüsse Dieses Motherboard bietet (4-polig, CPU_FAN1) einen 4-poligen CPU- (siehe S. 1, Nr. 2) Lüteranschluss (lautloser Lüter). Falls Sie einen (3-polig, CPU_FAN2) 3-poligen CPU-Lüter FAN_SPEED +12V (siehe S. 1, Nr. 1) anschließen möchten, verbinden Sie ihn bitte mit Kontakt 1 bis 3. ATX-Netzanschluss Dieses Motherboard (24-polig, ATXPWR1)
H81 Pro BTC Serieller-Port-Stitleiste Diese COM2-Stitleiste (9-polig, COM2) unterstützt ein Modul für (siehe S. 1, Nr. 20) serielle Ports. TPM-Stitleiste Dieser Anschluss (17-polig, TPMS1) unterstützt das Trusted (siehe S. 1, Nr. 6) Platform Module- (TPM) System, das Schlüssel, digitale Zertiikate, Kennwörter und Daten.
1 Introduction Nous vous remercions d’avoir acheté cette carte mère ASRock H81 Pro BTC, une carte mère iable fabriquée conformément au contrôle de qualité rigoureux et constant appliqué par ASRock. Fidèle à son engagement de qualité et de durabilité, ASRock vous garantit une carte mère de conception robuste aux performances élevées.
H81 Pro BTC Spéciications • Facteur de forme ATX Plateforme • Conception à condensateurs solides • Prend en charge les processeurs 4ème Génération Intel® Processeur Core i7 / i5 / i3 / Xeon® / Pentium® / Celeron® en package LGA1150 • Conception Digi Power.
• Prend en charge les technologies Auto Lip Sync, Deep Color (12bpc), xvYCC et HBR (High Bit Rate Audio) avec HDMI (un écran compatible HDMI est requis) • Prend en charge la fonction HDCP via port HDMI • Prend en charge la lecture Blu-ray (BD) Full HD 1080p via port HDMI • Audio 5.1 CH HD (codec audio Realtek ALC662) Audio.
H81 Pro BTC • 1 x embase IR Connectique • 1 x embase pour port COM • 1 x embase LED d’alimentation • 1 x embase TPM • 2 x connecteurs pour ventilateur de processeur (1 x 4 broches, 1 x 3 broches) • 2 x connecteurs pour ventilateur de châssis (1 x 4 broches, 1 x.
Certiications • ErP/EuP Ready (alimentation ErP/EuP ready requise) * pour des informations détaillées de nos produits, veuillez visiter notre site : http://www.asrock.com Il est important de signaler que l'overcloking présente certains risques, incluant des modiications du BIOS, l’application d’une technologie d’overclocking déliée et l'utilisation d'outils d'overclocking développés par des tiers.
H81 Pro BTC 1.3 Coniguration des cavaliers (jumpers) L’illustration ci-dessous vous renseigne sur la coniguration des cavaliers (jumpers). Lorsque le capuchon du cavalier est installé sur les broches, le cavalier est ‘court- circuité’. Si le capuchon du cavalier n’est pas installé sur les broches, le cavalier est ‘ouvert’.
1.4 Embases et connecteurs de la carte mère Les embases et connecteurs situés sur la carte NE SONT PAS des cavaliers. Ne placez JAMAIS de capuchons de cavaliers sur ces embases ou connecteurs. Placer un capuchon de cavalier sur ces embases ou connecteurs endommagera irrémédiablement votre carte mère.
H81 Pro BTC Embase LED Veuillez brancher le d’alimentation LED d’alimentation (PLED1 à 3 broches) du châssis sur cette (voir p.1, No. 9) embase pour indiquer l’état d’alimentation du système. Connecteurs Serial ATA2 Ces deux connecteurs SATA2_0 (SATA2_0: SATA2 sont compatibles (voir p.1, No.
1. L’audio haute déinition prend en charge la technologie Jack Sensing (détection de la iche), mais le panneau grillagé du châssis doit être compatible avec la HDA pour fonctionner correctement. Veuillez suivre les instructions igurant dans notre manuel et dans le manuel du châssis pour installer votre système. 2.
H81 Pro BTC Connecteurs du Cette carte mère est dotée ventilateur du processeur d’un connecteur pour (CPU_FAN1 à 4 broches) ventilateur de processeur (voir p.1, No. 2) (Quiet Fan) à 4 broches. Si vous envisagez de FAN_SPEED (CPU_FAN2 à 3 broches)
Embase pour port série Cette embase COM2 (COM2 à 9 broches) prend en charge un (voir p.1, No. 20) module de port série. Embase TPM Ce connecteur prend en (TPMS1 à 17 broches) charge un module TPM (voir p.1, No. 6) (Trusted Platform Module –.
Web per informazioni speciiche relative al modello attualmente in uso. È possibile trovare l'elenco di schede VGA più recenti e di supporto di CPU anche sul sito Web di ASRock. Sito Web di ASRock http://www.asrock.com.
1.2 Speciiche • Fattore di forma ATX Piattaforma • Design di condensatore solido • Supporta Intel® Core i7 / i5 / i3 di 4a generazione / Xeon® / Pentium® / Celeron® in LGA1150 Package • Design Digi Power • 4 Power Phase Design • Supporta la tecnologia Intel®.
H81 Pro BTC • Supporta Auto Lip Sync, Deep Color (12 bpc), xvYCC e HBR (High Bit Rate Audio) con HDMI (è necessario un monitor conforme ad HDMI) • Supporta la funzione HDCP con porta HDMI • Supporta Blu-ray (BD) Full HD 1080p, riproduzione con porta HDMI • Audio HD a 5.1 canali (codec audio Realtek ALC662)
• Microsot® Windows® 8.1 a 32-bit/8.1 a 64-bit/8 a 32-bit/8 a 64-bit/7 a 32-bit/7 a 64-bit • FCC, CE, WHQL Certiicazioni • ErP/EuP Ready (è necessaria alimentazione ErP/EuP ready) * Per informazioni dettagliate sul prodotto, visitare il nostro sito Web: http://www.asrock.com.
4 GB per riservare l’uso del sistema ai sistemi operativi di Windows® a 32 bit. I sistemi operativi Windows® a 64 bit non possiedono tali limitazioni. È possibile utilizzare la RAM XFast di ASRock per utilizzare la memoria che Windows® non può utilizzare.
1.3 Impostazione jumper L'illustrazione mostra in che modo vengono impostati i jumper. Quando il cappuccio del jumper è posizionato sui pin, il jumper è "cortocircuitato". Se sui pin non è posizionato alcun cappuccio del jumper, il jumper è "aperto". L'illustrazione mostra un jumper a 3 pin i cui pin1 e pin2 sono "cortocircuitati".
H81 Pro BTC 1.4 Header e connettori sulla scheda Gli header e i connettori sulla scheda NON sono jumper. NON posizionare cappucci del jumper su questi header e connettori. Il posizionamento di cappucci del jumper su header e connettori provocherà danni permanenti alla scheda madre.
Header LED di Collegare il LED di alimentazione alimentazione chassis a (PLED1 a 3 pin) questo header per indicare (vedere pag. 1, n. 9) lo stato di alimentazione del sistema. Connettori Serial ATA2 Questi due connettori SATA2_0 (SATA2_0: SATA2 supportano i cavi vedere pag.
H81 Pro BTC 1. L'audio ad alta deinizione supporta le funzioni Jack sensing, ma il ilo del pannello sullo chassis deve supportare HDA per funzionare correttamente. Seguire le istruzioni presenti nel nostro manuale e nel manuale dello chassis per installare il sistema.
Connettori della ventola Questa scheda madre è della CPU dotata di un connettore (CPU_FAN1 a 4 pin) per la ventola della CPU (vedere pag. 1, n. 2) (Ventola silenziosa) a 4 pin. Se si decide di FAN_SPEED +12V (CPU_FAN2 a 3 pin) collegare una ventola della (vedere pag.
H81 Pro BTC Header porta seriale Questo header COM2 (COM2 a 9 pin) supporta un modulo di (vedere pag. 1, n. 20) porta seriale. Header TPM Questo connettore (TPMS1 a 17 pin) supporta il sistema (vedere pag. 1, n. 6) Trusted Platform Module (TPM), che può.
Page 60: Contenido Del Paquete
1 Introducción Gracias por comprar la placa base ASRock H81 Pro BTC, una placa base iable fabricada según el rigurosísimo control de calidad de ASRock. Ofrece un rendimiento excelente con un diseño resistente de acuerdo con el compromiso de calidad y resistencia de ASRock.
H81 Pro BTC 1.2 Especiicaciones • Factor de forma ATX Plataforma • Diseño de los Condensadores: All Solid • Compatible con 4.ª Generación de Intel® Core i7 / i5 / i3 / Xeon® / Pentium® / Celeron® en paquete LGA1150 • Diseño Digi Power.
• Compatible con Auto Lip Sync, Deep Color (12bpc), xvYCC y HBR (audio de alta velocidad de bits) con HDMI (requiere un monitor compatible con HDMI) • Compatible con función HDCP con puerto HDMI • Compatible con reproducción Blu-ray (BD) Full HD de 1080p con puerto HDMI • 5.1 Audio CH HD (Realtek ALC662 Audio Codec) Audio.
H81 Pro BTC • 1 cabezal IR Conectores • 1 cabezal de puerto COM • 1 cabezal de indicador LED de alimentación • 1 cabezal TPM • 2 conectores de ventilador de la CPU (1 de 4 pines y 1 de 3 pines) • 2 conectores de ventilador del chasis (1 de 4 pines y 1 de 3.
• Compatible con ErP/EuP (requiere toma de alimentación compatible con ErP/EuP) * Para obtener más información acerca del producto, visite nuestro sitio web: http://www.asrock.com Tenga en cuenta que existen ciertos riesgos relacionados con el overclocking (sobreaceleración), incluyendo el ajuste de la coniguración del BIOS, aplicando la Tecnología overcloking no vinculada o utilizando las herramientas de overclocking.
H81 Pro BTC 1.3 Instalación de los puentes La instalación muestra cómo deben instalarse los puentes. Cuando la tapa de puente se coloca en los pines, el puente queda “Corto”. Si no coloca la tapa de puente en los pines, el puente queda “Abierto”. La ilustración muestra un puente de 3 pines cuyo pin 1 y pin 2 son “Cortos”.
1.4 Conectores y cabezales incorporados Los cabezales y conectores incorporados NO son puentes. NO coloque tapas de puente sobre estos cabezales y conectores. Si coloca tapas de puente sobre los cabezales y conectores dañará de forma permanente la placa base. Cabezal del panel del Conecte el interruptor de alimentación.
H81 Pro BTC Cabezal de indicador Conecte el indicador LED LED de alimentación de alimentación del chasis (PLED1 de 3 pines) a este cabezal para indicar (consulte la pág.1, N.º 9) el estado de alimentación del sistema. Conectores Serie ATA2.
1. El Audio de Alta Deinición (HDA, en inglés) es compatible con el método de sensor de conectores, sin embargo, el cable del panel del chasis deberá ser compatible con HDA para que pueda funcionar correctamente. Siga las instrucciones que se indican en nuestro manual y en el manual del chasis para instalar su sistema.
H81 Pro BTC Conectores del ventilador Esta placa base contiene de la CPU un conector de ventilador (CPU_FAN1 de 4 pines) (ventilador silencioso) de (consulte la pág.1, N.º 2) CPU de 4 pines. Si tiene pensando conectar un FAN_SPEED +12V.
Cabezal de puerto serie Este cabezal COM2 (COM2 de 9 pines) admite un módulo de (consulte la pág.1, N.º 20) puerto serie. Cabezal TPM Este conector es (TPMS1 de 17 pines) compatible con el sistema (consulte la pág.1, N.º 6) Módulo de Plataforma Segura (TPM, en inglés), que puede almacenar.
сайте ASRock также можно найти самый последний перечень поддерживаемых VGA-карт и ЦП. Веб-сайт ASRock http://www.asrock.com. 1.1 Комплект поставки • Материнская плата ASRock H81 Pro BTC (форм-фактор ATX) • Краткое руководство по установке ASRock H81 Pro BTC • Диск с ПО для ASRock H81 Pro BTC • 2 х.
1.2 Спецификация • Форм-фактор ATX Платформа • Использование только твердотельных конденсаторов • Поддержка процессоров 4-го поколения Intel® Core ЦП i7 / i5 / i3 / Xeon® / Pentium® / Celeron® в исполнении LGA1150 • Digi Power Design • Система питания 4 • Поддержка.
H81 Pro BTC • Поддержка Auto Lip Sync, Deep Color (12bpc), xvYCC и HBR (High Bit Rate Audio) по HDMI (необходим HDMI- совместимый монитор) • Поддержка функции HDCP через порты HDMI • Поддержка воспроизведения Full HD 1080p Blu-ray (BD) через порты HDMI • 5.1-канальный.
• 1 x колодка IR Разъемы • 1 x колодка СОМ-порта • 1 x колодка светодиодного индикатора питания • 1 x колодка ТРМ • 2 x разъем для вентилятора ЦП (1 х 4-контактный, 1 х 3-контактный) • 2 x разъем для вентилятора корпуса (1 х 4-контактный, 1 х.
1. В связи с ограничением при работе под 32-разрядной ОС Windows® фактический объем памяти может быть меньше 4 Гбайт. Для 64-разрядных ОС Windows® таких ограничений нет. Для использования той памяти, которую ОС Windows® не может использовать, используйте ASRock XFast RAM. 2. Технология Realtek RealWoW! позволяет пробуждать этот компьютер.
1.3 Установка перемычек Установка перемычек показана на рисунке. При установке колпачковой перемычки на контакты перемычка «замкнута». Если колпачковая перемычка на контакты не установлена, перемычка «разомкнута». На рисунке показана 3-контактная перемычка с замкнутыми контактами 1 и 2 при установке на них колпачковой перемычки. Перемычка.
H81 Pro BTC 1.4 Колодки и разъемы, расположенные на материнской плате Расположенные на материнской плате колодки и разъемы перемычками НЕ являются. НЕ устанавливайте на эти колодки и разъемы колпачковые перемычки. Установка колпачковых перемычек на эти колодки и разъемы может вызвать неустранимое повреждение материнской платы.
Колодка светодиодного Подключите индикатора питания светодиодный (3-контактная, PLED1) индикатор питания (См. стр. 1, № 9) корпуса к этой колодке, чтобы обеспечить индикацию состояния питания системы. Разъемы Serial ATA2 Эти два разъема SATA2 SATA2_0 (SATA2_0: предназначены для (См. стр. 1, № 11) подключения.
H81 Pro BTC 1. Аудиосистема высокого разрешения поддерживает функцию распознавания разъема, но для е правильной работы необходимо, чтобы провод панели корпуса поддерживал передачу сигналов HDA. Инструкции по установке системы см. в этом руководстве и руководстве на корпус. 2. При использовании аудиопанели AC’97 подключите ее к аудиоколодке.
Разъемы вентиляторов Эта материнская плата снабжена ЦП 4-контактным разъемом (4-контактный, CPU_ для малошумящего FAN1) вентилятора ЦП. (См. стр. 1, № 2) Если вы собираетесь подключить 3-контактный (3-контактный, CPU_ FAN_SPEED +12V вентилятор процессора, FAN2) подключайте его к (См. стр. 1, № 1) контактам.
H81 Pro BTC Колодка Колодка COM2 поддерживает последовательного подключение модуля порта последовательного (9-контактная, COM2) порта. (См. стр. 1, № 20) Колодка ТРМ Этот разъем (17-контактная, TPMS1) обеспечивает (См. стр. 1, № 6) поддержку системы Trusted Platform Module (TPM), которая способна обеспечить.
Web site para obter informações especíicas acerca do modelo que está a utilizar. Também poderá encontrar a lista de placas VGA e CPU mais recentes suportadas no Web site da ASRock. Web site da ASRock http://www.asrock.com.
H81 Pro BTC 1.2 Especiicações • Formato ATX Plataforma • Design de condensador sólido • Suporta processadores Intel® Core i7 / i5 / i3 / Xeon® / Pentium® / Celeron® de 4ª geração em socket LGA1150 • Design Digi Power • Design com 4 fases de alimentação.
• Suporta Auto sincronização labial, Deep Color (12bpc), xvYCC e HBR (High Bit Rate Audio) com HDMI (É necessário um monitor compatível com HDMI) • Suporta a função HDCP com porta HDMI • Suporta reprodução Blu-ray (BD) Full HD a 1080p com porta HDMI • Áudio HD de 5.1 canais (Codec de áudio Realtek ALC662) Áudio.
H81 Pro BTC • 1 x Terminal IV Conector • 1 x Terminal de porta COM • 1 x Conector para LED de alimentação • 1 x Terminal TPM • 2 x Conectores da ventoinha da CPU (1 x 4 pinos, 1 x 3 pinos) • 2 x Conectores da ventoinha do chassis (1 x 4 pinos, 1 x 3.
• Preparada para ErP/EuP (é necessária uma fonte de alimentação preparada para ErP/EuP) * Para obter informações detalhadas acerca do produto, visite o nosso Web site: http://www.asrock.com Tenha em atenção que o overclocking inclui um determinado grau de risco, incluindo o ajuste das deinições na BIOS, a aplicação de tecnologia Untied Overclocking ou a.
H81 Pro BTC 1.3 Coniguração dos jumpers A imagem abaixo ilustra como os jumpers são conigurados. Quando a tampa do jumper é colocada nos pinos, o jumper é "Curto". Se não for colocada uma tampa de jumper nos pinos, o jumper é "Aberto". A imagem ilustra um jumper de 3 pinos cujos pino1 e pino2 estão "Curtos".
1.4 Terminais e conectores integrados Os terminais e conectores integrados NÃO são jumpers. NÃO coloque tampas de jumpers sobre estes terminais e conectores. Colocar tampas de jumpers sobre os terminais e conectores irá causar danos permanentes à placa principal. Terminal do painel de Ligue o botão de sistema alimentação, o botão de.
H81 Pro BTC Conector do LED de Ligue o LED de alimentação alimentação do chassis a (PLED1 de 3 pinos) este terminal para indicar (consultar p.1, N.º 9) o estado de alimentação do sistema. Conectores ATA2 de série Estes dois conectores.
1. O Áudio de alta deinição suporta Detecção de icha, mas o cabo de painel no chassis deverá suportar HDA para funcionar correctamente. Siga as instruções no nosso manual e no manual do chassis para instalar o seu sistema. 2. Se utilizar um painel de áudio AC’97, instale-o no terminal de áudio do painel frontal de acordo com os passos abaixo: A.
H81 Pro BTC Conectores da ventoinha Esta placa principal inclui da CPU um conector de ventoinha (CPU_FAN1 de 4 pinos) de CPU (Ventoinha (consultar p.1, N.º 2) silenciosa) de 4 pinos. Se pretender ligar uma FAN_SPEED +12V (CPU_FAN2 de 3 pinos) ventoinha de CPU de 3 (consultar p.1, N.º.
Terminal de porta de Este terminal COM2 série suporta um módulo de (COM2 de 9 pinos) porta de série. (consultar p.1, N.º 20) Terminal TPM Este conector suporta (TPMS1 de 17 pinos) um sistema com Módulo (consultar p.1, N.º 6) de Plataforma Coniável (TPM), que pode armazenar com segurança.
H81 Pro BTC 1 Giriş ASRock'ın zorlu kalite kontrol süreçlerinden geçmiş olan ASRock H81 Pro BTC anakartını satın aldığınız için teşekkür ederiz. Sağlam tasarımı ile ASRock'ın kalite ve dayanıklılık taahhüdüne uygun şekilde mükemmel performans sağlar. Anakart özellikleri ve BIOS yazılımı güncellenebileceğinden, bu dokümantasyonun içeriği herhangi bir bildirimde bulunulmaksızın değiştirilebilir.
1.2 Özellikler • ATX Form Faktörü Platform • Tam Katı Bağlayıcı tasarımı • 4ncü Nesil Intel® Core i7 / i5 / i3 / Xeon® / Pentium® / Celeron®, LGA1150 Paketinde desteklemektedir • Dijital Güç Tasarımı • 4 Güç Sahası Tasarımı • Intel®.
H81 Pro BTC • HDMI ile Otomatik Dudak Senkronizasyonu (12bpc=, xvYCC ve HBR (Yüksek Bit Hızında Ses) özelliklerini destekler (Uyumlu bir HDMI monitörü kullanılmalıdır) • HDMI bağlantı noktaları ile HDCP işlevini destekler • HDMI bağlantı noktalarıyla, Full HD 1080p Blu-ray (BD) kayıttan yürütme özelliklerini destekler.
• 1 x IR bağlantısı Bağlayıcı • 1 x COM Bağlantı noktası bağlantısı • 1 x Güç LED bağlantısı • 1 x TPM bağlantısı • 2 x CPU Fan bağlayıcıları (1 x 4-pin, 1 x 3-pin) • 2 x Kasa Fanı bağlayıcıları (1 x 4-pin, 1 x 3-pin) • 1 x Güç.
• ErP/EuP için hazır (ErP/EuP için hazır güç beslemesi gereklidir) * Detaylı ürün bilgisi için, lütfen web sitemizi ziyaret edin: http://www.asrock.com Lütfen, BIOS ayarlarını düzenleme, Bağımsız Hız Aşırtma Teknolojinin uygulanması ya da üçüncü kişilerin hız aşırtma araçlarının kullanılması da dahil olmak üzere tüm hız aşırtma işlemlerinin belirli bir risk taşıdığını.
1.3 Bağlantı Teli Kurulumu Çizim, bağlantı tellerinin kurulumunu göstermektedir. Tel kapağı, pimlerin üzerine yerleştirildiğinde, tel "Kısa" olur. Pimlerin üzerinde tel kapağı bulunmadığında, tel "Kısa" olur. Çizim, pin1 ve pin2 alanları "Kısa" olan ve bu iki pim üzerinde bir bağlantı teli kapağı bulunan 3-pin bağlantı telini göstermektedir. CMOS'u Temizle Bağlantı.
H81 Pro BTC 1.4 Ekli Bağlantılar ve Bağlayıcılar Ekli bağlantılar ve bağlayıcılar bağlantı teli değildir. Bağlantı teli kapaklarını bu bağlantı ve bağlayıcılar üzerine yerleştirmeyin. Bağlantı teli kapaklarının bağlantılar ile bağlayıcılar üzerine yerleştirilmesi, anakarta kalıcı hasar verebilir. Sistem Paneli Bağlantısı Güç anahtarını bağlayın, (9-pin PANEL1) kasa üzerindeki anahtar.
Güç LED Bağlantısı Sistemin güç durumunun (3-pin PLED1) belirtilmesi için lütfen (bkz. sf.1, No. 9) güç LED'ini bu bağlantıya takın. Seri ATA2 Bağlayıcıları Bu iki SATA2 bağlayıcısı, SATA2_0 veri aktarım hızı 3,0 Gb/ (SATA2_0: sn'ye kadar olan dahili bkz. sf.1, No. 11) depolama aygıtları.
H81 Pro BTC 1. Yüksek Tanımlı Ses, Jak Algılama özelliğini destekler, ancak bu işlevin düzgün çalışabilmesi için kasa üzerindeki panel kablosunun HDA işlevini desteklemesi gerekmektedir. Sisteminizi kurarken, lütfen kılavuzumuzdaki talimatlar ile kasa kılavuzundaki talimatları izleyin. 2. Bir AC’97 ses paneli kullanıyorsanız, lütfen bu paneli aşağıdaki adımları izleyerek ön panel ses bağlantısına takın.
CPU Fan Bağlayıcıları Bu anakart, 4-Pin CPU (4-pin CPU_FAN1) fan (Sessiz Fan) bağlayıcısı (bkz sf.1, No. 2) sağlamaktadır. 3-Pin CPU fan bağlamak istiyorsanız, (3-pin CPU_FAN2) lütfen Pin 1-3'ü kullanın. FAN_SPEED +12V (bkz sf.1, No. 1) ATX Güç Bağlayıcısı Bu anakart, 24-pin (24-pin ATXPWR1) ATX güç.
H81 Pro BTC Seri Bağlantı Noktası Bu COM2 bağlantısı seri Bağlantısı bağlantı yuvası modülünü (9-pin COM2) destekler. (bkz. sf.1, No. 20) TPM Bağlantısı Bu bağlayıcı, anahtarlar, (17-pin TPMS1) dijital sertifikalar, (bkz. sf.1, No. 6) parolalar ve verileri güvenli bir şekilde saklama özelliği.
ASRock 의 웹사이트에서 추가 통지 없이 제공됩니다 . 이 마더보드와 관련하여 기 술적 지원이 필요한 경우 , 당사의 웹사이트를 방문하여 사용 중인 모델에 대한 구체 적 정보를 구하십시오 . ASRock 의 웹사이트에서는 최신 VGA 카드와 CPU 지원 목 록도 찾을 수 있습니다 . ASRock 웹사이트 http://www.asrock.com.
H81 Pro BTC 1.2 규격 • ATX 폼 팩터 플랫폼 • 모든 솔리드 콘덴서 구조 • LGA1150 패키지로 제공되는 4 세대 Intel ® Core i7 / i5 / i3 / ® ® ® 지원 Xeon / Pentium / Celeron • Digi 전원 구조.
• HDMI 포트를 이용한 HDCP 기능 지원 • HDMI 포트를 이용한 Full HD 1080p Blu-ray (BD) 재생 지원 • 5.1 CH HD 오디오 지원 (Realtek ALC662 오디오 코덱 ) 오디오 • PCIE 1 개 , Gigabit LAN 10/100/1000 Mb/s • Realtek RTL8111GR •.
8.1 32 비트 / 8.1 64 비트 / 8 32 비트 / 8 Windows 64 비트 / 7 32 비트 / 7 64 비트 • FCC, CE, WHQL 인증 • ErP/EuP 사용 가능 (ErP/EuP 사용 가능 전원공급장치 필요 ) * 자세한 제품 정보에 대해서는 당사 웹사이트를 참조하십시오 : http://www.asrock.com.
위한 예비 메모리용 4GB 보다 더 적을 수 있습니다 . Windows 64 비트 운영체제 ® 에는 그러한 제한이 없습니다 . ASRock XFast RAM 을 사용하여 Windows 가 사 용할 수 없는 메모리를 이용할 수 있습니다 . 2. Realtek RealWoW! Technology 는 스마트폰 , 태블릿 , 또는 기타 PC 와 같은 원격.
H81 Pro BTC 1.3 점퍼 설정 그림은 점퍼를 어떻게 설정하는지 보여줍니다 . 점퍼 캡을 핀에 씌우면 점퍼가 ì 단 락î 됩니다 . 점퍼 캡을 핀에 씌우지 않으면 점퍼가 ì 단선î 됩니다 . 그림은 3 핀 점 퍼를 보여주며 핀 1 과 핀 2 는 점퍼 캡을 씌울 때 ì 단락î 됩니다 .
1.4 온보드 헤더 및 커넥터 온보드 헤더와 커넥터는 점퍼가 아닙니다 . 점퍼 캡을 온보드 헤더와 커넥터에 씌우 지 마십시오 . 점퍼 캡을 온보드 헤더와 커넥터에 씌우면 마더보드가 영구적으로 손 상됩니다 . 시스템 패널 헤더 섀시의 전원 스위치 , 리 (9 핀 PANEL1) 셋.
H81 Pro BTC 전원 LED 헤더 시스템 전원 상태를 나타 (3 핀 PLED1) 내려면 섀시 전원 LED (1 페이지 , 9 번 항목 참조 ) 를 이 헤더에 연결하십시 오 . 시리얼 ATA2 커넥터 이들 두 개의 SATA2 커 SATA2_0 넥터는.
1. 고음질 오디오는 잭 감지를 지원하지만 올바르게 작동하려면 섀시의 패널 와이어 가 HDA 를 지원해야 합니다 . 설명서 및 섀시 설명서에 나와 있는 지침을 따라 시 스템을 설치하십시오 . 2. ACí 97 오디오 패널을 사용할 경우 아래와 같은 절차를 따라 전면 패널 오디오 헤 더에.
H81 Pro BTC CPU 팬 커넥터 이 마더보드에는 4 핀 (4 핀 CPU_FAN1) CPU 팬 ( 저소음 팬 ) 커 (1 페이지 , 2 번 항목 참조 ) 넥터가 탑재되어 있습니 다 . 3 핀 CPU 팬을 연결 FAN_SPEED (3 핀 CPU_FAN2) 하려는.
시리얼 포트 헤더 이 COM2 헤더는 시리 (9 핀 COM2) 얼 포트 모듈을 지원합 (1 페이지 , 20 번 항목 참조 ) 니다 . TPM 헤더 이 커넥터는 키 , 디지털 (17 핀 TPMS1) 인증서 , 암호 및 데이 (1 페이지 , 6 번 항목 참조 ) 터를.
H81 Pro BTC H81 Pro BTC BIOS http://www.asrock.com. • H81 Pro BTC • H81 Pro BTC • H81 Pro BTC • 2 x ATA SATA • 1 x I/O.
• ATX • • LGA1150 Intel® Core i7 / i5 / i3 / Xeon® / Pentium® / Celeron® • • 4 • Intel® • Intel® H81 • DDR3 • 2 x DDR3 DIMM • DDR3 1600/1333/1066 ECC • 16GB • Intel® XMP 1.3/1.2 •.
H81 Pro BTC • HDMI HDMI 12bpc xvYCC HBR • HDMI HDCP • HDMI HD 1080p (BD) • 5.1 CH HD Realtek ALC662 • PCIE x1 LAN 10/100/1000 Mb/ • Realtek RTL8111GR • Realtek RealWoW! Technology • • LAN •.
• CPU • CPU/ • +12V +5V +3.3V CPU Vcore • Microsot® Windows® 8.1 32 / 8.1 64 / 8 32 / 8 64 / 7 32 / 7 64 • FCC CE WHQL • ErP/EuP Ready ErP/EuP ready http://www.asrock.com.
H81 Pro BTC BIOS 1. Windows® 32 Windows® Windows® XFast RAM 2. Realtek RealWoW! Home Cloud (.
CMOS (CLRCMOS1) CMOS p.1 No. 23 CLRCMOS1 CMOS CLRCMOS1 BIOS CMOS BIOS CMOS CMOS CMOS.
H81 Pro BTC p.1 No. 15 PWRBTN RESET PLED S1/S3 HDLED.
PLED1 p.1 No. 9 ATA2 SATA2 SATA2_0 SATA2_0: 3.0 Gb/ p.1 No. 11 SATA2_1: p.1 No. 13 SATA SATA2_1 ATA3 SATA3 SATA3_0 SATA3_0: 6.0 Gb/ p.1 No. 12 SATA3_1: p.1 No. 14 SATA SATA3_1 USB 2.0 USB_2_3 p.1 No. 17 USB_4_5 p.1 No.
H81 Pro BTC 2. AC 97 A. Mic_IN (MIC) MIC2_L B. Audio_R (RIN) OUT2_R Audio_L (LIN) OUT2_L (GND) (GND) D. MIC_RET OUT_RET AC 97 Realtek FrontMic SPEAKER1 p.1 No. 10 SPDIF Out SPDIF_OUT1 HDMI VGA p.1 No. 19 SPDIF_OUT +12V.
CPU_FAN1 p.1 No. 2 FAN_SPEED CPU_FAN2 +12V p.1 No. 1 ATXPWR1 p.1 No. 7 ATX12V ATX12V1 ATX12V p.1 No. 4 SLI/XFIRE SLI/XFIRE_ PWR1 p.1 No. 25 SLI/XFIRE_ PWR2 p.1 No. 24 p.1 No. 21.
H81 Pro BTC COM2 COM2 p.1 No. 20 TPMS1 p.1 No. 6.
1 简介 感谢您购买 ASRock H81 Pro BTC 主板,这是按照 ASRock 一贯严格质量控制标 准生产的性能可靠的主板。它提供符合 ASRock 质量和耐久性承诺的精良设计和 卓越性能。 由于主板规格和 BIOS 软件可能已更新,因此, 本文档的内容可能会随时更改,恕 不另行通知。如果本文档有任何修改,则更新的版本将发布在 ASRock 网站上,我 们不会另外进行通知。如果您需要与此主板相关的技术支持,请访问我们的网站 以具体了解所用型号的信息。您也可以在 ASRock 网站上找到最新 VGA 卡和 CPU 支持列表。ASRock 网站 http://www.asrock.com。 1.1 包装清单 • ASRock H81 Pro BTC 主板 (ATX 规格尺寸).
H81 Pro BTC 1.2 规格 • ATX 规格尺寸 平台 • 全固态电容 • 支持 LGA1150 封装第 4 代 Intel® Core i7 / i5 / i3 / Xeon® / Pentium® / Celeron® • Digi Power 设计 • 4 电源相设计 • 支持 Intel® Turbo Boost 2.0 技术.
• 通过 HDMI 端口支持 HDCP 功能 • 通过 HDMI 端口支持全高清 1080p Blu-ray (BD) 播放。 • 5.1 CH 高清音频 (Realtek ALC662 音频编解码器) 音频 • PCIE x1 Gigabit LAN 10/100/1000 Mb/s • Realtek RTL8111GR (见 “注意 2” ) • 支持 Realtek RealWoW! Technology •.
H81 Pro BTC • 1 x IR 接脚 接口 • 1 x COM 端口接脚 • 1 x 电源 LED 接脚 • 1 x TPM 接脚 • 2 x CPU 风扇接口 (1 x 4 针 , 1 x 3 针 ) •.
须认识到超频会有一定风险,包括调整 BIOS 设置,应用 “自由超频技术” ,或使用 第三方超频工具。超频可能会影响到系统的稳定性,甚至对系统的组件和设备造 成损坏。执行这项工作您应自担风险和自己承担费用。我们对由于超频而造成的 损坏概不负责。 1. 由于限制原因,实际内存容量可能会小于 4GB, 以保留给 Windows® 32-bit 操 作系统下的系统使用。Windows® 64-bit 操作系统没有此类限制。您可以使用 ASRock XFast RAM 来利用 Windows® 不能使用的内存。 2. Realtek RealWoW! Technology 可以让您从远程移动设备 (如:智能手机 、平板电 脑或其它 PC) 唤醒该系统。它需要第三方软件和应用程序来利用此功能。请访 问我们的网站查找 “家庭云” 主题。.
H81 Pro BTC 1.3 跳线设置 此图显示如何设置跳线。将跳线帽装到这些针脚上时,跳线 “短接” 。如果这些 针脚上没有装跳线帽,跳线 “开路” 。此图显示 3 针跳线, 当跳线帽装在针脚 1 和 针脚 2 “上,它们短接” 。 清除 CMOS 跳线 (CLRCMOS1) 默认 清除 CMOS (见第 1 页 ,第 23 个) CLRCMOS1 允许您清除 CMOS 中的数据。要清除和重置系统参数到默认设 置,请关闭计算机 , 从电源上拔下电源线插头。等候 15 秒后,使用跳线帽将.
1.4 板载接脚和接口 板载接脚和接口不是跳线。不要将跳线帽装到这些接脚和接口上。将跳线帽装到 这些接脚和接口上将会对主板造成永久性损坏。 系统面板接脚 按照下面的针脚分配,将 (9 针 PANEL1) 机箱上的电源开关、 重置 见第 1 页 ,第 15 个) 开关和系统状态指示灯 连接到此接脚。在连接线 缆前请记下正负针脚。 PWRBTN ( 电源开关 ): 连接到机箱前面板上的电源开关。您可以配置使用电源开关关闭系统的方式。 RESET ( 重置开关 ): 连接到机箱前面板上的重置开关。如果计算机死机,无法执行正常重新启动,按重 置开关重新启动计算机。 PLED (系统电源 LED) : 连接到机箱前面板上的状态指示灯 。系统操作操作时,此 LED 亮起。系统处在 S1/ S3 睡眠状态时,.
H81 Pro BTC 电源 LED 接脚 请将机箱电源 LED 连接 (3 针 PLED1) 到此接脚以指示系统电源 (见第 1 页 ,第 9 个) 状态。 串行 ATA2 接口 这两个 SATA2 接口支持 SATA2_0 最高 3.0 Gb/s 数据传输 (SATA2_0: 见第 1 页 , 第 11 个) 速率的内部存储设备的.
1. 高清音频支持插孔感测,但机箱上的面板连线必须支持 HDA 才能正常工作。请 按照我们的手册和机箱手册的说明安装系统。 2. 如果您使用 AC’ 97 音频面板,请按照以下步骤安装到前面板音频接脚: A. 将 Mic_IN (MIC) 连接到 MIC2_L. B。将 Audio_R (RIN) 连接到 OUT2_R,将 Audio_L (LIN) 连接到 OUT2_L. C。将接地端 (GND) 连接到接地端 (GND)。 D. MIC_RET 和 OUT_RET 只用于高清音频面板。您不需要针对 AC’ 97 音频面 板连接它们。 E. 要启用前麦克风,请转到 Realtek 控制面板上的 “FrontMic” (前麦克风) 选项 卡,调整.
H81 Pro BTC CPU 风扇接口 此主板提供 4 针 CPU 风 (4 针 CPU_FAN1) 扇 (静音风扇) 接口。如果 见第 1 页 ,第 2 个) 您打算连接 3 针 CPU 风 扇,请将它连接到脚 1-3。 FAN_SPEED (3 针 CPU_FAN2) +12V 见第 1 页 ,第 1 个).
串行端口接脚 此 COM2 接脚支持串行 (9 针 COM2) 端口模块。 (见第 1 页 ,第 20 个) TPM 接脚 此接口支持 Trusted (17 针 TPMS1) Platform Module (信任平 (见第 1 页 ,第 6 个) 台模块,TPM) 系统, 可 以安全地存储密钥、数字 证书、密码和数据。TPM 系统也可以帮助增强网络 安全,保护数字身份和确 保平台完整性。.
H81 Pro BTC 電子信息產品污染控制標示 依據中國發布的「電子信息產品污染控制管理辦法」及 SJ/T 11364-2006「電 子信息產品污染控制標示要求」,電子信息產品應進行標示,藉以向消費者揭 露產品中含有的有毒有害物質或元素不致發生外洩或突變從而對環境造成污染 或對人身、財產造成嚴重損害的期限。依上述規定,您可于本產品之印刷電路 板上看見圖一之標示。圖一中之數字為產品之環保使用期限。由此可知此主板 之環保使用期限為 10 年。 圖一 有毒有害物質或元素的名稱及含量說明 若您慾了解此產品的有毒有害物質或元素的名稱及含量說明,請參照以下表格 及說明。 有害物質或元素 部件名稱 鉛 (Pb) 鎘 (Cd) 汞 (Hg) 六价鉻 (Cr(VI)) 多溴聯苯 (PBB) 多溴二苯醚 (PBDE) 印刷電路板 及電子組件 外部信號連 接頭及線材 O: 表示該有毒有害物質在該部件所有均質材料中的含量均在 SJ/T 11363-2006 標準規定.
1 簡介 感謝您購買 ASRock H81 Pro BTC 主機板, 本主機板經 ASRock 嚴格品管製作, 是一套讓人信賴的可靠產品。 本產品採耐用設計所展現的優異效能,完全符合 ASRock 對品質及耐用度的承諾。 由於主機板規格及 BIOS 軟體可能會更新,所以本文件內容如有變更 ,恕不另行通 知。如本文件有任何修改, 可至 ASRock 網站逕行取得更新版本,不另外通知。若 您需要與本主機板相關的技術支援,請上我們的網站瞭解有關您使用機型的特定 資訊。您也可以在 ASRock 網站找到最新的 VGA 卡及 CPU 支援清單。ASRock 網 站 http://www.asrock.com. 1.1 包裝內容 • ASRock H81 Pro BTC 主機板 (ATX 尺寸).
H81 Pro BTC 1.2 規格 • ATX 尺寸 平台 • 全固態電容設計 • 支援第 4 代 Intel® Core i7 / i5 / i3 / Xeon® / Pentium® / Celeron® (LGA1150 封裝 ) • 數位電源設計 • 4 電源相位設計 • 支援 Intel® Turbo Boost 2.0 技術.
• 支援含 HDMI 連接埠的 HDCP 功能 • 支援透過 HDMI 連接埠的 Full HD 1080p Blu-ray (BD) 播放 • 5.1 CH HD 音訊 (Realtek ALC662 音訊轉碼器) 功能 音訊 • PCIE x1 Gigabit LAN 10/100/1000 Mb/s • Realtek RTL8111GR • 支援 Realtek RealWoW! Technology (請參閱 「注意 2」 ) •.
H81 Pro BTC • 1 x IR 標頭 接頭 • 1 x COM 連接埠標頭 • 1 x 電源 LED 標頭 • 1 x TPM 標頭 • 2 x CPU 風扇接頭 (1 x 4-pin、 1 x 3-pin) • 2 x 機殼風扇接頭 (1 x 4-pin、 1 x 3-pin) •.
* 如需產品詳細資訊,請上我們的網站: http://www.asrock.com 請務必理解,超頻可能產生某種程度的風險,其中包括調整 BIOS 中的設定、採用 自由超頻技術或使用協力廠商的超頻工具。超頻可能會影響您系統的穩定性,或 者甚至會對您系統的元件及裝置造成傷害。您應自行負擔超頻風險及成本。我們 對於因超頻所造成的可能損害概不負責。 1. 在 Windows® 32 位元作業系統下 ,因有保留供系統使用記憶體的限制,所以實際 記憶體大小可能低於 4GB。Windows® 64 位元作業系統則沒有此類限制。您可使 用 ASRock XFast RAM 運用 Windows® 無法使用的記憶體。 2. Realtek RealWoW! Technology 可讓您從智慧型手機、平板電腦或其他電腦等遠 端行動裝置喚醒本系統。 您必須安裝第三方軟體與應用程式, 才能使用此功能。 請瀏覽官網的 「家庭雲端」 主題。.
H81 Pro BTC 1.3 跳線設定 圖例顯示設定跳線的方式 。跳線蓋套在針腳上時,該跳線為 「短路」 。若沒有跳 線蓋套在針腳上,該跳線為 「開啟」 。圖例顯示 3-pin 跳線的跳線蓋套在 pin1 及 pin2 時,這兩個針腳皆為 「短路」 。 清除 CMOS 跳線 (CLRCMOS1) 預設 清除 CMOS (請參閱第 1 頁 ,編號 23) 您可利用 CLRCMOS1 清除 CMOS 中的資料。若要清除及重設系統參數為預設 設定 ,請先關閉電腦電源,再拔下電源供應器的電源線。在等待 15 秒後,請使.
1.4 板載標頭及接頭 板載標頭及接頭都不是跳線,請勿將跳線蓋套在這些標頭及接頭上。將跳線蓋套 在標頭及接頭上,將造成主機板永久性的受損。 系統面板標頭 請依照以下的針腳排 列將機殼上的電源開 (9-pin PANEL1) (請參閱第 1 頁 ,編號 15) 關、 重設開關及系統 狀態指示燈連接至此 標頭。在連接纜線之 前,請注意正負針腳。 PWRBTN(電源開關) : 連接至機殼前面板上的電源開關。您可設定使用電源開關關閉系統電源的方式。 RESET(重設開關) : 連接至機殼前面板上的重設開關。若電腦凍結且無法執行正常重新啟動,按下重 設開關即可重新啟動電腦。 PLED(系統電源 LED) : 連接至機殼前面板上的電源狀態指示燈。系統正在運作時,此 LED 會亮起。系統 進入 S1/S3 睡眠狀態時,LED 會持續閃爍。系統進入 S4 睡眠狀態或關機 (S5) 時, LED 會熄滅。.
H81 Pro BTC 電源 LED 標頭 請將機殼電源 LED 連 接至此標頭, 以指示系 (3-pin PLED1) (請參閱第 1 頁 ,編號 9) 統的電源狀態。 Serial ATA2 接頭 這兩組 SATA2 接頭皆 SATA2_0 支援內部儲存裝置的 (SATA2_0: 請參閱第 1 頁 ,編號 11) SATA 資料纜線,最高 可達 3.0 Gb/s 資料傳 (SATA2_1: 請參閱第.
1. 高解析度音訊支援智慧型音效介面偵測 (Jack Sensing),但機殼上的面板線必須 支援 HDA 才能正確運作。請依本手冊及機殼手冊說明安裝系統。 2. 若您使用 AC’ 97 音訊面板,請按照以下步驟安裝至前面板音訊標頭: A. 將 Mic_IN (MIC) 連接至 MIC2_L。 B. 將 Audio_R (RIN) 連接至 OUT2_R 且將 Audio_L (LIN) 連接至 OUT2_L。 C. 將接地 (GND) 連接至接地 (GND)。 D. MIC_RET 及 OUT_RET 僅供 HD 音訊面板使用。您不需要在 AC’ 97 音訊面 板上連接。.
H81 Pro BTC CPU 風扇接頭 本主機板配備 4-Pin CPU 風扇 (靜音風扇) (4-pin CPU_FAN1) (請參閱第 1 頁 ,編號 2) 接頭。若您計畫連接 3-Pin CPU 風扇,請接 FAN_SPEED 至 Pin 1-3。 (3-pin CPU_FAN2) +12V (請參閱第 1 頁 ,編號 1) ATX 電源接頭 本主機板配備一組 24-pin ATX 電源接 (24-pin ATXPWR1) (請參閱第.
TPM 標頭 此接頭支援信賴平台模 組 (TPM) 系統, 可確保 (17-pin TPMS1) (請參閱第 1 頁 ,編號 6) 儲存金鑰、數位憑證、密 碼及資料的安全。TPM 系統也能強化網路安 全、保護數位身分並確 定平台完整性。.
ASRock tanpa pemberitahuan lebih lanjut. Jika Anda memerlukan dukungan teknis terkait motherboard ini, kunjungi situs web kami untuk mendapatkan informasi khusus tentang model yang Anda gunakan. Anda juga dapat menemukan kartu VGA dan datar dukungan CPU terkini di situs web ASRock. Situs web ASRock http://www.asrock.com. 1.1 Isi Kemasan • Motherboard ASRock H81 Pro BTC (Bentuk dan Ukuran ATX)
1.2 Spesiikasi • Bentuk dan Ukuran ATX Platform • Desain Kapasitor Solid • Mendukung Intel® Core i7 / i5 / i3 Generasi Ke-4 / Xeon® / Pentium® / Celeron® dalam Paket LGA1150 • Desain Digi Power • Desain 4 Fase Daya • Mendukung Teknologi Intel®.
H81 Pro BTC • Mendukung Auto Lip Sync, Deep Color (12bpc), xvYCC, dan HBR (High Bit Rate Audio) dengan HDMI (memerlukan monitor HDMI yang kompatibel) • Mendukung fungsi HDCP dengan port HDMI • Mendukung pemutaran Full HD 1080p Blu-ray (BD) dengan port HDMI • Audio HD 5.1 CH (Realtek ALC662 Audio Codec)
• 1 x Header IR Konektor • 1 x Header port COM • 1 x Kepala LED daya • 1 x Header TPM • 2 x Konektor kipas CPU (1 x 4-pin, 1 x 3-pin) • 2 x Konektor kipas chassis (1 x 4-pin, 1 x 3-pin) • 1 x Konektor kipas daya (3-pin) • 1 x Konektor daya ATX 24 pin • 1 x Konektor daya 12V 8 pin.
ASRock H81 Pro BTC User Manual
Also See for ASRock H81 Pro BTC
Related Manuals for ASRock H81 Pro BTC
Summary of Contents for ASRock H81 Pro BTC
Page 2: Copyright Notice
(including damages for loss of profits, loss of business, loss of data, interruption of business and the like), even if ASRock has been advised of the possibility of such damages arising from any defect or error in the documentation or product.
Page 3: Table Of Contents
Contents Chapter 1 Introduction Package Contents Specifications Unique Features Motherboard Layout I/O Panel Chapter 2 Installation Installing the CPU Installing the CPU Fan and Heatsink Installing Memory Modules (DIMM) Expansion Slots (PCI Express Slots) Jumpers Setup Onboard Headers and Connectors Chapter 3 Software and Utilities Operation Installing Drivers A-Tuning.
Page 4: Table Of Contents
Main Screen OC Tweaker Screen Advanced Screen 4.4.1 CPU Configuration 4.4.2 Chipset Configuration 4.4.3 Storage Configuration 4.4.4 Intel® Smart Connect Technology 4.4.5 Super IO Configuration 4.4.6 ACPI Configuration 4.4.7 USB Configuration 4.4.8 Trusted Computing Tools Hardware Health Event Monitoring Screen Boot Screen Security Screen Exit Screen.
Page 5: Chapter 1 Introduction, Package Contents
ASRock’s website without further notice. If you require technical support related to this motherboard, please visit our website for specific information about the model you are using. You may find the latest VGA cards and CPU support list on ASRock’s website as well. ASRock website http://www.asrock.com.
Page 6: Specifications
1.2 Specifications Platform • ATX Form Factor • All Solid Capacitor design • Supports 4 Generation Intel® Core i7 / i5 / i3 / Xeon® / Pentium® / Celeron® in LGA1150 Package • Digi Power design • 4 Power Phase design • Supports Intel®.
H81 Pro BTC • Supports Auto Lip Sync, Deep Color (12bpc), xvYCC and HBR (High Bit Rate Audio) with HDMI Port (Compliant HDMI monitor is required) • Supports HDCP with HDMI Port • Supports Full HD 1080p Blu-ray (BD) playback with HDMI.
• Microsoft® Windows® 8.1 32-bit / 8.1 64-bit / 8 32-bit / 8 64- bit / 7 32-bit / 7 64-bit • FCC, CE, WHQL Certifica- tions • ErP/EuP ready (ErP/EuP ready power supply is required) * For detailed product information, please visit our website: http://www.asrock.com.
1. Due to limitation, the actual memory size may be less than 4GB for the reserva- tion for system usage under Windows® 32-bit operating systems. Windows® 64-bit operating systems do not have such limitations. You can use ASRock XFast RAM to utilize the memory that Windows® cannot use.
Page 10: Unique Features
LED, FAN-Tastic Tuning, OC Tweaker and a whole lot more. ASRock Instant Flash ASRock Instant Flash is a BIOS flash utility embedded in Flash ROM. This conve- nient BIOS update tool allows you to update the system BIOS in a few clicks without preparing an additional floppy diskette or other complicated flash utility.
H81 Pro BTC ASRock Crashless BIOS ASRock Crashless BIOS allows users to update their BIOS without fear of failing. If power loss occurs during the BIOS updating process, ASRock Crashless BIOS will automatically finish the BIOS update procedure after regaining power. Please note that BIOS files need to be placed in the root directory of your USB disk.
Windows® 8 brings the ultimate boot up experience. The lightning boot up speed makes it hard to access the UEFI setup. ASRock Restart to UEFI allows users to enter the UEFI automatically when turning on the PC. By enabling this function, the PC will enter the UEFI directly after you restart.
Page 13: Motherboard Layout
H81 Pro BTC 1.4 Motherboard Layout CPU_FAN2 CPU_FAN1 PWR_FAN1 TPMS1 ATX12V1 USB 3.0 T: USB0 B: USB1 HDMI1 USB 2.0 Top: T: USB0 RJ-45 B: USB1 SLI/XFIRE_PWR2 CHA_FAN1 CLRCMOS1 CMOS USB 3.0 PCIE1 Battery H81 Pro BTC PCIE2 32Mb PCIE3.
No. Description CPU Fan Connector (CPU_FAN2) CPU Fan Connector (CPU_FAN1) Power Fan Connector (PWR_FAN1) ATX 12V Power Connector (ATX12V1) 2 x 240-pin DDR3 DIMM Slots (DDR3_A1, DDR3_B1) TPM Header (TPMS1) ATX Power Connector (ATXPWR1) Chassis Fan Connector (CHA_FAN1) Power LED Header (PLED1) Chassis Speaker Header (SPEAKER1) SATA2 Connector (SATA2_0) SATA3 Connector (SATA3_0)
Page 15: I/o Panel
H81 Pro BTC 1.5 I/O Panel No. Description No. Description PS/2 Mouse Port Front Speaker (Lime) Parallel Port Microphone (Pink) USB 3.0 Ports (USB3_01) USB 2.0 Ports (USB_01) HDMI Port D-Sub Port LAN RJ-45 Port* COM Port Line In (Light Blue) PS/2 Keyboard Port * There are two LEDs on each LAN port.
Page 16: Chapter 2 Installation
Chapter 2 Installation This is an ATX form factor motherboard. Before you install the motherboard, study the configuration of your chassis to ensure that the motherboard fits into it. Pre-installation Precautions Take note of the following precautions before you install motherboard components or change any motherboard settings.
Page 17: Installing The Cpu
H81 Pro BTC 2.1 Installing the CPU 1. Before you insert the 1150-Pin CPU into the socket, please check if the PnP cap is on the socket, if the CPU surface is unclean, or if there are any bent pins in the socket.
H81 Pro BTC Please save and replace the cover if the processor is removed. The cover must be placed if you wish to return the motherboard for after service.
Page 20: Installing The Cpu Fan And Heatsink
2.2 Installing the CPU Fan and Heatsink.
Page 21: Installing Memory Modules (dimm)
H81 Pro BTC 2.3 Installing Memory Modules (DIMM) This motherboard provides two 240-pin DDR3 (Double Data Rate 3) DIMM slots, and supports Dual Channel Memory Technology. 1. For dual channel configuration, you always need to install identical (the same brand, speed, size and chip-type) DDR3 DIMM pairs.
Page 23: Expansion Slots (pci Express Slots)
H81 Pro BTC 2.4 Expansion Slots (PCI Express Slots) There are 6 PCI Express slots on the motherboard. Before installing an expansion card, please make sure that the power supply is switched off or the power cord is unplugged. Please read the documentation of the expansion card and make necessary hardware settings for the card before you start the installation.
Page 24: Jumpers Setup
2.5 Jumpers Setup The illustration shows how jumpers are setup. When the jumper cap is placed on the pins, the jumper is “Short”. If no jumper cap is placed on the pins, the jumper is “Open”. The illustration shows a 3-pin jumper whose pin1 and pin2 are “Short” when a jumper cap is placed on these 2 pins.
Page 25: Onboard Headers And Connectors
H81 Pro BTC 2.6 Onboard Headers and Connectors Onboard headers and connectors are NOT jumpers. Do NOT place jumper caps over these headers and connectors. Placing jumper caps over the headers and connectors will cause permanent damage to the motherboard.
Serial ATA2 Connectors These two SATA2 SATA2_0 (SATA2_0: connectors support SATA see p.9, No. 11) data cables for internal (SATA2_1: storage devices with up to SATA2_1 see p.9, No. 13) 3.0 Gb/s data transfer rate. Serial ATA3 Connectors These two SATA3 SATA3_0 (SATA3_0: connectors support SATA.
H81 Pro BTC Chassis Speaker Header Please connect the chassis DUMMY SPEAKER (4-pin SPEAKER1) speaker to this header. (see p.9, No. 10) DUMMY SPDIF Out Connector Please connect the (2-pin SPDIF_OUT1) SPDIF_OUT connector of (see p.9, No. 19) a HDMI VGA card to this header with a cable.
ATX 12V Power This motherboard pro- Connector vides an 8-pin ATX 12V (8-pin ATX12V1) power connector. To use a (see p.9, No. 4) 4-pin ATX power supply, please plug it along Pin 1 and Pin 5. SLI/XFIRE Power Please connect these Connectors connectors to the (4-pin SLI/XFIRE_.
Page 29: Chapter 3 Software And Utilities Operation, Installing Drivers
H81 Pro BTC Chapter 3 Software and Utilities Operation 3.1 Installing Drivers The Support CD that comes with the motherboard contains necessary drivers and useful utilities that enhance the motherboard’s features. Running The Support CD To begin using the support CD, insert the CD into your CD-ROM drive. The CD automatically displays the Main Menu if “AUTORUN”.
Page 30: A-tuning
3.2 A-Tuning A-Tuning is ASRock’s multi purpose software suite with a new interface, more new features and improved utilities, including XFast RAM, Dehumidifier, Good Night LED, FAN-Tastic Tuning, OC Tweaker and a whole lot more. 3.2.1 Installing A-Tuning When you install the all-in-one driver to your system from ASRock’s support CD, A-Tuning will be auto-installed as well.
H81 Pro BTC Tools Various tools and utilities. XFast RAM Boost the system’s performance and extend the HDD’s or SDD’s lifespan! Create a hidden partition, then assign which files should be stored in the RAM drive. Fast Boot Fast Boot minimizes your computer's boot time. Please note that Ultra Fast mode is only supported by Windows 8 and the VBIOS must support UEFI GOP if you are using an external graphics card.
Dehumidifier Prevent motherboard damages due to dampness. Enable this function and configure the period of time until the computer powers on, and the duration of the dehumidifying process. OC Tweaker Configurations for overclocking the system. System Info View information about the system.
H81 Pro BTC Tech Service Contact Tech Service.
Page 34: IntelВ® Smart Connect Technology
3.3 Intel® Smart Connect Technology Intel® Smart Connect Technology is a feature that periodically wakes your computer from Windows® sleep state to refresh email or social networking applications. It saves your waiting time and keeps the content always up-to-date. 3.3.1 System Requirements •.
Page 35: Setup Guide
3.3.2 Setup Guide Installing ASRock Smart Connect Utility Step 1 Install ASRock Smart Connect Utility, which is located in the folder at the following path of the Support CD: \ ASRock Utility > Smart Connect. Step 2 Once installed, run ASRock Smart Connect from your desktop or go to Windows.
Step 3 Click the Add button. Take Foxmail as an example, add Foxmail to the Application list. Step 4 Select Foxmail from the Application List, then click the arrow pointing right to add this application to the Smart Connect List. Step 5 Click Apply to enable Smart Connect.
H81 Pro BTC Step 6 Double-click the Intel® Smart Connect Technology Manager icon in the Windows system tray. Step 7 Drag the slider to configure how often the system will connect to the network to download updates. Shorter durations will provide more frequent updates, but may cause more power consumption.
The system will wake up from sleep state periodically, and then start to update Foxmail. The screen will not display anything so the computer can maintain minimum power usage. Afterwards, the system will automatically return to sleep state again. Upon waking up the system, you will find the new mail that were sent to you during sleep state are already updated and ready to be read in Foxmail.
Page 39: Start8
3.4.1 Installing Start8 Install Start8, which is located in the folder at the following path of the Support CD: \ ASRock Utility > Start8. 3.4.2 Configuring Start8 Style Select between the Windows 7 style and Windows 8 style Start Menu. Then select.
Configure Configure provides configuration options, including icon sizes, which shortcuts you want Start Menu to display, quick access to recently used apps, the functionality of the power button, and more. Control.
H81 Pro BTC Control lets you configure what a click on the start button or a press on the Windows key does. Desktop Desktop allows you to disable the hot corners when you are working on the desktop. It also lets you choose whether or not the system boots directly into desktop mode and bypass the Metro user interface.
Page 42: Chapter 4 Uefi Setup Utility, Introduction, Uefi Menu Bar
Chapter 4 UEFI SETUP UTILITY 4.1 Introduction ASRock Interactive UEFI is a blend of system configuration tools, cool sound effects and stunning visuals. Not only will it make BIOS setup less difficult but also a lot more amusing. This section explains how to use the UEFI SETUP UTILITY to configure your system.
Page 43: Navigation Keys
H81 Pro BTC 4.1.2 Navigation Keys Use key or key to choose among the selections on the menu bar, and use key or key to move the cursor up or down to select items, then press .
Page 44: Main Screen
When you enter the UEFI SETUP UTILITY, the Main screen will appear and display the system overview. Active Page on Entry Select the default page when entering the UEFI setup utility. UEFI Guide UEFI Guide is a quick tutorial for ASRock's UEFI setup Utility. You may abort the tutorial by pressing "esc".
Page 45: Oc Tweaker Screen
H81 Pro BTC 4.3 OC Tweaker Screen In the OC Tweaker screen, you can set up overclocking features. Because the UEFI software is constantly being updated, the following UEFI setup screens and descriptions are for reference purpose only, and they may not exactly match what you see on your screen.
Page 46: Cpu Configuration, Internal Pll Overvoltage, Long Duration Power Limit
CPU Configuration Multi core enhancement Improve the system's performance by forcing the CPU to perform the highest frequency on all CPU cores simultaneously. Disable to reduce power consumption. CPU Ratio The CPU speed is determined by the CPU Ratio multiplied with the BCLK. Increasing the CPU Ratio will increase the internal CPU clock speed without affecting the clock speed of other components.
Page 47: Long Duration Maintained, Dram Timing Configuration
H81 Pro BTC Long Duration Maintained Configure the period of time until the CPU ratio is lowered when the Long Duration Power Limit is exceeded. Short Duration Power Limit Configure Package Power Limit 2 in watts. When the limit is exceeded, the CPU ratio will be lowered immediately.
Page 48: Dram Configuration
DRAM Configuration CAS# Latency (tCL) The time between sending a column address to the memory and the beginning of the data in response. RAS# to CAS# Delay (tRCD) The number of clock cycles required between the opening of a row of memory and accessing columns within it.
H81 Pro BTC Refresh Cycle Time (tRFC) The number of clocks from a Refresh command until the first Activate command to the same rank. RAS to RAS Delay (tRRD) The number of clocks between two rows activated in different banks of the same rank.
tWRRDDR Configure between module write to read delay from different ranks. tWRRDDD Use this to change DRAM tRRSR Auto/Manual settings. The default is [Auto]. Configure between module write to read delay from different DIMMs. tWRWR Configure between module write to write delay. tWRWRDR Configure between module write to write delay from different ranks.
H81 Pro BTC ODT WR (CHB) Configure the memory on die termination resistors' WR for channel B. ODT NOM (CHA) Use this to change ODT (CHA) Auto/Manual settings. The default is [Auto]. ODT NOM (CHB) Use this to change ODT (CHB) Auto/Manual settings. The default is [Auto].
Page 52: Voltage Configuration
CPU Cache Override Voltage Add voltage to the CPU Cache when the system is under heavy load. CPU Cache Voltage Offset Configure the voltage for the CPU Cache. Setting the voltage higher may increase system stability when overclocking. System Agent Voltage Offset Configure the voltage for the System Agent.
Page 53: Advanced Screen
H81 Pro BTC 4.4 Advanced Screen In this section, you may set the configurations for the following items: CPU Con- figuration, Chipset Configuration, Storage Configuration, Intel® Smart Connect Technology, Super IO Configuration, ACPI Configuration, USB Configuration and Trusted Computing. Setting wrong values in this section may cause the system to malfunction.
Page 54: Cpu Configuration
4.4.1 CPU Configuration Active Processor Cores Select the number of cores to enable in each processor package. CPU C States Support Enable CPU C States Support for power saving. It is recommended to keep C3, C6 and C7 all enabled for better power saving. Enhanced Halt State (C1E) Enable Enhanced Halt State (C1E) for lower power consumption.
Page 55: Intel Virtualization Technology, Hardware Prefetcher
H81 Pro BTC CPU Thermal Throttling Enable CPU internal thermal control mechanisms to keep the CPU from overheat- ing. No-Execute Memory Protection Processors with No-Execution Memory Protection Technology may prevent certain classes of malicious buffer overflow attacks. Intel Virtualization Technology.
Page 56: Chipset Configuration
4.4.2 Chipset Configuration Primary Graphics Adapter Select a primary VGA. VT-d Intel® Virtualization Technology for Directed I/O helps your virtual machine monitor better utilize hardware by improving application compatibility and reliability, and providing additional levels of manageability, security, isolation, and I/O performance.
Page 57: Render Standby, Front Panel, Onboard Lan, Deep Sleep
H81 Pro BTC Render Standby Power down the render unit when the GPU is idle for lower power consumption. Onboard HD Audio Enable/disable onboard HD audio. Set to Auto to enable onboard HD audio and automatically disable it when a sound card is installed.
Page 58: Storage Configuration
4.4.3 Storage Configuration SATA Controller(s) Enable/disable the SATA controllers. SATA Mode Selection IDE: For better compatibility. AHCI: Supports new features that improve performance. AHCI (Advanced Host Controller Interface) supports NCQ and other new features that will improve SATA disk performance but IDE mode does not have these advan- tages.
H81 Pro BTC 4.4.4 Intel® Smart Connect Technology ® Intel Smart Connect Technology ® Intel Smart Connect Technology automatically updates your email and social networks, such as Twitter, Facebook, etc. while the computer is in sleep mode.
Page 60: Super Io Configuration
4.4.5 Super IO Configuration Serial Port 1 Enable or disable the Serial port 1. Serial Port 1 Address Select the address of the Serial port 1. COM2 & IR Enable or disable the Serial port 2 and Infrared port. Serial Port 2 Enable or disable the Serial port 2.
Page 61: Device Mode
H81 Pro BTC Device Mode Select the device mode according to your connected device.
Page 62: Acpi Configuration
4.4.6 ACPI Configuration Suspend to RAM Select disable for ACPI suspend type S1. It is recommended to select auto for ACPI S3 power saving. Check Ready Bit Enable to enter the operating system after S3 only when the hard disk is ready, this is recommended for better system stability.
H81 Pro BTC RTC Alarm Power On Allow the system to be waked up by the real time clock alarm. Set it to By OS to let it be handled by your operating system. USB Keyboard/Remote Power On Allow the system to be waked up by an USB keyboard or remote controller.
Page 64: Usb Configuration
4.4.7 USB Configuration USB Controller Enable or disable all the USB 2.0 ports. Intel USB 3.0 Mode Enable or disable all the USB 3.0 ports. It is recommended to select [Smart Auto]. Legacy USB Support Enable or disable Legacy OS Support for USB 2.0 devices. If you encounter USB compatibility issues it is recommended to disable legacy USB support.
Page 65: Trusted Computing
H81 Pro BTC 4.4.8 Trusted Computing Security Device Support Enable to activate Trusted Platform Module (TPM) security for your hard disk drives.
Page 66: Tools
4.5 Tools UEFI Tech Service Contact ASRock Tech Service if you are having trouble with your PC. Please setup network configuration before using UEFI Tech Service. Easy Driver Installer For users that don’t have an optical disk drive to install the drivers from our support.
H81 Pro BTC Internet Setting Enable or disable sound effects in the setup utility. UEFI Download Server Select a server to download the UEFI firmware. Dehumidifier Function If Dehumidifier Function is enabled, the computer will power on automatically to dehumidify the system after entering S4/S5 state.
Save User Default Type a profile name and press enter to save your settings as user default. Load User Default Load previously saved user defaults.
Page 69: Hardware Health Event Monitoring Screen
H81 Pro BTC 4.6 Hardware Health Event Monitoring Screen This section allows you to monitor the status of the hardware on your system, including the parameters of the CPU temperature, motherboard temperature, fan speed and voltage. CPU Fan 1 & 2 Setting Select a fan mode for CPU Fans 1&2, or choose Customize to set 5 CPU.
Page 70: Boot Screen
4.7 Boot Screen This section displays the available devices on your system for you to configure the boot settings and the boot priority. Fast Boot Fast Boot minimizes your computer's boot time. In fast mode you may not boot from an USB storage device. Ultra Fast mode is only supported by Windows 8 and the VBIOS must support UEFI GOP if you are using an external graphics card.
H81 Pro BTC Full Screen Logo Enable to display the boot logo or disable to show normal POST messages. AddOn ROM Display Enable AddOn ROM Display to see the AddOn ROM messages or configure the AddOn ROM if you've enabled Full Screen Logo. Disable for faster boot speed.
Launch PXE OpROM Policy Select UEFI only to run those that support UEFI option ROM only. Select Legacy only to run those that support legacy option ROM only. Launch Storage OpROM Policy Select UEFI only to run those that support UEFI option ROM only. Select Legacy only to run those that support legacy option ROM only.
Page 73: Security Screen
H81 Pro BTC 4.8 Security Screen In this section you may set or change the supervisor/user password for the system. You may also clear the user password. Supervisor Password Set or change the password for the administrator account. Only the administrator has authority to change the settings in the UEFI Setup Utility.
Page 74: Exit Screen
4.9 Exit Screen Save Changes and Exit When you select this option the following message, “Save configuration changes and exit setup?” will pop out. Select [OK] to save changes and exit the UEFI SETUP UTILITY. Discard Changes and Exit When you select this option the following message, “Discard changes and exit setup?”.
ASRock H81 Pro BTC R2.0 Intel Chipset Driver 10.1.1.8
Key Features:
- ASRock Super Alloy
- Supports New 4th and 4th Generation Intel Core i7/i5/i3/Xeon/Pentium/Celeron Processors (Socket 1150)
- All Solid Capacitor design
- Digi Power, 4 Power Phase design
- Supports Dual Channel DDR3 1600
- 1 x PCIe 2.0 x16, 5 x PCIe 2.0 x1
- Graphics output options: D-Sub, HDMI
- 5.1 CH HD Audio (Realtek ALC662 Audio Codec)
- 2 x SATA3, 2 x SATA2
- 2 x USB 3.0, 6 x USB 2.0 (4 Front, 2 Rear)
- Realtek Gigabit LAN
- Supports Full Spike Protection, ASRock Live Update & APP Shop
INSTALLING THE SOFTWARE IN INTERACTIVE MODE:
- Verify that all system requirements have been met.
- Download and unzip the archive.
- Run the setup program.
- You will be prompted to agree to the license agreement. If you do not agree, the installation program will exit.
- Upon successful installation you will see a screen listing Intel Chipset Device Software as installed. You can view the instalation logs by clicking on View Log Files in the bottom left-hand side corner.
INSTALLING THE SOFTWARE IN SILENT MODE:
- Verify that all system requirements have been met.
- Download and unzip the archive.
- Run the setup program for silent install: SetupChipset.exe -s
- The utility will perform the necessary updates and record the installation status in the following system registry key: HKEY_LOCAL_MACHINESoftwareIntelINFInst
- If the utility was not invoked with the "-norestart" swith, the system may automatically restart if the setup was successful.
- NOTE: If prompted, the system MUST be restarted for all device updates to take effect.
- To determine whether the install was successful, verify the "version" value in the registry key
- In Silent Mode the utility will not display the license agreement. When using Silent Mode the license agreement, license.txt, will be placed in the following folder: %ProgramFiles%IntelIntel Chipset Device Software
- Please read this agreement.
About Chipset Drivers:
Windows OS automatically installs a generic driver that allows computers to recognize basic motherboard functions. However, to make use of all board components, appropriate chipset drivers must be applied.
US Search Mobile Web
Welcome to the Yahoo Search forum! We’d love to hear your ideas on how to improve Yahoo Search.
The Yahoo product feedback forum now requires a valid Yahoo ID and password to participate.
You are now required to sign-in using your Yahoo email account in order to provide us with feedback and to submit votes and comments to existing ideas. If you do not have a Yahoo ID or the password to your Yahoo ID, please sign-up for a new account.
If you have a valid Yahoo ID and password, follow these steps if you would like to remove your posts, comments, votes, and/or profile from the Yahoo product feedback forum.
- Vote for an existing idea ( )
- or
- Post a new idea…
- Hot ideas
- Top ideas
- New ideas
- Category
- Status
- My feedback
Improve your services
Your search engine does not find any satisfactory results for searches. It is too weak. Also, the server of bing is often off
I created a yahoo/email account long ago but I lost access to it; can y'all delete all my yahoo/yahoo account except for my newest YaAccount
I want all my lost access yahoo account 'delete'; Requesting supporter for these old account deletion; 'except' my Newest yahoo account this Account don't delete! Because I don't want it interfering my online 'gamble' /games/business/data/ Activity , because the computer/security program might 'scure' my Information and detect theres other account; then secure online activities/ business securing from my suspicion because of my other account existing will make the security program be 'Suspicious' until I'm 'secure'; and if I'm gambling online 'Depositing' then I need those account 'delete' because the insecurity 'Suspicioun' will program the casino game 'Programs' securities' to be 'secure' then it'll be 'unfair' gaming and I'll lose because of the insecurity can be a 'Excuse'. Hope y'all understand my explanation!
I want all my lost access yahoo account 'delete'; Requesting supporter for these old account deletion; 'except' my Newest yahoo account this Account don't delete! Because I don't want it interfering my online 'gamble' /games/business/data/ Activity , because the computer/security program might 'scure' my Information and detect theres other account; then secure online activities/ business securing from my suspicion because of my other account existing will make the security program be 'Suspicious' until I'm 'secure'; and if I'm gambling online 'Depositing' then I need those account 'delete' because the insecurity 'Suspicioun' will program the casino game 'Programs' securities' to be… more
chithidio@Yahoo.com
i dont know what happened but i can not search anything.
Golf handicap tracker, why can't I get to it?
Why do I get redirected on pc and mobile device?
Rahyaftco@yahoo.com
RYAN RAHSAD BELL literally means
Question on a link
In the search for Anaïs Nin, one of the first few links shows a picture of a man. Why? Since Nin is a woman, I can’t figure out why. Can you show some reason for this? Who is he? If you click on the picture a group of pictures of Nin and no mention of that man. Is it an error?
Repair the Yahoo Search App.
Yahoo Search App from the Google Play Store on my Samsung Galaxy S8+ phone stopped working on May 18, 2018.
I went to the Yahoo Troubleshooting page but the article that said to do a certain 8 steps to fix the problem with Yahoo Services not working and how to fix the problem. Of course they didn't work.
I contacted Samsung thru their Samsung Tutor app on my phone. I gave their Technican access to my phone to see if there was a problem with my phone that stopped the Yahoo Search App from working. He went to Yahoo and I signed in so he could try to fix the Yahoo Search App not working. He also used another phone, installed the app from the Google Play Store to see if the app would do any kind of search thru the app. The Yahoo Search App just wasn't working.
I also had At&t try to help me because I have UVERSE for my internet service. My internet was working perfectly. Their Technical Support team member checked the Yahoo Search App and it wouldn't work for him either.
We can go to www.yahoo.com and search for any topic or website. It's just the Yahoo Search App that won't allow anyone to do web searches at all.
I let Google know that the Yahoo Search App installed from their Google Play Store had completely stopped working on May 18, 2018.
I told them that Yahoo has made sure that their Yahoo members can't contact them about anything.
I noticed that right after I accepted the agreement that said Oath had joined with Verizon I started having the problem with the Yahoo Search App.
No matter what I search for or website thru the Yahoo Search App it says the following after I searched for
www.att.com.
WEBPAGE NOT AVAILABLE
This webpage at gttp://r.search.yahoo.com/_ylt=A0geJGq8BbkrgALEMMITE5jylu=X3oDMTEzcTjdWsyBGNvbG8DYmyxBHBvcwMxBHZ0aWQDTkFQUEMwxzEEc2VjA3NylRo=10/Ru=https%3a%2f%2fwww.att.att.com%2f/Rk=2/Es=plkGNRAB61_XKqFjTEN7J8cXA-
could not be loaded because:
net::ERR_CLEARTEXT_NOT_PERMITTED
I tried to search for things like www.homedepot.com. The same thing happened. It would say WEBPAGE NOT AVAILABLE. The only thing that changed were all the upper and lower case letters, numbers and symbols.
Then it would again say
could not be loaded because:
net::ERR_CLEARTEXT_NOT_PERMITTED
This is the same thing that happened when Samsung and At&t tried to do any kind of searches thru the Yahoo Search App.
Yahoo needs to fix the problem with their app.
Yahoo Search App from the Google Play Store on my Samsung Galaxy S8+ phone stopped working on May 18, 2018.
I went to the Yahoo Troubleshooting page but the article that said to do a certain 8 steps to fix the problem with Yahoo Services not working and how to fix the problem. Of course they didn't work.
I contacted Samsung thru their Samsung Tutor app on my phone. I gave their Technican access to my phone to see if there was a problem with my phone that stopped the Yahoo Search App from working. He went to Yahoo and… more
ASRock H81 Pro BTC Manual
Also See for ASRock H81 Pro BTC
Related Manuals for ASRock H81 Pro BTC
Summary of Contents for ASRock H81 Pro BTC
Page 1: Copyright Notice
(including damages for loss of proits, loss of business, loss of data, interruption of business and the like), even if ASRock has been advised of the possibility of such damages arising from any defect or error in the documentation or product.
Page 3: Motherboard Layout
H81 Pro BTC Motherboard Layout CPU_FAN2 CPU_FAN1 PWR_FAN1 TPMS1 ATX12V1 USB 3.0 T: USB0 B: USB1 HDMI1 USB 2.0 Top: T: USB0 RJ-45 B: USB1 SLI/XFIRE_PWR2 CHA_FAN1 CLRCMOS1 CMOS USB 3.0 PCIE1 Battery H81 Pro BTC PCIE2 32Mb PCIE3 BIOS.
No. Description CPU Fan Connector (CPU_FAN2) CPU Fan Connector (CPU_FAN1) Power Fan Connector (PWR_FAN1) ATX 12V Power Connector (ATX12V1) 2 x 240-pin DDR3 DIMM Slots (DDR3_A1, DDR3_B1) TPM Header (TPMS1) ATX Power Connector (ATXPWR1) Chassis Fan Connector (CHA_FAN1) Power LED Header (PLED1) Chassis Speaker Header (SPEAKER1) SATA2 Connector (SATA2_0) SATA3 Connector (SATA3_0)
H81 Pro BTC I/O Panel No. Description No. Description PS/2 Mouse Port Front Speaker (Lime) Parallel Port Microphone (Pink) USB 3.0 Ports (USB3_01) USB 2.0 Ports (USB_01) HDMI Port D-Sub Port LAN RJ-45 Port* COM Port Line In (Light Blue) PS/2 Keyboard Port * here are two LEDs on each LAN port.
Page 6: Chapter 1 Introduction, Package Contents
ASRock’s website without further notice. If you require technical support related to this motherboard, please visit our website for speciic information about the model you are using. You may ind the latest VGA cards and CPU support list on ASRock’s website as well. ASRock website http://www.asrock.com.
H81 Pro BTC 1.2 Speciications • ATX Form Factor Platform • All Solid Capacitor design • Supports 4 Generation Intel® Core i7 / i5 / i3 / Xeon® / Pentium® / Celeron® in LGA1150 Package • Digi Power design • 4 Power Phase design • Supports Intel®.
• Supports Auto Lip Sync, Deep Color (12bpc), xvYCC and HBR (High Bit Rate Audio) with HDMI Port (Compliant HDMI monitor is required) • Supports HDCP with HDMI Port • Supports Full HD 1080p Blu-ray (BD) playback with HDMI Port • 5.1 CH HD Audio (Realtek ALC662 Audio Codec) Audio • PCIE x1 Gigabit LAN 10/100/1000 Mb/s.
• Microsot® Windows® 8.1 32-bit / 8.1 64-bit / 8 32-bit / 8 64- bit / 7 32-bit / 7 64-bit • FCC, CE, WHQL Certiica- • ErP/EuP ready (ErP/EuP ready power supply is required) tions * For detailed product information, please visit our website: http://www.asrock.com.
1. Due to limitation, the actual memory size may be less than 4GB for the reserva- tion for system usage under Windows® 32-bit operating systems. Windows® 64-bit operating systems do not have such limitations. You can use ASRock XFast RAM to utilize the memory that Windows® cannot use.
Page 11: Unique Features
LED, FAN-Tastic Tuning, OC Tweaker and a whole lot more. ASRock Instant Flash ASRock Instant Flash is a BIOS lash utility embedded in Flash ROM. his conve- nient BIOS update tool allows you to update the system BIOS in a few clicks without preparing an additional loppy diskette or other complicated lash utility.
ASRock Crashless BIOS ASRock Crashless BIOS allows users to update their BIOS without fear of failing. If power loss occurs during the BIOS updating process, ASRock Crashless BIOS will automatically inish the BIOS update procedure ater regaining power. Please note that BIOS iles need to be placed in the root directory of your USB disk.
Windows® 8 brings the ultimate boot up experience. he lightning boot up speed makes it hard to access the UEFI setup. ASRock Restart to UEFI allows users to enter the UEFI automatically when turning on the PC. By enabling this function, the PC will enter the UEFI directly ater you restart.
Page 14: Chapter 2 Installation
Chapter 2 Installation his is an ATX form factor motherboard. Before you install the motherboard, study the coniguration of your chassis to ensure that the motherboard its into it. Pre-installation Precautions Take note of the following precautions before you install motherboard components or change any motherboard settings.
Page 15: Installing The Cpu
H81 Pro BTC 2.1 Installing the CPU 1. Before you insert the 1150-Pin CPU into the socket, please check if the PnP cap is on the socket, if the CPU surface is unclean, or if there are any bent pins in the socket.
H81 Pro BTC Please save and replace the cover if the processor is removed. he cover must be placed if you wish to return the motherboard for ater service.
2.2 Installing the CPU Fan and Heatsink.
Page 19: Installing Memory Modules (dimm)
H81 Pro BTC 2.3 Installing Memory Modules (DIMM) his motherboard provides two 240-pin DDR3 (Double Data Rate 3) DIMM slots, and supports Dual Channel Memory Technology. 1. For dual channel coniguration, you always need to install identical (the same brand, speed, size and chip-type) DDR3 DIMM pairs.
Page 21: Expansion Slots (pci Express Slots)
H81 Pro BTC 2.4 Expansion Slots (PCI Express Slots) here are 6 PCI Express slots on the motherboard. Before installing an expansion card, please make sure that the power supply is switched of or the power cord is unplugged. Please read the documentation of the expansion card and make necessary hardware settings for the card before you start the installation.
Page 22: Jumpers Setup
2.5 Jumpers Setup he illustration shows how jumpers are setup. When the jumper cap is placed on the pins, the jumper is “Short”. If no jumper cap is placed on the pins, the jumper is “Open”. he illustration shows a 3-pin jumper whose pin1 and pin2 are “Short” when a jumper cap is placed on these 2 pins.
Page 23: Onboard Headers And Connectors
H81 Pro BTC 2.6 Onboard Headers and Connectors Onboard headers and connectors are NOT jumpers. Do NOT place jumper caps over these headers and connectors. Placing jumper caps over the headers and connectors will cause permanent damage to the motherboard.
Serial ATA2 Connectors hese two SATA2 SATA2_0 (SATA2_0: connectors support SATA see p.1, No. 11) data cables for internal (SATA2_1: storage devices with up to SATA2_1 see p.1, No. 13) 3.0 Gb/s data transfer rate. Serial ATA3 Connectors hese two SATA3 SATA3_0 (SATA3_0: connectors support SATA.
H81 Pro BTC Chassis Speaker Header Please connect the chassis DUMMY SPEAKER (4-pin SPEAKER1) speaker to this header. DUMMY (see p.1, No. 10) SPDIF Out Connector Please connect the (2-pin SPDIF_OUT1) SPDIF_OUT connector of (see p.1, No. 19) a HDMI VGA card to this header with a cable.
ATX 12V Power his motherboard pro- Connector vides an 8-pin ATX 12V (8-pin ATX12V1) power connector. To use a (see p.1, No. 4) 4-pin ATX power supply, please plug it along Pin 1 and Pin 5. SLI/XFIRE Power Please connect these Connectors connectors to the (4-pin SLI/XFIRE_.
H81 Pro BTC 1 Einleitung Vielen Dank, dass Sie sich für das H81 Pro BTC von ASRock entschieden haben – ein zuverlässiges Motherboard, das konsequent unter der strengen Qualitäts- kontrolle von ASRock hergestellt wurde. Es liefert ausgezeichnete Leistung mit robustem Design, das ASRocks Streben nach Qualität und Beständigkeit erfüllt.
Page 28: Technische Daten
1.2 Technische Daten • ATX-Formfaktor Plattform • Vollständig solides Kondensatordesign • Unterstützt Intel® Core Prozessor i7 / i5 / i3 / Xeon® / Pentium® / Celeron® der 4. Generation im LGA1150-Paket • Digipower-Design • 4-Leistungsphasendesign • Unterstützt Intel® Turbo Boost 2.0-Technologie • Intel®.
H81 Pro BTC • Unterstützt Auto-Lippensynchronizität, hohe Farbtiefe (12 bpc), xvYCC und HBR (Audio mit hoher Bitrate) mit HDMI (konformer HDMI-Monitor erforderlich) • Unterstützt HDCP-Funktion mit HDMI-Port • Unterstützt Blu-ray- (BD) Wiedergabe (Full HD/1080p) mit HDMI-Port • 5.1-Kanal-HD-Audio (Realtek ALC662-Audiocodec) Audio • PCIE x1 Gigabit LAN 10/100/1000 Mb/s.
• Microsot® Windows® 8.1, 32 Bit / 8.1, 64 Bit / 8, 32 Bit / 8, 64 Betriebssystem Bit / 7, 32 Bit / 7, 64 Bit • FCC, CE, WHQL Zertiizierungen • ErP/EuP ready (ErP/EuP ready-Netzteil erforderlich) * Detaillierte Produktinformationen inden Sie auf unserer Webseite: http://www.asrock.com.
Speichers unter Windows®-Betriebssystemen mit 32 Bit weniger als 4 GB betragen. Windows®-Betriebssysteme mit 64 Bit haben keine derartigen Beschränkungen. Mit ASRock XFast RAM können Sie den Speicher einsetzen, den Windows® nicht nutzen kann. 2. Mit Realteks RealWoW!-Technologie wecken Sie Ihr Computersystem mit Mo- bilgeräten wie Smartphones, Tablets und anderen PCs von extern auf.
1.3 Jumpereinstellung Die Abbildung zeigt, wie die Jumper eingestellt werden. Wenn die Jumper- Kappe auf den Kontakten angebracht ist, ist der Jumper „kurzgeschlossen“. Wenn keine Jumper-Kappe auf den Kontakten angebracht ist, ist der Jumper „ofen“. Die Abbildung zeigt einen 3-poligen Jumper, dessen Kontakt 1 und Kontakt 2 „kurzgeschlossen“.
H81 Pro BTC 1.4 Integrierte Stiftleisten und Anschlüsse Integrierte Stitleisten und Anschlüsse sind KEINE Jumper. Bringen Sie KEINE Jumper-Kappen an diesen Stitleisten und Anschlüssen an. Durch Anbringen von Jumper-Kappen an diesen Stitleisten und Anschlüssen können Sie das Motherboard dauerhat beschädigen.
Betrieb-LED-Stitleiste Bitte verbinden Sie (3-polig, PLED1) die Betrieb-LED des (siehe S. 1, Nr. 9) Gehäuses zur Anzeige des Systembetriebsstatus mit dieser Stitleiste. Serial-ATA-II-Anschlüsse Diese beiden SATA-II- SATA2_0 (SATA2_0: Anschlüsse unterstützen siehe S. 1, Nr. 11) SATA-Datenkabel für (SATA2_1: interne Speichergeräte mit SATA2_1 siehe S.
H81 Pro BTC 1. High Deinition Audio unterstützt Anschlusserkennung, der Draht am Gehäuse muss dazu jedoch HDA unterstützt. Bitte befolgen Sie zum Installieren Ihres Systems die Anweisungen in unserer Anleitung und der Anleitung zum Gehäuse. 2. Wenn Sie ein AC’97-Audiopanel nutzen, installieren Sie es bitte anhand der nachstehenden Schritte an der Audiostitleiste (Frontblende): A.
CPU-Lüteranschlüsse Dieses Motherboard bietet (4-polig, CPU_FAN1) einen 4-poligen CPU- (siehe S. 1, Nr. 2) Lüteranschluss (lautloser Lüter). Falls Sie einen (3-polig, CPU_FAN2) 3-poligen CPU-Lüter FAN_SPEED +12V (siehe S. 1, Nr. 1) anschließen möchten, verbinden Sie ihn bitte mit Kontakt 1 bis 3. ATX-Netzanschluss Dieses Motherboard (24-polig, ATXPWR1)
H81 Pro BTC Serieller-Port-Stitleiste Diese COM2-Stitleiste (9-polig, COM2) unterstützt ein Modul für (siehe S. 1, Nr. 20) serielle Ports. TPM-Stitleiste Dieser Anschluss (17-polig, TPMS1) unterstützt das Trusted (siehe S. 1, Nr. 6) Platform Module- (TPM) System, das Schlüssel, digitale Zertiikate, Kennwörter und Daten.
1 Introduction Nous vous remercions d’avoir acheté cette carte mère ASRock H81 Pro BTC, une carte mère iable fabriquée conformément au contrôle de qualité rigoureux et constant appliqué par ASRock. Fidèle à son engagement de qualité et de durabilité, ASRock vous garantit une carte mère de conception robuste aux performances élevées.
H81 Pro BTC Spéciications • Facteur de forme ATX Plateforme • Conception à condensateurs solides • Prend en charge les processeurs 4ème Génération Intel® Processeur Core i7 / i5 / i3 / Xeon® / Pentium® / Celeron® en package LGA1150 • Conception Digi Power.
• Prend en charge les technologies Auto Lip Sync, Deep Color (12bpc), xvYCC et HBR (High Bit Rate Audio) avec HDMI (un écran compatible HDMI est requis) • Prend en charge la fonction HDCP via port HDMI • Prend en charge la lecture Blu-ray (BD) Full HD 1080p via port HDMI • Audio 5.1 CH HD (codec audio Realtek ALC662) Audio.
H81 Pro BTC • 1 x embase IR Connectique • 1 x embase pour port COM • 1 x embase LED d’alimentation • 1 x embase TPM • 2 x connecteurs pour ventilateur de processeur (1 x 4 broches, 1 x 3 broches) • 2 x connecteurs pour ventilateur de châssis (1 x 4 broches, 1 x.
Certiications • ErP/EuP Ready (alimentation ErP/EuP ready requise) * pour des informations détaillées de nos produits, veuillez visiter notre site : http://www.asrock.com Il est important de signaler que l'overcloking présente certains risques, incluant des modiications du BIOS, l’application d’une technologie d’overclocking déliée et l'utilisation d'outils d'overclocking développés par des tiers.
H81 Pro BTC 1.3 Coniguration des cavaliers (jumpers) L’illustration ci-dessous vous renseigne sur la coniguration des cavaliers (jumpers). Lorsque le capuchon du cavalier est installé sur les broches, le cavalier est ‘court- circuité’. Si le capuchon du cavalier n’est pas installé sur les broches, le cavalier est ‘ouvert’.
1.4 Embases et connecteurs de la carte mère Les embases et connecteurs situés sur la carte NE SONT PAS des cavaliers. Ne placez JAMAIS de capuchons de cavaliers sur ces embases ou connecteurs. Placer un capuchon de cavalier sur ces embases ou connecteurs endommagera irrémédiablement votre carte mère.
H81 Pro BTC Embase LED Veuillez brancher le d’alimentation LED d’alimentation (PLED1 à 3 broches) du châssis sur cette (voir p.1, No. 9) embase pour indiquer l’état d’alimentation du système. Connecteurs Serial ATA2 Ces deux connecteurs SATA2_0 (SATA2_0: SATA2 sont compatibles (voir p.1, No.
1. L’audio haute déinition prend en charge la technologie Jack Sensing (détection de la iche), mais le panneau grillagé du châssis doit être compatible avec la HDA pour fonctionner correctement. Veuillez suivre les instructions igurant dans notre manuel et dans le manuel du châssis pour installer votre système. 2.
H81 Pro BTC Connecteurs du Cette carte mère est dotée ventilateur du processeur d’un connecteur pour (CPU_FAN1 à 4 broches) ventilateur de processeur (voir p.1, No. 2) (Quiet Fan) à 4 broches. Si vous envisagez de FAN_SPEED (CPU_FAN2 à 3 broches)
Embase pour port série Cette embase COM2 (COM2 à 9 broches) prend en charge un (voir p.1, No. 20) module de port série. Embase TPM Ce connecteur prend en (TPMS1 à 17 broches) charge un module TPM (voir p.1, No. 6) (Trusted Platform Module –.
Web per informazioni speciiche relative al modello attualmente in uso. È possibile trovare l'elenco di schede VGA più recenti e di supporto di CPU anche sul sito Web di ASRock. Sito Web di ASRock http://www.asrock.com.
1.2 Speciiche • Fattore di forma ATX Piattaforma • Design di condensatore solido • Supporta Intel® Core i7 / i5 / i3 di 4a generazione / Xeon® / Pentium® / Celeron® in LGA1150 Package • Design Digi Power • 4 Power Phase Design • Supporta la tecnologia Intel®.
H81 Pro BTC • Supporta Auto Lip Sync, Deep Color (12 bpc), xvYCC e HBR (High Bit Rate Audio) con HDMI (è necessario un monitor conforme ad HDMI) • Supporta la funzione HDCP con porta HDMI • Supporta Blu-ray (BD) Full HD 1080p, riproduzione con porta HDMI • Audio HD a 5.1 canali (codec audio Realtek ALC662)
• Microsot® Windows® 8.1 a 32-bit/8.1 a 64-bit/8 a 32-bit/8 a 64-bit/7 a 32-bit/7 a 64-bit • FCC, CE, WHQL Certiicazioni • ErP/EuP Ready (è necessaria alimentazione ErP/EuP ready) * Per informazioni dettagliate sul prodotto, visitare il nostro sito Web: http://www.asrock.com.
4 GB per riservare l’uso del sistema ai sistemi operativi di Windows® a 32 bit. I sistemi operativi Windows® a 64 bit non possiedono tali limitazioni. È possibile utilizzare la RAM XFast di ASRock per utilizzare la memoria che Windows® non può utilizzare.
1.3 Impostazione jumper L'illustrazione mostra in che modo vengono impostati i jumper. Quando il cappuccio del jumper è posizionato sui pin, il jumper è "cortocircuitato". Se sui pin non è posizionato alcun cappuccio del jumper, il jumper è "aperto". L'illustrazione mostra un jumper a 3 pin i cui pin1 e pin2 sono "cortocircuitati".
H81 Pro BTC 1.4 Header e connettori sulla scheda Gli header e i connettori sulla scheda NON sono jumper. NON posizionare cappucci del jumper su questi header e connettori. Il posizionamento di cappucci del jumper su header e connettori provocherà danni permanenti alla scheda madre.
Header LED di Collegare il LED di alimentazione alimentazione chassis a (PLED1 a 3 pin) questo header per indicare (vedere pag. 1, n. 9) lo stato di alimentazione del sistema. Connettori Serial ATA2 Questi due connettori SATA2_0 (SATA2_0: SATA2 supportano i cavi vedere pag.
H81 Pro BTC 1. L'audio ad alta deinizione supporta le funzioni Jack sensing, ma il ilo del pannello sullo chassis deve supportare HDA per funzionare correttamente. Seguire le istruzioni presenti nel nostro manuale e nel manuale dello chassis per installare il sistema.
Connettori della ventola Questa scheda madre è della CPU dotata di un connettore (CPU_FAN1 a 4 pin) per la ventola della CPU (vedere pag. 1, n. 2) (Ventola silenziosa) a 4 pin. Se si decide di FAN_SPEED +12V (CPU_FAN2 a 3 pin) collegare una ventola della (vedere pag.
H81 Pro BTC Header porta seriale Questo header COM2 (COM2 a 9 pin) supporta un modulo di (vedere pag. 1, n. 20) porta seriale. Header TPM Questo connettore (TPMS1 a 17 pin) supporta il sistema (vedere pag. 1, n. 6) Trusted Platform Module (TPM), che può.
Page 60: Contenido Del Paquete
1 Introducción Gracias por comprar la placa base ASRock H81 Pro BTC, una placa base iable fabricada según el rigurosísimo control de calidad de ASRock. Ofrece un rendimiento excelente con un diseño resistente de acuerdo con el compromiso de calidad y resistencia de ASRock.
H81 Pro BTC 1.2 Especiicaciones • Factor de forma ATX Plataforma • Diseño de los Condensadores: All Solid • Compatible con 4.ª Generación de Intel® Core i7 / i5 / i3 / Xeon® / Pentium® / Celeron® en paquete LGA1150 • Diseño Digi Power.
• Compatible con Auto Lip Sync, Deep Color (12bpc), xvYCC y HBR (audio de alta velocidad de bits) con HDMI (requiere un monitor compatible con HDMI) • Compatible con función HDCP con puerto HDMI • Compatible con reproducción Blu-ray (BD) Full HD de 1080p con puerto HDMI • 5.1 Audio CH HD (Realtek ALC662 Audio Codec) Audio.
H81 Pro BTC • 1 cabezal IR Conectores • 1 cabezal de puerto COM • 1 cabezal de indicador LED de alimentación • 1 cabezal TPM • 2 conectores de ventilador de la CPU (1 de 4 pines y 1 de 3 pines) • 2 conectores de ventilador del chasis (1 de 4 pines y 1 de 3.
• Compatible con ErP/EuP (requiere toma de alimentación compatible con ErP/EuP) * Para obtener más información acerca del producto, visite nuestro sitio web: http://www.asrock.com Tenga en cuenta que existen ciertos riesgos relacionados con el overclocking (sobreaceleración), incluyendo el ajuste de la coniguración del BIOS, aplicando la Tecnología overcloking no vinculada o utilizando las herramientas de overclocking.
H81 Pro BTC 1.3 Instalación de los puentes La instalación muestra cómo deben instalarse los puentes. Cuando la tapa de puente se coloca en los pines, el puente queda “Corto”. Si no coloca la tapa de puente en los pines, el puente queda “Abierto”. La ilustración muestra un puente de 3 pines cuyo pin 1 y pin 2 son “Cortos”.
1.4 Conectores y cabezales incorporados Los cabezales y conectores incorporados NO son puentes. NO coloque tapas de puente sobre estos cabezales y conectores. Si coloca tapas de puente sobre los cabezales y conectores dañará de forma permanente la placa base. Cabezal del panel del Conecte el interruptor de alimentación.
H81 Pro BTC Cabezal de indicador Conecte el indicador LED LED de alimentación de alimentación del chasis (PLED1 de 3 pines) a este cabezal para indicar (consulte la pág.1, N.º 9) el estado de alimentación del sistema. Conectores Serie ATA2.
1. El Audio de Alta Deinición (HDA, en inglés) es compatible con el método de sensor de conectores, sin embargo, el cable del panel del chasis deberá ser compatible con HDA para que pueda funcionar correctamente. Siga las instrucciones que se indican en nuestro manual y en el manual del chasis para instalar su sistema.
H81 Pro BTC Conectores del ventilador Esta placa base contiene de la CPU un conector de ventilador (CPU_FAN1 de 4 pines) (ventilador silencioso) de (consulte la pág.1, N.º 2) CPU de 4 pines. Si tiene pensando conectar un FAN_SPEED +12V.
Cabezal de puerto serie Este cabezal COM2 (COM2 de 9 pines) admite un módulo de (consulte la pág.1, N.º 20) puerto serie. Cabezal TPM Este conector es (TPMS1 de 17 pines) compatible con el sistema (consulte la pág.1, N.º 6) Módulo de Plataforma Segura (TPM, en inglés), que puede almacenar.
сайте ASRock также можно найти самый последний перечень поддерживаемых VGA-карт и ЦП. Веб-сайт ASRock http://www.asrock.com. 1.1 Комплект поставки • Материнская плата ASRock H81 Pro BTC (форм-фактор ATX) • Краткое руководство по установке ASRock H81 Pro BTC • Диск с ПО для ASRock H81 Pro BTC • 2 х.
1.2 Спецификация • Форм-фактор ATX Платформа • Использование только твердотельных конденсаторов • Поддержка процессоров 4-го поколения Intel® Core ЦП i7 / i5 / i3 / Xeon® / Pentium® / Celeron® в исполнении LGA1150 • Digi Power Design • Система питания 4 • Поддержка.
H81 Pro BTC • Поддержка Auto Lip Sync, Deep Color (12bpc), xvYCC и HBR (High Bit Rate Audio) по HDMI (необходим HDMI- совместимый монитор) • Поддержка функции HDCP через порты HDMI • Поддержка воспроизведения Full HD 1080p Blu-ray (BD) через порты HDMI • 5.1-канальный.
• 1 x колодка IR Разъемы • 1 x колодка СОМ-порта • 1 x колодка светодиодного индикатора питания • 1 x колодка ТРМ • 2 x разъем для вентилятора ЦП (1 х 4-контактный, 1 х 3-контактный) • 2 x разъем для вентилятора корпуса (1 х 4-контактный, 1 х.
1. В связи с ограничением при работе под 32-разрядной ОС Windows® фактический объем памяти может быть меньше 4 Гбайт. Для 64-разрядных ОС Windows® таких ограничений нет. Для использования той памяти, которую ОС Windows® не может использовать, используйте ASRock XFast RAM. 2. Технология Realtek RealWoW! позволяет пробуждать этот компьютер.
1.3 Установка перемычек Установка перемычек показана на рисунке. При установке колпачковой перемычки на контакты перемычка «замкнута». Если колпачковая перемычка на контакты не установлена, перемычка «разомкнута». На рисунке показана 3-контактная перемычка с замкнутыми контактами 1 и 2 при установке на них колпачковой перемычки. Перемычка.
H81 Pro BTC 1.4 Колодки и разъемы, расположенные на материнской плате Расположенные на материнской плате колодки и разъемы перемычками НЕ являются. НЕ устанавливайте на эти колодки и разъемы колпачковые перемычки. Установка колпачковых перемычек на эти колодки и разъемы может вызвать неустранимое повреждение материнской платы.
Колодка светодиодного Подключите индикатора питания светодиодный (3-контактная, PLED1) индикатор питания (См. стр. 1, № 9) корпуса к этой колодке, чтобы обеспечить индикацию состояния питания системы. Разъемы Serial ATA2 Эти два разъема SATA2 SATA2_0 (SATA2_0: предназначены для (См. стр. 1, № 11) подключения.
H81 Pro BTC 1. Аудиосистема высокого разрешения поддерживает функцию распознавания разъема, но для е правильной работы необходимо, чтобы провод панели корпуса поддерживал передачу сигналов HDA. Инструкции по установке системы см. в этом руководстве и руководстве на корпус. 2. При использовании аудиопанели AC’97 подключите ее к аудиоколодке.
Разъемы вентиляторов Эта материнская плата снабжена ЦП 4-контактным разъемом (4-контактный, CPU_ для малошумящего FAN1) вентилятора ЦП. (См. стр. 1, № 2) Если вы собираетесь подключить 3-контактный (3-контактный, CPU_ FAN_SPEED +12V вентилятор процессора, FAN2) подключайте его к (См. стр. 1, № 1) контактам.
H81 Pro BTC Колодка Колодка COM2 поддерживает последовательного подключение модуля порта последовательного (9-контактная, COM2) порта. (См. стр. 1, № 20) Колодка ТРМ Этот разъем (17-контактная, TPMS1) обеспечивает (См. стр. 1, № 6) поддержку системы Trusted Platform Module (TPM), которая способна обеспечить.
Web site para obter informações especíicas acerca do modelo que está a utilizar. Também poderá encontrar a lista de placas VGA e CPU mais recentes suportadas no Web site da ASRock. Web site da ASRock http://www.asrock.com.
H81 Pro BTC 1.2 Especiicações • Formato ATX Plataforma • Design de condensador sólido • Suporta processadores Intel® Core i7 / i5 / i3 / Xeon® / Pentium® / Celeron® de 4ª geração em socket LGA1150 • Design Digi Power • Design com 4 fases de alimentação.
• Suporta Auto sincronização labial, Deep Color (12bpc), xvYCC e HBR (High Bit Rate Audio) com HDMI (É necessário um monitor compatível com HDMI) • Suporta a função HDCP com porta HDMI • Suporta reprodução Blu-ray (BD) Full HD a 1080p com porta HDMI • Áudio HD de 5.1 canais (Codec de áudio Realtek ALC662) Áudio.
H81 Pro BTC • 1 x Terminal IV Conector • 1 x Terminal de porta COM • 1 x Conector para LED de alimentação • 1 x Terminal TPM • 2 x Conectores da ventoinha da CPU (1 x 4 pinos, 1 x 3 pinos) • 2 x Conectores da ventoinha do chassis (1 x 4 pinos, 1 x 3.
• Preparada para ErP/EuP (é necessária uma fonte de alimentação preparada para ErP/EuP) * Para obter informações detalhadas acerca do produto, visite o nosso Web site: http://www.asrock.com Tenha em atenção que o overclocking inclui um determinado grau de risco, incluindo o ajuste das deinições na BIOS, a aplicação de tecnologia Untied Overclocking ou a.
H81 Pro BTC 1.3 Coniguração dos jumpers A imagem abaixo ilustra como os jumpers são conigurados. Quando a tampa do jumper é colocada nos pinos, o jumper é "Curto". Se não for colocada uma tampa de jumper nos pinos, o jumper é "Aberto". A imagem ilustra um jumper de 3 pinos cujos pino1 e pino2 estão "Curtos".
1.4 Terminais e conectores integrados Os terminais e conectores integrados NÃO são jumpers. NÃO coloque tampas de jumpers sobre estes terminais e conectores. Colocar tampas de jumpers sobre os terminais e conectores irá causar danos permanentes à placa principal. Terminal do painel de Ligue o botão de sistema alimentação, o botão de.
H81 Pro BTC Conector do LED de Ligue o LED de alimentação alimentação do chassis a (PLED1 de 3 pinos) este terminal para indicar (consultar p.1, N.º 9) o estado de alimentação do sistema. Conectores ATA2 de série Estes dois conectores.
1. O Áudio de alta deinição suporta Detecção de icha, mas o cabo de painel no chassis deverá suportar HDA para funcionar correctamente. Siga as instruções no nosso manual e no manual do chassis para instalar o seu sistema. 2. Se utilizar um painel de áudio AC’97, instale-o no terminal de áudio do painel frontal de acordo com os passos abaixo: A.
H81 Pro BTC Conectores da ventoinha Esta placa principal inclui da CPU um conector de ventoinha (CPU_FAN1 de 4 pinos) de CPU (Ventoinha (consultar p.1, N.º 2) silenciosa) de 4 pinos. Se pretender ligar uma FAN_SPEED +12V (CPU_FAN2 de 3 pinos) ventoinha de CPU de 3 (consultar p.1, N.º.
Terminal de porta de Este terminal COM2 série suporta um módulo de (COM2 de 9 pinos) porta de série. (consultar p.1, N.º 20) Terminal TPM Este conector suporta (TPMS1 de 17 pinos) um sistema com Módulo (consultar p.1, N.º 6) de Plataforma Coniável (TPM), que pode armazenar com segurança.
H81 Pro BTC 1 Giriş ASRock'ın zorlu kalite kontrol süreçlerinden geçmiş olan ASRock H81 Pro BTC anakartını satın aldığınız için teşekkür ederiz. Sağlam tasarımı ile ASRock'ın kalite ve dayanıklılık taahhüdüne uygun şekilde mükemmel performans sağlar. Anakart özellikleri ve BIOS yazılımı güncellenebileceğinden, bu dokümantasyonun içeriği herhangi bir bildirimde bulunulmaksızın değiştirilebilir.
1.2 Özellikler • ATX Form Faktörü Platform • Tam Katı Bağlayıcı tasarımı • 4ncü Nesil Intel® Core i7 / i5 / i3 / Xeon® / Pentium® / Celeron®, LGA1150 Paketinde desteklemektedir • Dijital Güç Tasarımı • 4 Güç Sahası Tasarımı • Intel®.
H81 Pro BTC • HDMI ile Otomatik Dudak Senkronizasyonu (12bpc=, xvYCC ve HBR (Yüksek Bit Hızında Ses) özelliklerini destekler (Uyumlu bir HDMI monitörü kullanılmalıdır) • HDMI bağlantı noktaları ile HDCP işlevini destekler • HDMI bağlantı noktalarıyla, Full HD 1080p Blu-ray (BD) kayıttan yürütme özelliklerini destekler.
• 1 x IR bağlantısı Bağlayıcı • 1 x COM Bağlantı noktası bağlantısı • 1 x Güç LED bağlantısı • 1 x TPM bağlantısı • 2 x CPU Fan bağlayıcıları (1 x 4-pin, 1 x 3-pin) • 2 x Kasa Fanı bağlayıcıları (1 x 4-pin, 1 x 3-pin) • 1 x Güç.
• ErP/EuP için hazır (ErP/EuP için hazır güç beslemesi gereklidir) * Detaylı ürün bilgisi için, lütfen web sitemizi ziyaret edin: http://www.asrock.com Lütfen, BIOS ayarlarını düzenleme, Bağımsız Hız Aşırtma Teknolojinin uygulanması ya da üçüncü kişilerin hız aşırtma araçlarının kullanılması da dahil olmak üzere tüm hız aşırtma işlemlerinin belirli bir risk taşıdığını.
1.3 Bağlantı Teli Kurulumu Çizim, bağlantı tellerinin kurulumunu göstermektedir. Tel kapağı, pimlerin üzerine yerleştirildiğinde, tel "Kısa" olur. Pimlerin üzerinde tel kapağı bulunmadığında, tel "Kısa" olur. Çizim, pin1 ve pin2 alanları "Kısa" olan ve bu iki pim üzerinde bir bağlantı teli kapağı bulunan 3-pin bağlantı telini göstermektedir. CMOS'u Temizle Bağlantı.
H81 Pro BTC 1.4 Ekli Bağlantılar ve Bağlayıcılar Ekli bağlantılar ve bağlayıcılar bağlantı teli değildir. Bağlantı teli kapaklarını bu bağlantı ve bağlayıcılar üzerine yerleştirmeyin. Bağlantı teli kapaklarının bağlantılar ile bağlayıcılar üzerine yerleştirilmesi, anakarta kalıcı hasar verebilir. Sistem Paneli Bağlantısı Güç anahtarını bağlayın, (9-pin PANEL1) kasa üzerindeki anahtar.
Güç LED Bağlantısı Sistemin güç durumunun (3-pin PLED1) belirtilmesi için lütfen (bkz. sf.1, No. 9) güç LED'ini bu bağlantıya takın. Seri ATA2 Bağlayıcıları Bu iki SATA2 bağlayıcısı, SATA2_0 veri aktarım hızı 3,0 Gb/ (SATA2_0: sn'ye kadar olan dahili bkz. sf.1, No. 11) depolama aygıtları.
H81 Pro BTC 1. Yüksek Tanımlı Ses, Jak Algılama özelliğini destekler, ancak bu işlevin düzgün çalışabilmesi için kasa üzerindeki panel kablosunun HDA işlevini desteklemesi gerekmektedir. Sisteminizi kurarken, lütfen kılavuzumuzdaki talimatlar ile kasa kılavuzundaki talimatları izleyin. 2. Bir AC’97 ses paneli kullanıyorsanız, lütfen bu paneli aşağıdaki adımları izleyerek ön panel ses bağlantısına takın.
CPU Fan Bağlayıcıları Bu anakart, 4-Pin CPU (4-pin CPU_FAN1) fan (Sessiz Fan) bağlayıcısı (bkz sf.1, No. 2) sağlamaktadır. 3-Pin CPU fan bağlamak istiyorsanız, (3-pin CPU_FAN2) lütfen Pin 1-3'ü kullanın. FAN_SPEED +12V (bkz sf.1, No. 1) ATX Güç Bağlayıcısı Bu anakart, 24-pin (24-pin ATXPWR1) ATX güç.
H81 Pro BTC Seri Bağlantı Noktası Bu COM2 bağlantısı seri Bağlantısı bağlantı yuvası modülünü (9-pin COM2) destekler. (bkz. sf.1, No. 20) TPM Bağlantısı Bu bağlayıcı, anahtarlar, (17-pin TPMS1) dijital sertifikalar, (bkz. sf.1, No. 6) parolalar ve verileri güvenli bir şekilde saklama özelliği.
ASRock 의 웹사이트에서 추가 통지 없이 제공됩니다 . 이 마더보드와 관련하여 기 술적 지원이 필요한 경우 , 당사의 웹사이트를 방문하여 사용 중인 모델에 대한 구체 적 정보를 구하십시오 . ASRock 의 웹사이트에서는 최신 VGA 카드와 CPU 지원 목 록도 찾을 수 있습니다 . ASRock 웹사이트 http://www.asrock.com.
H81 Pro BTC 1.2 규격 • ATX 폼 팩터 플랫폼 • 모든 솔리드 콘덴서 구조 • LGA1150 패키지로 제공되는 4 세대 Intel ® Core i7 / i5 / i3 / ® ® ® 지원 Xeon / Pentium / Celeron • Digi 전원 구조.
• HDMI 포트를 이용한 HDCP 기능 지원 • HDMI 포트를 이용한 Full HD 1080p Blu-ray (BD) 재생 지원 • 5.1 CH HD 오디오 지원 (Realtek ALC662 오디오 코덱 ) 오디오 • PCIE 1 개 , Gigabit LAN 10/100/1000 Mb/s • Realtek RTL8111GR •.
8.1 32 비트 / 8.1 64 비트 / 8 32 비트 / 8 Windows 64 비트 / 7 32 비트 / 7 64 비트 • FCC, CE, WHQL 인증 • ErP/EuP 사용 가능 (ErP/EuP 사용 가능 전원공급장치 필요 ) * 자세한 제품 정보에 대해서는 당사 웹사이트를 참조하십시오 : http://www.asrock.com.
위한 예비 메모리용 4GB 보다 더 적을 수 있습니다 . Windows 64 비트 운영체제 ® 에는 그러한 제한이 없습니다 . ASRock XFast RAM 을 사용하여 Windows 가 사 용할 수 없는 메모리를 이용할 수 있습니다 . 2. Realtek RealWoW! Technology 는 스마트폰 , 태블릿 , 또는 기타 PC 와 같은 원격.
H81 Pro BTC 1.3 점퍼 설정 그림은 점퍼를 어떻게 설정하는지 보여줍니다 . 점퍼 캡을 핀에 씌우면 점퍼가 ì 단 락î 됩니다 . 점퍼 캡을 핀에 씌우지 않으면 점퍼가 ì 단선î 됩니다 . 그림은 3 핀 점 퍼를 보여주며 핀 1 과 핀 2 는 점퍼 캡을 씌울 때 ì 단락î 됩니다 .
1.4 온보드 헤더 및 커넥터 온보드 헤더와 커넥터는 점퍼가 아닙니다 . 점퍼 캡을 온보드 헤더와 커넥터에 씌우 지 마십시오 . 점퍼 캡을 온보드 헤더와 커넥터에 씌우면 마더보드가 영구적으로 손 상됩니다 . 시스템 패널 헤더 섀시의 전원 스위치 , 리 (9 핀 PANEL1) 셋.
H81 Pro BTC 전원 LED 헤더 시스템 전원 상태를 나타 (3 핀 PLED1) 내려면 섀시 전원 LED (1 페이지 , 9 번 항목 참조 ) 를 이 헤더에 연결하십시 오 . 시리얼 ATA2 커넥터 이들 두 개의 SATA2 커 SATA2_0 넥터는.
1. 고음질 오디오는 잭 감지를 지원하지만 올바르게 작동하려면 섀시의 패널 와이어 가 HDA 를 지원해야 합니다 . 설명서 및 섀시 설명서에 나와 있는 지침을 따라 시 스템을 설치하십시오 . 2. ACí 97 오디오 패널을 사용할 경우 아래와 같은 절차를 따라 전면 패널 오디오 헤 더에.
H81 Pro BTC CPU 팬 커넥터 이 마더보드에는 4 핀 (4 핀 CPU_FAN1) CPU 팬 ( 저소음 팬 ) 커 (1 페이지 , 2 번 항목 참조 ) 넥터가 탑재되어 있습니 다 . 3 핀 CPU 팬을 연결 FAN_SPEED (3 핀 CPU_FAN2) 하려는.
시리얼 포트 헤더 이 COM2 헤더는 시리 (9 핀 COM2) 얼 포트 모듈을 지원합 (1 페이지 , 20 번 항목 참조 ) 니다 . TPM 헤더 이 커넥터는 키 , 디지털 (17 핀 TPMS1) 인증서 , 암호 및 데이 (1 페이지 , 6 번 항목 참조 ) 터를.
H81 Pro BTC H81 Pro BTC BIOS http://www.asrock.com. • H81 Pro BTC • H81 Pro BTC • H81 Pro BTC • 2 x ATA SATA • 1 x I/O.
• ATX • • LGA1150 Intel® Core i7 / i5 / i3 / Xeon® / Pentium® / Celeron® • • 4 • Intel® • Intel® H81 • DDR3 • 2 x DDR3 DIMM • DDR3 1600/1333/1066 ECC • 16GB • Intel® XMP 1.3/1.2 •.
H81 Pro BTC • HDMI HDMI 12bpc xvYCC HBR • HDMI HDCP • HDMI HD 1080p (BD) • 5.1 CH HD Realtek ALC662 • PCIE x1 LAN 10/100/1000 Mb/ • Realtek RTL8111GR • Realtek RealWoW! Technology • • LAN •.
• CPU • CPU/ • +12V +5V +3.3V CPU Vcore • Microsot® Windows® 8.1 32 / 8.1 64 / 8 32 / 8 64 / 7 32 / 7 64 • FCC CE WHQL • ErP/EuP Ready ErP/EuP ready http://www.asrock.com.
H81 Pro BTC BIOS 1. Windows® 32 Windows® Windows® XFast RAM 2. Realtek RealWoW! Home Cloud (.
CMOS (CLRCMOS1) CMOS p.1 No. 23 CLRCMOS1 CMOS CLRCMOS1 BIOS CMOS BIOS CMOS CMOS CMOS.
H81 Pro BTC p.1 No. 15 PWRBTN RESET PLED S1/S3 HDLED.
PLED1 p.1 No. 9 ATA2 SATA2 SATA2_0 SATA2_0: 3.0 Gb/ p.1 No. 11 SATA2_1: p.1 No. 13 SATA SATA2_1 ATA3 SATA3 SATA3_0 SATA3_0: 6.0 Gb/ p.1 No. 12 SATA3_1: p.1 No. 14 SATA SATA3_1 USB 2.0 USB_2_3 p.1 No. 17 USB_4_5 p.1 No.
H81 Pro BTC 2. AC 97 A. Mic_IN (MIC) MIC2_L B. Audio_R (RIN) OUT2_R Audio_L (LIN) OUT2_L (GND) (GND) D. MIC_RET OUT_RET AC 97 Realtek FrontMic SPEAKER1 p.1 No. 10 SPDIF Out SPDIF_OUT1 HDMI VGA p.1 No. 19 SPDIF_OUT +12V.
CPU_FAN1 p.1 No. 2 FAN_SPEED CPU_FAN2 +12V p.1 No. 1 ATXPWR1 p.1 No. 7 ATX12V ATX12V1 ATX12V p.1 No. 4 SLI/XFIRE SLI/XFIRE_ PWR1 p.1 No. 25 SLI/XFIRE_ PWR2 p.1 No. 24 p.1 No. 21.
H81 Pro BTC COM2 COM2 p.1 No. 20 TPMS1 p.1 No. 6.
1 简介 感谢您购买 ASRock H81 Pro BTC 主板,这是按照 ASRock 一贯严格质量控制标 准生产的性能可靠的主板。它提供符合 ASRock 质量和耐久性承诺的精良设计和 卓越性能。 由于主板规格和 BIOS 软件可能已更新,因此, 本文档的内容可能会随时更改,恕 不另行通知。如果本文档有任何修改,则更新的版本将发布在 ASRock 网站上,我 们不会另外进行通知。如果您需要与此主板相关的技术支持,请访问我们的网站 以具体了解所用型号的信息。您也可以在 ASRock 网站上找到最新 VGA 卡和 CPU 支持列表。ASRock 网站 http://www.asrock.com。 1.1 包装清单 • ASRock H81 Pro BTC 主板 (ATX 规格尺寸).
H81 Pro BTC 1.2 规格 • ATX 规格尺寸 平台 • 全固态电容 • 支持 LGA1150 封装第 4 代 Intel® Core i7 / i5 / i3 / Xeon® / Pentium® / Celeron® • Digi Power 设计 • 4 电源相设计 • 支持 Intel® Turbo Boost 2.0 技术.
• 通过 HDMI 端口支持 HDCP 功能 • 通过 HDMI 端口支持全高清 1080p Blu-ray (BD) 播放。 • 5.1 CH 高清音频 (Realtek ALC662 音频编解码器) 音频 • PCIE x1 Gigabit LAN 10/100/1000 Mb/s • Realtek RTL8111GR (见 “注意 2” ) • 支持 Realtek RealWoW! Technology •.
H81 Pro BTC • 1 x IR 接脚 接口 • 1 x COM 端口接脚 • 1 x 电源 LED 接脚 • 1 x TPM 接脚 • 2 x CPU 风扇接口 (1 x 4 针 , 1 x 3 针 ) •.
须认识到超频会有一定风险,包括调整 BIOS 设置,应用 “自由超频技术” ,或使用 第三方超频工具。超频可能会影响到系统的稳定性,甚至对系统的组件和设备造 成损坏。执行这项工作您应自担风险和自己承担费用。我们对由于超频而造成的 损坏概不负责。 1. 由于限制原因,实际内存容量可能会小于 4GB, 以保留给 Windows® 32-bit 操 作系统下的系统使用。Windows® 64-bit 操作系统没有此类限制。您可以使用 ASRock XFast RAM 来利用 Windows® 不能使用的内存。 2. Realtek RealWoW! Technology 可以让您从远程移动设备 (如:智能手机 、平板电 脑或其它 PC) 唤醒该系统。它需要第三方软件和应用程序来利用此功能。请访 问我们的网站查找 “家庭云” 主题。.
H81 Pro BTC 1.3 跳线设置 此图显示如何设置跳线。将跳线帽装到这些针脚上时,跳线 “短接” 。如果这些 针脚上没有装跳线帽,跳线 “开路” 。此图显示 3 针跳线, 当跳线帽装在针脚 1 和 针脚 2 “上,它们短接” 。 清除 CMOS 跳线 (CLRCMOS1) 默认 清除 CMOS (见第 1 页 ,第 23 个) CLRCMOS1 允许您清除 CMOS 中的数据。要清除和重置系统参数到默认设 置,请关闭计算机 , 从电源上拔下电源线插头。等候 15 秒后,使用跳线帽将.
1.4 板载接脚和接口 板载接脚和接口不是跳线。不要将跳线帽装到这些接脚和接口上。将跳线帽装到 这些接脚和接口上将会对主板造成永久性损坏。 系统面板接脚 按照下面的针脚分配,将 (9 针 PANEL1) 机箱上的电源开关、 重置 见第 1 页 ,第 15 个) 开关和系统状态指示灯 连接到此接脚。在连接线 缆前请记下正负针脚。 PWRBTN ( 电源开关 ): 连接到机箱前面板上的电源开关。您可以配置使用电源开关关闭系统的方式。 RESET ( 重置开关 ): 连接到机箱前面板上的重置开关。如果计算机死机,无法执行正常重新启动,按重 置开关重新启动计算机。 PLED (系统电源 LED) : 连接到机箱前面板上的状态指示灯 。系统操作操作时,此 LED 亮起。系统处在 S1/ S3 睡眠状态时,.
H81 Pro BTC 电源 LED 接脚 请将机箱电源 LED 连接 (3 针 PLED1) 到此接脚以指示系统电源 (见第 1 页 ,第 9 个) 状态。 串行 ATA2 接口 这两个 SATA2 接口支持 SATA2_0 最高 3.0 Gb/s 数据传输 (SATA2_0: 见第 1 页 , 第 11 个) 速率的内部存储设备的.
1. 高清音频支持插孔感测,但机箱上的面板连线必须支持 HDA 才能正常工作。请 按照我们的手册和机箱手册的说明安装系统。 2. 如果您使用 AC’ 97 音频面板,请按照以下步骤安装到前面板音频接脚: A. 将 Mic_IN (MIC) 连接到 MIC2_L. B。将 Audio_R (RIN) 连接到 OUT2_R,将 Audio_L (LIN) 连接到 OUT2_L. C。将接地端 (GND) 连接到接地端 (GND)。 D. MIC_RET 和 OUT_RET 只用于高清音频面板。您不需要针对 AC’ 97 音频面 板连接它们。 E. 要启用前麦克风,请转到 Realtek 控制面板上的 “FrontMic” (前麦克风) 选项 卡,调整.
H81 Pro BTC CPU 风扇接口 此主板提供 4 针 CPU 风 (4 针 CPU_FAN1) 扇 (静音风扇) 接口。如果 见第 1 页 ,第 2 个) 您打算连接 3 针 CPU 风 扇,请将它连接到脚 1-3。 FAN_SPEED (3 针 CPU_FAN2) +12V 见第 1 页 ,第 1 个).
串行端口接脚 此 COM2 接脚支持串行 (9 针 COM2) 端口模块。 (见第 1 页 ,第 20 个) TPM 接脚 此接口支持 Trusted (17 针 TPMS1) Platform Module (信任平 (见第 1 页 ,第 6 个) 台模块,TPM) 系统, 可 以安全地存储密钥、数字 证书、密码和数据。TPM 系统也可以帮助增强网络 安全,保护数字身份和确 保平台完整性。.
H81 Pro BTC 電子信息產品污染控制標示 依據中國發布的「電子信息產品污染控制管理辦法」及 SJ/T 11364-2006「電 子信息產品污染控制標示要求」,電子信息產品應進行標示,藉以向消費者揭 露產品中含有的有毒有害物質或元素不致發生外洩或突變從而對環境造成污染 或對人身、財產造成嚴重損害的期限。依上述規定,您可于本產品之印刷電路 板上看見圖一之標示。圖一中之數字為產品之環保使用期限。由此可知此主板 之環保使用期限為 10 年。 圖一 有毒有害物質或元素的名稱及含量說明 若您慾了解此產品的有毒有害物質或元素的名稱及含量說明,請參照以下表格 及說明。 有害物質或元素 部件名稱 鉛 (Pb) 鎘 (Cd) 汞 (Hg) 六价鉻 (Cr(VI)) 多溴聯苯 (PBB) 多溴二苯醚 (PBDE) 印刷電路板 及電子組件 外部信號連 接頭及線材 O: 表示該有毒有害物質在該部件所有均質材料中的含量均在 SJ/T 11363-2006 標準規定.
1 簡介 感謝您購買 ASRock H81 Pro BTC 主機板, 本主機板經 ASRock 嚴格品管製作, 是一套讓人信賴的可靠產品。 本產品採耐用設計所展現的優異效能,完全符合 ASRock 對品質及耐用度的承諾。 由於主機板規格及 BIOS 軟體可能會更新,所以本文件內容如有變更 ,恕不另行通 知。如本文件有任何修改, 可至 ASRock 網站逕行取得更新版本,不另外通知。若 您需要與本主機板相關的技術支援,請上我們的網站瞭解有關您使用機型的特定 資訊。您也可以在 ASRock 網站找到最新的 VGA 卡及 CPU 支援清單。ASRock 網 站 http://www.asrock.com. 1.1 包裝內容 • ASRock H81 Pro BTC 主機板 (ATX 尺寸).
H81 Pro BTC 1.2 規格 • ATX 尺寸 平台 • 全固態電容設計 • 支援第 4 代 Intel® Core i7 / i5 / i3 / Xeon® / Pentium® / Celeron® (LGA1150 封裝 ) • 數位電源設計 • 4 電源相位設計 • 支援 Intel® Turbo Boost 2.0 技術.
• 支援含 HDMI 連接埠的 HDCP 功能 • 支援透過 HDMI 連接埠的 Full HD 1080p Blu-ray (BD) 播放 • 5.1 CH HD 音訊 (Realtek ALC662 音訊轉碼器) 功能 音訊 • PCIE x1 Gigabit LAN 10/100/1000 Mb/s • Realtek RTL8111GR • 支援 Realtek RealWoW! Technology (請參閱 「注意 2」 ) •.
H81 Pro BTC • 1 x IR 標頭 接頭 • 1 x COM 連接埠標頭 • 1 x 電源 LED 標頭 • 1 x TPM 標頭 • 2 x CPU 風扇接頭 (1 x 4-pin、 1 x 3-pin) • 2 x 機殼風扇接頭 (1 x 4-pin、 1 x 3-pin) •.
* 如需產品詳細資訊,請上我們的網站: http://www.asrock.com 請務必理解,超頻可能產生某種程度的風險,其中包括調整 BIOS 中的設定、採用 自由超頻技術或使用協力廠商的超頻工具。超頻可能會影響您系統的穩定性,或 者甚至會對您系統的元件及裝置造成傷害。您應自行負擔超頻風險及成本。我們 對於因超頻所造成的可能損害概不負責。 1. 在 Windows® 32 位元作業系統下 ,因有保留供系統使用記憶體的限制,所以實際 記憶體大小可能低於 4GB。Windows® 64 位元作業系統則沒有此類限制。您可使 用 ASRock XFast RAM 運用 Windows® 無法使用的記憶體。 2. Realtek RealWoW! Technology 可讓您從智慧型手機、平板電腦或其他電腦等遠 端行動裝置喚醒本系統。 您必須安裝第三方軟體與應用程式, 才能使用此功能。 請瀏覽官網的 「家庭雲端」 主題。.
H81 Pro BTC 1.3 跳線設定 圖例顯示設定跳線的方式 。跳線蓋套在針腳上時,該跳線為 「短路」 。若沒有跳 線蓋套在針腳上,該跳線為 「開啟」 。圖例顯示 3-pin 跳線的跳線蓋套在 pin1 及 pin2 時,這兩個針腳皆為 「短路」 。 清除 CMOS 跳線 (CLRCMOS1) 預設 清除 CMOS (請參閱第 1 頁 ,編號 23) 您可利用 CLRCMOS1 清除 CMOS 中的資料。若要清除及重設系統參數為預設 設定 ,請先關閉電腦電源,再拔下電源供應器的電源線。在等待 15 秒後,請使.
1.4 板載標頭及接頭 板載標頭及接頭都不是跳線,請勿將跳線蓋套在這些標頭及接頭上。將跳線蓋套 在標頭及接頭上,將造成主機板永久性的受損。 系統面板標頭 請依照以下的針腳排 列將機殼上的電源開 (9-pin PANEL1) (請參閱第 1 頁 ,編號 15) 關、 重設開關及系統 狀態指示燈連接至此 標頭。在連接纜線之 前,請注意正負針腳。 PWRBTN(電源開關) : 連接至機殼前面板上的電源開關。您可設定使用電源開關關閉系統電源的方式。 RESET(重設開關) : 連接至機殼前面板上的重設開關。若電腦凍結且無法執行正常重新啟動,按下重 設開關即可重新啟動電腦。 PLED(系統電源 LED) : 連接至機殼前面板上的電源狀態指示燈。系統正在運作時,此 LED 會亮起。系統 進入 S1/S3 睡眠狀態時,LED 會持續閃爍。系統進入 S4 睡眠狀態或關機 (S5) 時, LED 會熄滅。.
H81 Pro BTC 電源 LED 標頭 請將機殼電源 LED 連 接至此標頭, 以指示系 (3-pin PLED1) (請參閱第 1 頁 ,編號 9) 統的電源狀態。 Serial ATA2 接頭 這兩組 SATA2 接頭皆 SATA2_0 支援內部儲存裝置的 (SATA2_0: 請參閱第 1 頁 ,編號 11) SATA 資料纜線,最高 可達 3.0 Gb/s 資料傳 (SATA2_1: 請參閱第.
1. 高解析度音訊支援智慧型音效介面偵測 (Jack Sensing),但機殼上的面板線必須 支援 HDA 才能正確運作。請依本手冊及機殼手冊說明安裝系統。 2. 若您使用 AC’ 97 音訊面板,請按照以下步驟安裝至前面板音訊標頭: A. 將 Mic_IN (MIC) 連接至 MIC2_L。 B. 將 Audio_R (RIN) 連接至 OUT2_R 且將 Audio_L (LIN) 連接至 OUT2_L。 C. 將接地 (GND) 連接至接地 (GND)。 D. MIC_RET 及 OUT_RET 僅供 HD 音訊面板使用。您不需要在 AC’ 97 音訊面 板上連接。.
H81 Pro BTC CPU 風扇接頭 本主機板配備 4-Pin CPU 風扇 (靜音風扇) (4-pin CPU_FAN1) (請參閱第 1 頁 ,編號 2) 接頭。若您計畫連接 3-Pin CPU 風扇,請接 FAN_SPEED 至 Pin 1-3。 (3-pin CPU_FAN2) +12V (請參閱第 1 頁 ,編號 1) ATX 電源接頭 本主機板配備一組 24-pin ATX 電源接 (24-pin ATXPWR1) (請參閱第.
TPM 標頭 此接頭支援信賴平台模 組 (TPM) 系統, 可確保 (17-pin TPMS1) (請參閱第 1 頁 ,編號 6) 儲存金鑰、數位憑證、密 碼及資料的安全。TPM 系統也能強化網路安 全、保護數位身分並確 定平台完整性。.
ASRock tanpa pemberitahuan lebih lanjut. Jika Anda memerlukan dukungan teknis terkait motherboard ini, kunjungi situs web kami untuk mendapatkan informasi khusus tentang model yang Anda gunakan. Anda juga dapat menemukan kartu VGA dan datar dukungan CPU terkini di situs web ASRock. Situs web ASRock http://www.asrock.com. 1.1 Isi Kemasan • Motherboard ASRock H81 Pro BTC (Bentuk dan Ukuran ATX)
1.2 Spesiikasi • Bentuk dan Ukuran ATX Platform • Desain Kapasitor Solid • Mendukung Intel® Core i7 / i5 / i3 Generasi Ke-4 / Xeon® / Pentium® / Celeron® dalam Paket LGA1150 • Desain Digi Power • Desain 4 Fase Daya • Mendukung Teknologi Intel®.
H81 Pro BTC • Mendukung Auto Lip Sync, Deep Color (12bpc), xvYCC, dan HBR (High Bit Rate Audio) dengan HDMI (memerlukan monitor HDMI yang kompatibel) • Mendukung fungsi HDCP dengan port HDMI • Mendukung pemutaran Full HD 1080p Blu-ray (BD) dengan port HDMI • Audio HD 5.1 CH (Realtek ALC662 Audio Codec)
• 1 x Header IR Konektor • 1 x Header port COM • 1 x Kepala LED daya • 1 x Header TPM • 2 x Konektor kipas CPU (1 x 4-pin, 1 x 3-pin) • 2 x Konektor kipas chassis (1 x 4-pin, 1 x 3-pin) • 1 x Konektor kipas daya (3-pin) • 1 x Konektor daya ATX 24 pin • 1 x Konektor daya 12V 8 pin.
H81 Pro BTC - GPU order

- solved AsRock H81 PRO BTC R2.0 Does not start BIOS, no POST
- solved H81 PRO BTC motherboard i5 4470s
- solved SSD and HDD at same time on Asrock H81 Pro BTC?
- solved HyperX 8GB DDR3 1866 RAM running @ 1333 on ASROCK H81 PRO BTC with Intel G3258 Unlocked Processor
- solved Alternative, Budget, Gaming Motherboard to the ASrock H81 PRO BTC?
- solved Corsair Vengeance DDR3 4 GB (1 x 4 GB) PC RAM (CMZ4GX3M1A1600C9) Support ASRock H81 Pro BTC
- solved Can I Overclock The Intel Pentium G3258 On The ASRock H81 Pro BTC ATX LGA1150 Motherboard
- asrock h81 pro btc r2.0 stuck on american megatrends splash screen
- solved ASRock H81 PRO BTC
- solved Asrock h81 pro btc
- Asrock H81 Pro BTC won't recognize keyboard on first boot
- asus h87m-e vs gigabyte b85-hd3 Vs asus h81m-k vs Asrock h81 pro btc
- asrock h81 btc pro motherboard
- Disable onboard video - Asrock H81 Pro BTC
- Asrock h81 pro - not booting with GPU on
- solved GIGABYTE GA-AB350M-DS2 vs BIOSTAR PRO TB350-BTC
- solved as rock h110 pro btc availability
- solved ASRock H110 Pro BTC+ Good For Mining ?
- ASROCK H110 PRO BTC+ mb Chasis Fan Connectors
- solved Problem with BTC GPU
- United Kingdom
By clicking "Sign me up" you are subscribing to the Tom's Hardware newsletter and agreeing to our Terms of Service. Unsubscribe at any time.

Комментариев нет:
Отправить комментарий